Salty dough for crafts: recipe. Training material on design, manual labor on the topic: salt dough recipes for different works
Salt dough for crafts - a recipe for an interesting day in the kitchen. Judge for yourselves, in a couple of hours your child will be able to:
- learn to knead the dough
- find out what colors you need to mix to get a certain shade,
- stick new toys for yourself,
- bake toy food for dolls
- make beads for mom, a little sister’s bracelet and daddy’s keychain,
- to blind a kitten, a hand dragon and something else incomprehensible,
- try the salt dough and abandon this idea,
- ideally, even tidy up a table and wash the dishes.
About the fact that crafts develop imagination, and modeling is useful for fine motor skills,i am generally silent. In my opinion, excellent.
Salt dough for crafts: a simple recipe
The classic salted pastry for crafts consists of only a few ingredients. You will need:
- 1 tbsp. wheat flour
- 0.5 tbsp. salts (better than non-iodized),
- 1 tbsp. l vegetable oil
- 0.5 tbsp. very cold water (250 ml are placed in a Soviet faceted glass to the rim),
- a few drops of food coloring.
1. Mix salt and flour.
2. In a mixture of flour and salt, mix water in small portions. Better use a mixer, the dough will be more uniform.
The recipe for salt dough for crafts, as is usually the case with recipes, is approximate and average. The larger the objects that you are going to sculpt, the more salt is needed.The finer the work, the more flour.
Coloring salt dough for crafts and products from it
If you need quite a lot of dough of the same color, add paint directly to the water while kneading the dough.
If you are going to use many different colors and shades, knead the dough without dyes, divide it into parts, and then mix the paints drop by drop. Do not forget that after baking the paints will become lighter.
If you want to teach your child to get different colors from the main ones, divide the dough into 4 parts. Color three in basic colors - yellow, blue and red, leave the fourth white,to get lighter shades.

And one more thing: if you do not have food coloring on hand, do not worry. You can add a few drops of acrylic paint with the dough. And the easiest way is to paint the finished product with thickly taken watercolor paints or gouache with a small addition of PVA.


After painting the crafts, you will need to dry again.
Salt Dough Crafts
What to do with salt dough? Yes, everything your heart desires! Sculpt, paint, cut with molds, make prints of plants, small objects, fingers ... The salt dough has unlimited potential!
Imprints of plants


Color prints with watercolors, gouache, markers and even pencils!


Imprints of items


Imprints of objects - a great occasion to talk about evolution and even try making your own fossil.

Hand and finger printing


Porcelain and cereal mosaic


Necklaces, Earrings, Bracelets


Colored and white salt dough

On our site you can see a lot of various crafts created on the basis of salt dough.
Here one of the recipes for the manufacture of salt dough:
1 a glass of flour and 1 glass of salt mix.
Then pour 125 ml of water (the volume is approximate, because the amount of water may depend on the type of flour that you took for the test). Stir this mass again with a spoon, and then knead with your hands until a homogeneous consistency. Some use a mixer for this purpose.
By the way, water can be replaced with jelly cooked from potato starch (dissolve 1 tablespoon of starch in 1/2 cup of cold water. Then pour another 1 glass of boiled water into this liquid. When the jelly thickens and becomes clear, remove from heat. got a paste). From such a replacement, the dough only benefits - it becomes more plastic.
Just don't overdo it! If the dough is too soft, knead it with a small amount of flour and salt mixture additionally. Salty dough should be tight.
Can now sculpt! It is better to sculpt on a protvin or a board - this is a good place to dry. Drying itself is carried out at a temperature of + 80 ° C in the oven, for an hour, or on a battery (in winter). The drying time depends on the thickness of the figure.
If you need color salty dough , then it can be painted either at the kneading stage, using food colors or gouache, which is convenient when working with small children; or paint the finished product after complete drying.
And our craftswomen have their own subtleties and secrets for working with salt dough. therefore , go to the blog , whose work you liked and ask! I'm sure the craftswomen will be happy to share with you!
P.S. Memo how to make the necessary color:
cyan \u003d blue + white
pink \u003d white + red
purple \u003d blue + pink
green \u003d blue + yellow
orange \u003d yellow + red
brown \u003d green + red
emerald \u003d green + blue
flesh \u003d light pink + slightly yellow
gold and silver will turn out if you add the appropriate color of gouache or acrylic, in the same way you can get glitter dough (gouache gel)
When working with salt dough many come up with amazingly beautiful names - testoplasty , bioceramics and even, flour ! But don’t call it - the result, at times, exceeds all our expectations! The birth of a masterpiece from salt dough is always an event! Good luck to everyone and creativity!
Have you heard of mucosol or bioceramics? These are synonyms of the growing type of needlework - testoplasty. Beautiful crafts - this is a great option for hanging out with a child, the opportunity to relax from the hustle and bustle in the works. How to make salt dough? There are some simple options for creating ductile material. Choose the appropriate method for you according to the cooking time and available ingredients.
Features of making salt dough do-it-yourself
Do-it-yourself dough is easy to make. This is a safe material, even kids can work with it. Before you learn how to make salt dough at home, learn about its main positive features:
- Thrift. It does not take a lot of money to make salt dough. All the components are already in your home.
- Neatness. It is very easy to wash off such material, and it is only necessary to brush off clothes or a table, wipe with a damp cloth.
- Consistency. Excellent elasticity, density do not allow the dough to stick to your hands, so working with it is easy.
- Keeps shape. Finished crafts dry not only in the oven, but also in the air.
- The naturalness of the design. Natural dyes that are not harmful to health are suitable for working with the material.
- Long-term storage of finished products. Varnishing is a chance to preserve a beautiful craft for a long period of time.
How and how to make salt dough at home? List of tools you will need for that lesson:
- wide bowl (for kneading dough);
- drying oven (alternative is a battery, drying in the sun);
- board, baking sheet or special form;
- a plastic bag (for storing dough so that it does not form a dry crust);
- measuring containers: spoons, glasses or cups;
- shoulder blades and molds;
- brushes and paints (for decoration of finished products);
- items, materials for processing products: buttons, coffee beans, cereals, comb, mesh, screws, nails, tubes.
The best recipes for salt dough for sculpting crafts
If you are interested in how to make a dough for modeling, remember what ingredients you need:
- Only wheat flour, ordinary. Pancake, almond, with additional additives will not work.
- Extra salt is small. Large grains of salt and inclusions will give the product an unkempt appearance.
- Use cold water: it is better if it is completely icy.
- The plasticity of the dough is provided by potato starch.
- The strength of the finished material is higher if prepared using PVA glue diluted in water.
The quality of the material will be better if it is kneaded by hands intensively. The uniformity of the structure does not allow the test to crumble, crumble. If dyes were added, the color should be distributed throughout the piece of dough evenly, without interspersing or staining. The paint is introduced when the material is kneaded into water or the ready-made salty craft is painted. When the dough is ready, it is wrapped in a plastic bag and stored for a couple of hours in the refrigerator. You can use the finished product for a month if stored in the cold.

From coarse salt
The classic way to cook salt dough. It will turn out a lot of such material, enough for large and small crafts, and still remain. If you do not need a lot of dough, reduce the proportions of the components. You will need:
- coarse salt - 300 g;
- wheat flour - 300 g;
- water - 1 faceted glass (200 ml).
How does salt dough mix:
- Pour salt. Most of the water flows, but not all at once, into a large container.
- After the salt is completely dissolved, the sifted flour is poured into the liquid in portions, a lump of dough is kneaded. You need to continue working with the finished lump on the work surface.
- If the material is not too malleable, water is added, with excessive softness - salt with flour in proportions according to the recipe.

How to knead from flour, water and salt
Such a recipe is suitable for creating volumetric figures. The material is very strong, keeps the shape of the finished products, making them durable, despite the large size. To prepare the dough for modeling from flour and salt you need:
- plain flour (without additives) - 200 g;
- salt - 400 g;
- water - 1.5 faceted glasses.
Recipe step by step:
- Dissolve the salt in ice water. Grains should not remain.
- Add the flour previously sifted through a strainer.
- Knead the elastic dough. The intensity of the work is very high, the material is rough, kneading is necessary for a long time.
- Cover the bowl with the dough with a towel and refrigerate for several hours. After a while, take out and sculpt the figures.

How to make PVA glue
There is an option with the introduction of PVA glue. To prepare the dough, use:
- flour - 2 glasses;
- fine Extra salt - 1 cup;
- warm water - 125 ml;
- pVA glue - 50 ml.
Instruction:
- Mix flour and salt, pour warm water.
- Use a blender or mixer to mix the ingredients.
- Add glue to the finished composition and knead well with your hands.
- Roll into a smooth ball, put in a bag and put in the refrigerator.

How to make starch
To prepare salt dough, you need such components:
- potato starch - 1 tbsp. l .;
- water - 1 cup;
- flour - 1 cup;
- salt - 1 cup.
Step-by-step process:
- Prepare starch jelly: a tablespoon of starch dissolves in half a glass of cold liquid. Avoid lumping.
- Bring half a glass of water to a boil in a saucepan, pour a thin stream of boiling water starch jelly.
- Stir constantly until a thick consistency.
- In a deep bowl, mix salt and plain flour.
- Pour jelly in the dry mixture in portions, knead, avoiding excessive softness of the dough.

How to Dry Salt Dough at Home
Have you prepared the dough and fashioned the figures? It's time to dry them well! There are a couple of ways:
- Open air. Drying on the street or in a room where fresh air flows regularly is the most economical option. It will be better to dry under the sun. The duration of the procedure depends on the thickness of the product. The color of the craft will not change after it hardens.
- Oven. Immediately, the crafts are dried in the fresh air for a couple of days, then the oven is heated to 50 degrees. Lay out the figures on a baking sheet covered with paper and dry, increasing the temperature (maximum 140 degrees). Drying lasts about 3 hours at 50 degrees, and half an hour at 140. Do not try to set the temperature to maximum immediately, otherwise the products will crack.
If cracks appeared on the figures, then you can sketch them with a mixture of PVA glue and ordinary flour with a thin brush, filling the space. It’s easy to find out how dried a product is by tapping on it. A muffled sound comes after a knock from a crude figurine, but a loud sound indicates a willingness to work. If the craft is damp, extend drying in the oven.
- Flowers It is very simple to fashion a rose, a sunflower, a forget-me-not. Choose the necessary colors and use the toothpick, long needle, knife or shape to cut out the necessary details to create the desired flower.
- Toys Dolls are in great demand, so if you want to surprise loved ones, give them as a souvenir little men in beautifully decorated shirts, with rosy cheeks and cute eyes.
- Paintings. Using a variety of tools, it will be possible to depict a whole story or just a landscape on a rolled formation. It all depends on your imagination: a cozy house or an interesting ornament, a bouquet of flowers or a silhouette of a person and many other variations.
- Figurines of animals. Blind with the kids a nice and kind hedgehog or a funny pig, learn where they live and what sounds they say. The guys will be delighted!
- I'm going. Ruddy apples, generous still lifes, Christmas cookies - simple and bright.
- Other products. Do you want to make clever earrings, jewelry for a vase, an interesting pendant, but don’t know how? Try to make all kinds of crafts using salty material, give them color mood with gouache.

Julia Barsukova
Relevance: a master class is held to strengthen the emotionally-positive interpersonal relationships of children and parents in the process of making crafts.
Purpose: to teach to use the capabilities of salt dough - testoplasty in the joint work of parents and children; strengthening the relationship of the preschool with the family
Acquaintance with the unconventional modeling technique - testoplasty;
Using the test to develop the creative abilities of children.
To acquaint with recipes for making dough, about the methods of dyeing it, the use of additional tools and devices;
Arouse interest in this type of activity.
Develop fine motor skills and flexibility of fingers;
Skill to work in team;
To interest and involve parents in joint leisure activities with children;
Material: salted dough, painted in various colors, modeling boards, cardboards, napkins, modeling molds, beads, garlic press, modeling stacks; PVA brushes and glue, glasses with water
Participants in the master class: children 3 years of age, parents of pupils, group educators.
Preliminary work: personal conversations with parents, information in travel folders, counseling for parents, memos, an open lesson for parents on modeling, a pedagogical library, preparation of colorful invitations for parents indicating the topic of the master class; selection of literature on the manufacture of crafts; drawing up recommendations;
Planned results: the parents of the pupils have an idea of \u200b\u200bthe technological capabilities of the salt dough and its use in the process of artistic creation (modeling, they learn the basic developmental functions of modeling, there is an interest in modeling of salt dough, as a form of artistic creation.
Venue: group room
Type of activity: creative, developing
Form of conduct: master class
Duration: 40-50 minutes
Problem: instill in parents and children an interest in artistic creation and an emotionally positive attitude towards it.
Workshop progress:
1. Introduction.
Hello dear parents! We are very glad to see you at our place! Thank you for taking the time to come to us. Our meeting today is unusual. First, your children will help us; secondly, this is not a meeting, not a consultation, but a master class.
What is a master class? At the master classes, you get information, acquire useful skills. For some, this is an opportunity to try a new, interesting activity. This is an opportunity to create, do the real thing with your own hands! This is an opportunity for joint work of parents and children. You can make friends even more, understand each other, get closer. You are given a unique opportunity to immerse yourself in an atmosphere of joint inspiration, beauty and joy. You will be able to develop abilities in many directions.
Today at our workshop we will introduce you to different ways of making a plastic, soft material - salt dough and the basic techniques of sculpting from it.
The goal of any workshop is to learn new things.
And we are learning new things for different purposes. Including, in order to be able to solve any problems, issues.
And so we will start by designating the problem.
Practice shows that, having come to school at the age of 6-7 years, 70-80% of first-graders have an unsatisfactory level of development of fine motor skills of hands.
There are many reasons for the lack of motor development. Along with weakened health and a reduced indicator of the overall physical development of children, psychologists explain the lag in motor development by a number of social factors. Children often have very little experience in performing graphic tasks, drawing, imperfect coordination of hand movements, the level of hand-eye coordination is low.
Questions to parents:
Let's think together and figure it out. Here's how you, how parents could solve this problem?
(drawing, applique, manual labor, finger gymnastics, modeling, manuals for fine motor skills - lacing, embroidery, beadwork, burning, writing)
The famous teacher V. A. Sukhomlinsky belongs to the statement: “The origins of the creative abilities and talents of children are at their fingertips. Figuratively speaking, the thinnest streams that feed the source of creative thought come from the fingers. The more confidence and ingenuity in the movement of the child’s hand, the finer the interaction with the tool, the more complicated the movements necessary for this interaction, the deeper the interaction of the hand with nature, with social work, enters the spiritual life of the child. In other words: the more skill in the child’s hand, the smarter the child is ”
And as one of the tools, and very powerful one that can help solve this problem, it is modeling from salt dough. In addition to this main task in the development of the child, modeling, of course, is also solved by a number of others. It contributes to the development of visual perception, memory, imaginative thinking, inculcation of manual skills. Like other types of fine art, modeling forms aesthetic tastes, develops a sense of beauty.
She is dedicated to our master class. First, see what beauty can be created from this seemingly ordinary material.
Modeling is one of the most fascinating and interesting types of children's art. It makes it possible for even the smallest child to feel like a master and creator. And you, parents, do not even suspect what amazing, developing and useful activities your child is involved in. Modeling is the most tangible form of art. The child not only sees what he has created, but also touches, picks it up and changes it as necessary. The main tool in modeling is the hand (or rather, both hands, therefore, the level of skill depends on owning your own hands, and not on a brush, pencil or scissors) From the point of view of modeling, you can evaluate the technique as the most accessible for self-mastering. The sooner the child is given the opportunity to sculpt, the better his or her own skills are developed. And when the child begins to understand that from one lump he can countless images - modeling becomes a favorite pastime for many years. An important role in this fascinating process is played by an adult who acts not as a passive observer, but as a direct participant who can give advice, timely praise, and explain the incomprehensible. Do not forget that the leading form of a child’s creative activity is a game that can change the attitude of children to what seems simple and ordinary at first glance.
Modeling is a very important activity for a child, which develops creativity, fine motor skills of hands, spatial thinking, the concept of color, shape of objects. Toddlers learn concentration and perseverance. All these skills will be useful to the crumbs in preparation for school.
Salt dough (the best option for modeling) is one of the most affordable and cheap materials. Salty dough has several advantages over plasticine. It is more plastic, it is easy to shape, it does not get dirty. This material is very elastic, pleasant to the touch, warm, delicate, completely harmless from the point of view of ecology and allergens. Salt dough products are more durable, easily cough with paints and felt-tip pens. Both flat and voluminous figures can be made from salt dough, they are easily glued to paper, which allows you to create beautiful compositions and wall panels.
The art of sculpting from salt dough has become extremely popular these days, especially among children. Salty dough is easy to make by yourself.
If you manage to knead the dough correctly, its possibilities become almost unlimited.
Advantages of salt dough over plasticine:
You can cook at any time without spending extra money;
Easy to clean and leaves no residue;
It is safe when it enters the mouth, if you do not add glue, if it is properly mixed, it sticks wonderfully, does not stick to your hands;
You can dry it in the oven, or you can just air it;
Any paint sticks, and the possibilities for painting are practically unlimited;
It’s also good to varnish over the paint - it will remain for centuries.
You can play with a finished “product” - without fear that it will lose shape.
The use of salt dough in the manufacture of products is called - testoplasty.
Modeling with salt dough can be an excellent family activity, because nothing unites as much as joint creative work.
I hope that modeling from salt dough will be an exciting experience for you, and you can be proud of your creation. What could be better, a gift made by yourself, because it is warm and the love of your hands.
Now let's talk in more detail about the methods of making salt dough.
There are many recipes. Some of them are suitable for sculpting small products, others large, others for modeling with children (this recipe without glue), etc. Each master chooses his own. Anyone who may be fond of modeling on the Internet, in books can familiarize themselves with them all and experimenting with him, choose your own.
But today I will introduce you to the classic recipe:
The simplest of them: 2 cups flour, 1 cup salt (extra, 1 cup cold water.
There are various options for additives in the dough, such as wallpaper glue, vegetable oil, PVA glue, starch, glycerin. After kneading, it is advisable to put the dough in the refrigerator for a couple of hours.
There are two types of dough. You can sculpt from colored dough and, if necessary, paint over the finished product. To make colored dough, you need to add the necessary dye to the ready-made salt dough and knead it. If the dough turns liquidy, you can add a little flour to it.

Well, now I suggest you start the practical part of our meeting. The dough is ready, and we can begin to work with it. For modeling, we need various additional materials to give expressiveness to the product. It can be various buttons, beads, cookie cutters, strainer, garlic gadget, etc.
Salt Dough Warm Up
Shifting and squeezing the dough in the palms;
Skating a little bun in the palms;
Skating a kolobok on the table;
Pressure on the bun - receiving cakes;
"Spiders" ran along the tortilla;
Came “mice” began to dig minks;
The “geese” raids began pinching the dough;
Came the "clumsy bear" began to stomp on the test;
The "elephant" came and with its knives on the test top-top-top-top;
Rolling tortillas into sausage;
Wrap the sausage in the "snail";
The "snail" hid in a house - a bun.

Illustrations from modeling books are offered to parents.

After the product is ready, it can be dried or baked. Of course, we only dry, naturally, on a battery or on a windowsill in the sun. It takes more time. This method is good for color dough products. Since dyes can change their color with strong heat. By the way, keep in mind that after drying in any case, the colors will become lighter than the dough was originally.
At home, you can bake in the oven. But not in the microwave.
Parents carry out, together with the children, simple dough products.
(Sounds calm melodic music).


Summing up:
So you have learned what is modeling from salt dough, and how to do it yourself. Now you can keep your baby busy. Dear parents, it was cozy, comfortable, you felt a sense of joy and pride in yourself.
Did the modeling of the product serve as a means of replenishing the stock of impressions, positive emotions?
What did today's meeting give you, what made you think about it, express your emotional response, your questions and wishes.
Do you need such master classes?
At the end of our meeting, I would like to wish all parents success in raising their child. Be sure to find a free minute to chat with your child.! Try to pay attention to your child as much as possible! It is very interesting to create with children - sculpt, draw! Creativity develops thinking, imagination, perseverance, prepares the child’s hand for writing to prepare for school. In memory of our meeting we want to hand out memos.
Thank you all for your attention!
The works are laid out on the tables (for drying). After the work is dry, an exhibition of joint creativity of children and parents will be organized).
Our distant ancestors decorated the surface of loaves before baking with curly images of spikelets, berries, leaves to attract good luck and receive blessings from their deities. Today we are doing this without any religious background, just for beauty.
In addition to decorating edible products, the use of a special composition test allows you to create very effective and beautiful decorative figures, pictures and flowers. In this case, the dough perfectly replaces the more difficult and expensive materials, so it is ideal for young children. But this is such a fascinating activity that adult respectable people are happy to do it.
Everyone can use salted dough for self-expression and relaxation, it is only important to know how to make a durable and plastic material, as well as competently dry and color the finished product.
The subtleties of making dough for crafts
The modeling of products itself is no different from working with plasticine or other similar materials. The advantage of salt dough is that it is more plastic, smudges hands and surrounding objects less, provides more opportunities for complex work, and is also well preserved after proper drying, becoming solid and durable.
- The difficulty lies in how to cook the right dough, which will not stick to your hands and tools, will not crack and crumble. To do this, use a few simple tips:
- Do not take pancake flour for work - it is more sticky and the dough will turn out to be of poor consistency.
- Use only Extra fine salt. Coarse salt will create a coarse crumbling dough due to grains when mixed directly in dry form, and the dissolution of such salt in water will be too long in time. In addition, rock salt may contain impurities that stain the dough for modeling, and the Extra salt is refined and very small.
Breeding flour with ice water, you can get an excellent, plastic and very uniform dough.
Using these simple tips, you can start working with your children, creating a variety of products of amazing beauty. Salt dough is a simple, inexpensive and very affordable material for creativity, and children are just crazy about such useful entertainment.

Used tools and materials
When we sculpt from salt dough, we need special tools for work. All of them are available in our homes, in the kitchens or among office supplies, materials for sewing and needlework.
Basic tools and materials for work:
- Rolling pin for rolling dough. If it is not there or if it is too large for children's hands, you can find a replacement in the form of a regular glass bottle.
- Knife for cutting dough. Children can be given a plastic knife from a set of colored plasticine.
- Board for rolling dough and manufacturing products.
- Paints for coloring (watercolor, acrylic, gouache - any water-soluble dyes).
- Varnishes for finishing (water-based, best in aerosols). Additionally, you can use spray varnishes “with special effects” - “snow”, with sparkles, gold, silver or other metallized varnish.
- A set of brushes for coloring.
- Capacity with water.
- Forms for cookies.
- A variety of objects to give the texture to the finished product - toothbrushes, combs, knitting needles, buttons, lace and much more.
For young children, it is worthwhile to provide special clothes, as they can be very dirty. Stock up before work with a pack of dry and wet wipes - they are convenient not only to clean your hands, but also to wet your brushes from excess paint. This way you can avoid the spread of dyes on the finished thing.

Three best recipes
To knead the salt dough, you can use your own hands or entrust this process with modern technology - a mixer or a dough mixer. With their help, you can get a particularly smooth and elastic dough.
In order for the finished product not to crumble, you need to pre-fill the salt with the required volume of water, and then mix it thoroughly with flour. It is important to knead the product well until completely homogeneous, otherwise when drying the finished thing may crack or break into separate pieces.
Basic recipe:
- A glass of flour (wheat or rye).
- A glass of finely ground salt of the Extra type.
- Half a glass of ice water.
Mix the ingredients and knead the dough until smooth. This recipe is great for products with delicate details: to create flowers, leaves, ornamental plants, and so on.
Soft soft dough recipe:
- Flour - one glass.
- Small salt - one glass.
- The water is very cold - half a cup.
- Vegetable oil - 2 tablespoons.
Instead of oil, you can take glycerin, a sufficiently oily cream or cooking oil. The introduction of fats or oils in the recipe for salt dough allows you to make its consistency more plastic and elastic, and also to avoid cracking the product after drying. This option is especially suitable for "thick-walled" products that can crack if the dough is completely dry.
To work with fine details or many small elements, you will need to use an improved salt dough recipe:
- 1.5 cups flour.
- 1 cup of salt.
- 0.5 cups of water.
- 2 - 3 tablespoons of glue PVA, glue for wallpaper type "Methylan" or any other water-soluble glue.
Such a dough keeps its shape perfectly, small thin elements can be made of it, and with definitely “stuffed” hands you can do things that are outwardly indistinguishable from good porcelain.
Any recipe for salt dough can be regarded as the basis, as you can modify it "for yourself" endlessly, experimenting with various ingredients to obtain the correct composition.

How to Dry Salty Dough Ideally
The main difficulty for beginners is the technology of drying the finished product. You can carry out drying in different ways:
- “Bake” in a heated oven like an ordinary cookie, at a temperature ranging from 50 to 80 degrees (depending on the size and thickness of the product). The finished thing is placed on parchment baking paper and placed in a preheated oven for about an hour. The processing time depends on the dimensions of the product. Until the oven cools down completely, the thing is not removed from it.
- Drying in a cold oven, that is, the product is placed in a cold oven, turn on heating and bring to the desired temperature. Everything else is exactly the same as in the previous paragraph.
- Dough products with salt are best simply dried in the air, although this takes a lot of time. A well-dried craft becomes strong, solid and not subject to external influences. Conventional drying is great for small items or products made from delicate parts.
Do not use appliances or a central heating battery for drying. They dry the dough unevenly, which can cause cracking or spoilage of the thing if it has dried on only one side, has a dry surface and “raw entrails”.
Dyes and Finishes Used
In the preparation of salt dough, the dye can be introduced directly into the product itself and obtain a material very similar to plasticine. But the difficulty in this case will be working with the material - you will have to combine the individual colored parts, but for kids it is too difficult. Everyone loves to work with paints, so for children it is preferable to use the painting of a ready-made plain thing.
In work it is easiest to apply water-soluble paints. Acrylic dyes are very good - they give a dense and uniform color, have a large color palette and are easy to use, dry quickly. But you can use ordinary watercolor. It gives a wonderful translucent layer, and paints can be layered with glazes to obtain special effects - volume, transition of tones, overflows and the acquisition of various textures. If there is a need to obtain an opaque stain with watercolors, you can use a white primer. White acrylic paint, gouache or tempera with the addition of PVA glue to hold it on the surface of the product can play its role.
For decoration, you can use bulk paints, metallized dyes, beads of different sizes and shapes, buttons, rhinestones and other little things that do not deteriorate from high temperature, if you plan to dry in the oven.
Is it worth it to varnish crafts
In principle, the finished craftwork from salt dough holds paint very well, but if you plan to use this thing, for example, for games, or is it a chess piece, decorative vase, casket, in a word, a thing that will suffer from constant touch, then it should be covered varnish. It will not only protect the finished product from external influences, but also give a beautiful glossy shine, which is necessary for many types of crafts.
The easiest way is to use varnish in aerosols, when processing outdoors or in a well-ventilated area. If necessary, varnish can be repeated several times, drying each previous layer well. To give a special decorative effect, you can use special sprays, for example, with the effect of snow or with sparkles.

Types of salt dough products
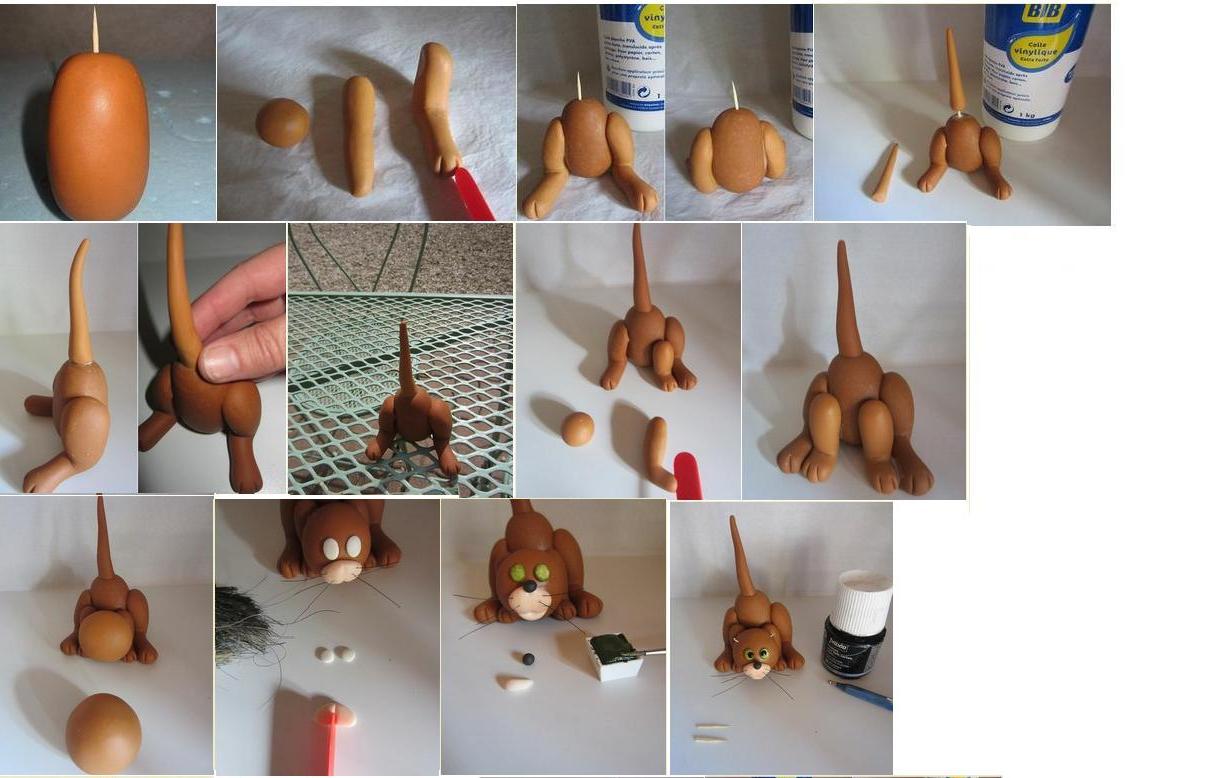
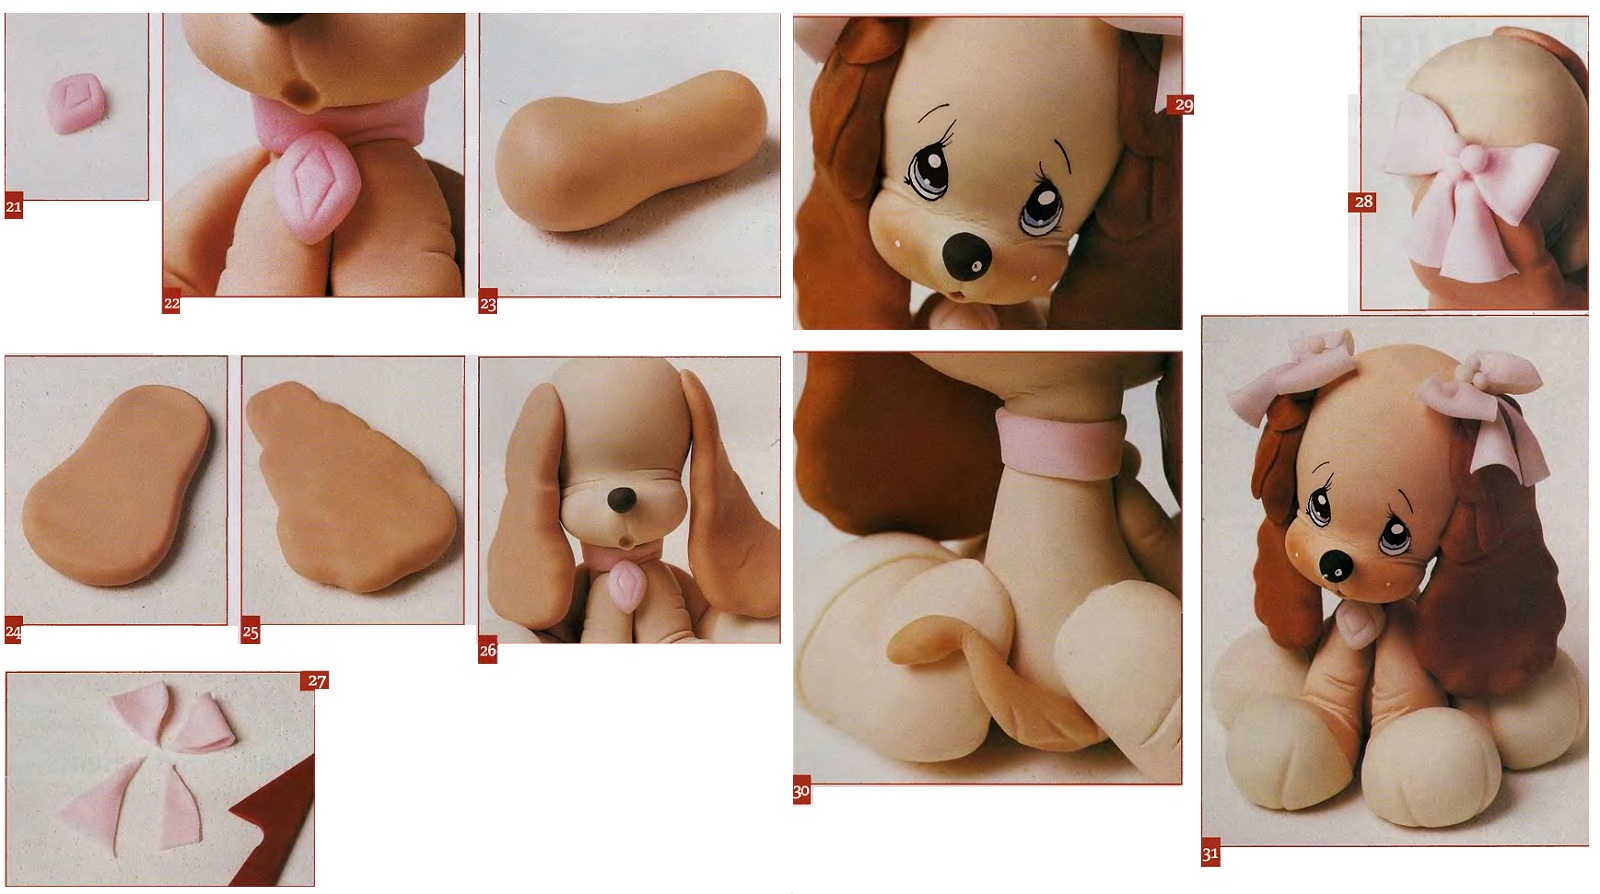
For kids or beginners, you need to use simpler forms and objects that they understand. You can start sculpting with traditional kitties or dogs, fruits and berries, cars and other simple figures without numerous and complex details. Gradually, with an increase in the level of skill and young sculptors themselves, the work can be complicated by moving on to creating figures, paintings and compositions.
The peak of craftsmanship can be considered the creation of flowers from bioceramics, as salt dough is also called. Of course, a baby can also make a simple daisy, but a full-fledged bouquet of roses or a flowering jasmine branch can only be made by an "advanced" user.
To learn how to work with salt dough, you need to follow the instructions step by step and not rush to take on complex products.
A variety of panels and paintings from the test with salt
Creating pictures from the test is not as difficult as it seems. At the first stages of creativity, you should use a hint in the form of a photograph of a future “work of art”. For example, you want to create a beautiful autumn landscape. Find a beautiful photo with a few small details and use it for inspiration.
- A piece of thin plywood is suitable as the basis for the picture, but in its absence you can also use thick cardboard. A rolled dough layer is superimposed on the surface of the base. It can be glued with any suitable adhesive.
- All the details of the future painting are cut out or fashioned from salt dough and superimposed on each other as the distance from the background of the painting. That is, the objects farthest from the viewer will be laid out first. This method will allow you to get a very neat and expressive three-dimensional image.
- The finished picture is thoroughly dried, and then painted with suitable paints. After the paints have dried, the painting is varnished and placed in a frame. The product is ready, it can be hung on the wall in the room or presented to someone who can appreciate the creative approach and talent of the performer.
If you use foil as the basis for the product, the dried and painted part can be easily removed from it and then transferred to any other material. It can be a dense fabric stretched over a frame, glass, plastic, even metal. With such flat and at the same time voluminous products, you can decorate caskets, decorate children's furniture, boxes with various things or use them to identify, for example, lockers for things in the locker room of the kindergarten.


Figures and dolls made of bioceramics
For kids, there is nothing more interesting than sculpting "little men." They really like “cartoon” characters, for example, fixies, Masha from the cartoon about the bear, heroes of comics and fairy tales. From salt dough you can make not only figures and dolls, but also various houses, benches, trees, fountains - in a word, everything that a fantasy can suggest.
If you plan to make large enough figures, you should take care of the inner frame and the stands for stable standing. Matches with a remote sulfur head, plastic and wooden toothpicks are suitable as a support for small plastic; larger products may require cocktail skewers or sticks for Asian cuisine. Keep wooden sticks from ice cream - they can become the basis of many different products.
For stability, the figures must be placed on the base of salt dough in the form of a circle or oval - this will ensure an even plane.
If the figure is depicted in motion, it may be necessary to create a wire frame - it will help in modeling and will not allow the finished product to crumble.
In addition to three-dimensional, three-dimensional figures of people and animals, various fruits or vegetables can be created from salt dough. They are beautiful both on their own and as part of various compositions. For example, elegant fruits can be effectively laid out on a beautiful dish and decorate them with a kitchen or dining room.
Flat figures can be cut using cookie cutters. Hearts can become original valentines, Christmas trees - decorate the New Year's table, flowers - can be used to designate places for seating guests at the holiday. Only imagination can limit the scope of application of various dough products.


Spectacular flowers and plants made of flour
The pinnacle of craftsmanship is delicate and graceful flowers made from flour flour, as salt dough is also called. This work requires tremendous perseverance, talent and accuracy, so it is more suitable for adults and adolescents. Kids can successfully sculpt stylized flowers of a simple form.
How to create a complex volumetric flower, such as a rose?
- You need to take a piece of dough and roll a drop-shaped core from it. The base of the drop is the bottom of the flower.
- Then you need to thinly roll out the dough and cut out of it rose petals of different sizes and shapes.
- Gently laying one petal after another on a teardrop-shaped base, you can get a rose blank. To make it look like a real flower, each petal must be gently bent, giving it a natural shape and shape.
- At the end of the work, you need to create a cup of flower with turned sepals, cut some beautiful leaves with carved edges and connect all the parts together using wire and pieces of salt dough.
- Finished crafts are left to dry completely, and then painted in selected colors.

By this principle, you can create any flowers, whole bouquets, complex compositions and even imitations of plants in pots. The choice of plot depends on the imagination and creativity of the creator. A good example is a cute cactus, which should be kept near a computer. A living plant, even such a stable one as a cactus, may not survive in an office environment, but a lovely spiny creature made from salt dough will survive any cataclysms perfectly.

How to deal with possible problems
Errors may appear in any work, or things may go completely different from what they expected. Even if you do everything in stages, taking into account all the nuances, product defects may appear. Basically, it is cracking and chipping of individual parts of the product.
Cracks in crafts appear due to improper composition of the dough, errors in drying or the beginning of coloring of the finished thing with incomplete drying of the base. If the cracks are small or the surface of the product is covered with a thin mesh of small cracks, they can be completely repaired.
To do this, you need to finally dry the thing, and then thoroughly sanded the defects with sandpaper of varying degrees of abrasiveness. You can bring the surface to an ideal “velvet” sandpaper. Then the surviving cracks can be puttied with a slightly diluted water dough with salt. You may need to repeat the procedure several times if the cracks are very deep.
The lesson will teach you that much more attention needs to be paid to the basis of a future thing than even to decoration - not only the appearance of the product itself, but also the fact of its existence depends on its quality.
It happens that during the drying process, part of the product simply disappears, especially often this happens with thin parts or fragile small fragments. Sometimes work items break off during painting with too much exposure. In order to repair a toy with an even break line, you can use ordinary PVA glue. Apply glue layers carefully so that ugly streaks do not form. Finished and dried things need to be processed with emery and repainted and varnished.
If the product breaks from fresh dough, moisten the fault points well enough with water, press individual parts to each other and wait for setting. Decorate the dried work as planned.
A damaged figure with the loss of individual elements can be tried to be restored by replacing the missing parts with pieces of fresh dough. Dry and fresh elements may not bond securely, so after drying new parts, they may need to be glued together for strength.
Give yourself and your children the pleasure of creativity, because working with the dough is easy and enjoyable, and the cost of materials is scanty. The result of the work can exceed any expectations!