DIY coffee beans. DIY Christmas decor: a tree of coffee beans
New Year traditionally smells of tangerines and a Christmas tree. However, you can add variety and add some coffee, cinnamon and vanilla. Coffee bean trees in the interior delight with their appearance, as well as the aroma of warmth and comfort.

Making a Christmas tree from coffee beans is very close to the technique of creating topiary, but it has its own nuances.

To create a Christmas decor with our own hands, we need:
- foam cone
- small glass jar
- wire
- alabaster + water
- glue gun for needlework + 3-5 sticks of glue
- jute twine
- coffee beans
- dried citrus fruits
- floral moss
- sackcloth
- decorative elements

How to make a Christmas tree from coffee beans
We connect the glue gun for needlework, since we will work primarily with it, and while it is heating up, we are engaged in the base for the Christmas tree.

We take a foam cone and wire. We make a hole in the cone, carefully insert the wire into it.

We take jute twine and wrap them with the base for the Christmas tree.

We fix the twine with a glue gun. To look neat, do it pointwise.

As a result, we get just such a Christmas tree.

We take a thin wire. Fold it in half and twist it together.

We pass the twine into the “eye” that we have, and tie a knot, then wrap the wire with jute along the entire length.


Insert the wire into the base of the Christmas tree. We got a playful tail, which we fix with a glue gun.

The Christmas tree leg should also be wrapped with twine.

Getting started with coffee beans.

Based on our Christmas tree, we glue coffee beans individually.

We start with a sharp edge at the base of the tree.

Then close the bottom with grains ...

And the whole Christmas tree.
We try to place the grains as close as possible.
We make a Christmas tree pot.

Take a glass jar and burlap.

We make a jar in a bag (according to the scheme in the figure).
So that the bag does not turn around, we fix it with glue from the inside.

We "plant" our Christmas tree using any method available to you (we have alabaster) and make a "green meadow" of moss.

We decorate our Christmas tree with strings, ropes, an orange and a bronze pendant.

Our Christmas tree is ready.

If you do not have moss - it does not matter, you can replace it with the same coffee beans.

All with the upcoming holidays!
Crafts made of coffee look very stylish and perfectly complement any interior, saturating the room with a pleasant aroma. Basically, they are created with your own hands. Such products have won special sympathy among children who like to decorate various objects with coffee beans.
The most interesting and unusual coffee crafts for any living room are a soaring cup in the air, from which flows a waterfall of coffee beans, a coffee tree, as well as a coffee heart. First, consider the first product.
To make a soaring cup you will need:
- cup and saucer;
- thick wire;
- hot glue gun;
- masking tape;
- brush;
- coffee beans.

Cup with coffee beans
Stages of the work:
1. First you need to bend a thick wire that looks similar to the English letter Z.
2. Then you need to glue the bottom edge of the resulting part to the middle of the saucer using a hot gun, and the top to the inside of the cup. In this case, it is necessary to first indicate the location of the cup in the air.
3. After the glue has dried, when the cup is firmly held in the air, take masking tape and glue the wire in several layers so that the part looks like a stream of water.
4. Take a brush and paint the stream with brown acrylic paint.
5. Wait until the paint dries, and proceed to decorate the jet with coffee beans. To do this, grains need to be glued tightly to each other so that the gaps of the base are not visible. In the same way we decorate the inside of the cup and saucer.
You can complement the decor of the resulting composition with knitted flowers, beads, satin ribbons and other elements, depending on your imagination. Or, resorting to examples of works by other craftswomen from the Internet or books on needlework, from the photo of the presented crafts from coffee beans, you can recreate any option you like.

You can complement the decor of the resulting composition with knitted flowers, beads, satin ribbons and other elements
Fragrant coffee tree
The coffee tree is also one of the popular coffee crafts. It perfectly complements the interior of any living space, and is also an original gift for any celebration. You can make a craft from coffee beans with your own hands, and you will learn how to do it from the description below.
So you will need:
- small round plastic ball;
- alabaster;
- disposable cup;
- wooden stick;
- brown acrylic paint;
- brush;
- coffee beans;
- hot gun;
- thin satin ribbon;
- colored felt and sisal;
- decor elements.

A coffee tree
The order of the work:
1. Make a small hole in the ball, insert a stick into it, which will be the trunk of the tree, and glue everything with silicone glue from a hot gun.
2. After the glue has dried, take a paper towel and wrapping it with a ball, fix it at the base of the barrel with a thread, making several turns. Remove the protruding edges of the napkin with scissors.
3. Using a brush, cover the paper wrapper with brown paint on an acrylic base and wait until it dries.
4. Dilute the alabaster with water and pour it into a disposable glass.
5. Insert the barrel into the glass with alabaster to the end or to half the capacity, depending on the length of the stick. Allow alabaster to solidify.
6. Glue the base of the ball tightly with coffee beans in a paper wrapper coated with brown paint. At the same time, it is important that the grains are glued with the convex part up - so they create volume to the product. It’s better to arrange them randomly for a natural look.
7. We decorate the glass and the craft itself from coffee beans, pasting the container in a circle with a small segment of colored felt and decorating it with bows made of thin satin ribbon, as well as other decorative elements.
8. Hide the frozen alabaster with colored sisal and several grains of coffee, gluing them to it.
9. Decorate the tree with a bow or flower.
You can see clearly what such craft items look like from a photo from the Internet, where you can also see tree decoration options.

A wonderful and romantic gift are DIY coffee crafts in the shape of a tree-heart
Tree of love made from coffee beans
A wonderful and romantic gift are DIY coffee crafts in the shape of a tree-heart. Anyone can make it, since its manufacture is not difficult. You only need to have the following tools at hand:
- styrofoam;
- wooden stick;
- alabaster;
- stationery knife;
- a glass of yogurt;
- twine;
- brown acrylic paint;
- coffee beans;
- glue gun;
- white paper napkins;
- pVA glue;
- black marker;
- decorative elements and fabric by color.

Tree of love with decorations
Stages of making a tree of love from coffee beans:
1. Make a base for the tree from polystyrene foam, on which you need to draw a heart of such a size that it coincides with the size of a square 10 × 12 cm.
2. Clerical knife to cut a drawn heart.
3. To give the heart a rounded shape, you need to cut off all the corners and round them.
4. Grease a wooden stick with PVA glue and wrap the entire surface with twine, while the turns should be even.
5. After drying the stick, insert it into a pre-prepared hole on the side of the heart - it will be a tree trunk. Glue it with silicone glue from a hot gun.
6. Paste the heart with a paper towel.
7. After the glue has dried with a brush, apply brown paint on an acrylic base to a paper wrapper.
8. Put coffee beans on glue and put on the heart, the first layer can be laid out in an arbitrary order, while trying to fill all the gaps of the base.
9. After drying, stick the second layer of beans also randomly, so that the coffee craft would be more natural. All grains should be glued convex part down to obtain additional volume.
10. Create a base for the tree using a container of yogurt, in which you need to pour a solution of alabaster with water at the very top.
11. Insert a tree trunk into the central part of the container and let the alabaster harden.
12. Cut a 18 × 20 cm square from the fabric and round 4 of its corners.
13. Put the cut-out part on the table upside down, and raising its edges, fix the glass with the solidified tree with a twine, which must be pulled and tied up with a bow.
At the last stage, you should decorate the fabric with coffee beans, putting them on the glue from a hot gun. After completing the last stage, the craft can be considered finished.
Interesting coffee bean craft ideas
In fact, there are a lot of interesting ideas for coffee crafts. And if you show imagination, you can make an original thing from coffee beans for any celebration for both man and woman. These gifts include: a coffee globe, a car, a Christmas tree decorated with dried slices of orange, a horseshoe that will protect your home, filling it with a pleasant aroma of coffee, and many other, no less interesting things.
You can also create pictures from coffee beans that will make the room cozy and stylish, or a clock for the kitchen, in which there will always be a coffee aroma and awaken you, filling you with positive.
Advice! Making DIY coffee is easy, just turn on your imagination or find a photo of ideas, be patient, as well as all the necessary materials, and start creating.
The process of creating unusual things is very exciting and brings a lot of pleasure from the work itself. If you have children, include them in the work, create your masterpieces together, especially since children's imagination knows no bounds. Let your DIY crafts made from coffee beans make you happy for many years, photos of which, by the way, can be placed in a coffee photo frame and hung on the wall. Such a product will bring some zest to your home.

Coffee Bean Flower
Where can I use coffee cans?
Cans of coffee can also be used as material for crafts that can be useful in household use. Therefore, do not rush to throw them away, they can still come in handy.
As one of these crafts can be an organizer, which is designed to store various things. Its function is to maintain order. It can be used in the kitchen, on shelves, on a desk and in other places where it is convenient for you to keep it. Such an organizer can accommodate stationery, cutlery, scarves, scarves, headphones, chargers and other items. They will be especially useful for lovers of needlework, who can put various small objects, bobbins, needles, threads, etc. Such an assistant quickly organizes the order on the needlewoman’s table.

The use of coffee cans
However, in its original form, such an organizer looks unremarkable. Therefore, it is worth decorating it so that it not only pleases your eye, but also becomes an element of the decor of your interior. To do this, you can take denim and tighten a jar on it, putting it on glue. Lace or flowers made from the same fabric can serve as decoration.
An interesting article from a coffee can is decorated with twine, which is glued to the container, starting from the middle of the bottom, in a spiral. It is necessary to make turns carefully so that there are no gaps in the base, gradually reaching the very top. It is better to use universal glue, but you can get by with a hot glue gun.
Advice! Any, at your discretion, can act as a decorative material.
For example, you can still make decoupage - a very popular technique for decorating various things. In this section, only options for a possible finish were presented, to use them, or not, you decide for yourself.
Crafts from coffee cans for children
As mentioned above, crafts from coffee cans can be different. Another example is a product in the form of a minion, which your child will really like, especially if he will actively participate in its creation. To do this, you will need:
- coffee cans;
- yellow paint;
- brush;
- color cardboard;
- toy eyes;
- universal glue or silicone from a hot gun.

Crafts from coffee cans for children
The order of the work:
1. Brush several layers of yellow paint on the cans.
2. After the paint has dried, cut off a thin strip of black cardboard and stick it a little higher than the middle of the container, to where the character’s future eyes will be located.
3. Glue toy eyes on the black strip. If it is not possible to purchase them, then you can do with plasticine in black and white or stick buttons.
4. To draw a smile with a black marker, if you wish, you can draw more teeth. The product is ready.
In this way, you can make a craft of any character from a cartoon or from a fairy tale. Your child will be able not only to play with this craft, but also to put there his pencils or pens, using it as an organizer.
Original night light from coffee cans
Unusual crafts from coffee cans are night lights. They are made very simply, however, depending on the chosen decor, they may require some skills and time. The following decor methods are available:
- winding jars with threads or satin ribbon;
- knitted cover on a jar;
- pasting cans with lace;
- decoupage;
- painting the inside of the can with light-accumulating paints;
- painting cans with paints of various shades.

Advice! For creative people, a night lamp decorated with fluorescent paint that glows in the dark is suitable.
When using several colors, the product will look more colorful and interesting. Making such a night light will take you no more than 5 minutes. To do this, you will need cans, paints and a brush. All that is required of you is to paint on the inside of the container. And you can draw anything you want. During the day, the paint will accumulate light, and at night it will delight you with its radiance.
For children, you can make a nightlight using a can, New Year's garland, tulle and glue. To do this, cut circles from tulle. Then fold them into the shape of a rose and glue the tulle in the middle on a clean and dry jar. The result is a fluffy ball.
Thus, it is possible to competently and usefully use coffee beans for crafts, as well as the capacity in which they were stored.
One of the great materials for decorating are roasted coffee grains. In addition to them, you only need glue, with which you can simply decorate any thing - a clock, saucer, frame, vase or casket. Below are options for crafts based on coffee beans and several workshops.
DIY coffee tree
A decorative tree or topiary often began to decorate both residential and office premises. His crown is often made from coffee beans. In nature, such a tree looks like a rounded bush with leaves of a dark green hue. Then white flowers appear on it, which serve as the basis for future fruits and raw materials for crafts. To make a tree from coffee beans with your own hands, the following materials are required:
- styrofoam;
- pVA glue;
- stick for the barrel;
- gypsum;
- ribbon;
- coffee beans;
- flower pot;
- brown threads.
DIY make coffee topiary according to this simple instruction:
- From the foam, form a ball that wrap with thread. Fix their ends with glue.
- Determine the place where you will insert the stick for the barrel. Spread the threads there a little.
- Using PVA glue, glue coffee beans onto small beads wrapped in thread in small sections. Leave empty space for the trunk.
- When the first layer of the crown is ready, start gluing the next, using superglue already. In this case, place the grains with the convex part down.
- Leave the ball sealed with grains to dry.
- Insert one end of the stick in a predetermined location for the barrel, smeared with glue.
- Pour a solution of gypsum into a flower pot. You can add some coffee grounds if the container is transparent.
- Insert the tree trunk into the gypsum mixture and place the entire structure near the wall to lean on it.
- When the gypsum dries, decorate it on top with nuts, such as hazelnuts.
- Wrap a tree trunk with a ribbon.

Coffee Bean Pictures
Another element of interior decoration are paintings. Do-it-yourself DIY coffee beans are also easy to make. They refresh the room and give it a touch of elegance. The principle of creation is to stick the seeds on some basis. As a picture, you can choose any one you like. The main thing is that you can deal with it. It can be an owl, a heart, a boat, cats, trees or a cup of coffee. The following materials and tools are required to create any picture:
- a piece of thick cardboard;
- glue gun;
- glue stick;
- coffee beans
- linen or cotton fabric;

Any pictures of coffee beans with their own hands are made in several stages:
- From the cardboard cut out the square of the desired size.
- Given the dimensions of the cut cardboard and small allowances of 1.5-2 cm, cut a piece of fabric.
- Glue the cardboard with a glue stick, glue a cloth to it. Fix its edges on the reverse side.
- On a dried base, draw a sketch with a simple pencil.
- Glue the grains to the craft first along the edges of the pattern, and then fill the middle. Attach them to the base of the convex part.
- To frame the picture along its perimeter, also glue coffee beans.
Coffee Bean Wax
Due to its unusual shade, pleasant aroma and soft oval shape, coffee beans are used to create a wide variety of cute accessories. The more popular area of \u200b\u200btheir application is ordinary candles, which, with this design, take an unusual look. For the manufacture you will need only a few materials:
- coffee beans
- decor elements at your discretion;
- wick;
- the form;
- paraffin candles.

After preparing the necessary materials, proceed to the instructions for making DIY coffee beans:
- Grate the candles, then melt in a water bath.
- Into the melted paraffin enter grains of coffee.
- In the center of the pencil, fix the wick at one end.
- Put the pencil on the prepared in advance form, and lower the free end of the wick down.
- Pour “coffee” paraffin into the mold.
- Melt the remaining candles, send this paraffin to the dried first layer.
- When the mixture has hardened, remove the candle from the mold and decorate to your liking, for example, with a ribbon.
Souvenir crafts made of coffee
The first thing that you can decorate with coffee beans is a regular photo frame. Grains are simply glued onto the workpiece. This craft is especially suitable for an interior decorated in vintage style. To give a special aroma to the room, not only candles from coffee beans, but also candlesticks are used. It is only necessary to fill them in any form. Then a candle is fixed in it. In addition to grains, twine is often used. Entire models, for example, mills or small huts, are made of these two materials.
The most original gift can be a cup of spilled coffee. To do this, perform a thick wire frame in the form of flowing water. Then all this is wrapped with masking tape and glued over with grains, and a mug is fixed on top. It turns out a very original composition - the cup seems to soar in the air. Another option for DIY coffee beans is a magnet. It is made on the basis of cardboard, so any shape can be given - a heart, a Christmas tree, a horseshoe or some kind of animal.
Photo: coffee paintings
Especially appropriate will be pictures of coffee in the kitchen, because this drink has established itself as invigorating and tonic. With the help of such elements, not only is the empty space closed, but the interior itself becomes cozy and complete. Coffee paintings fit well into the interior, where brown colors and their shades predominate. To create a similar craft, you need some materials and inspiration. You can learn the latter from photos with examples of pictures that you can create.
We will need:
- Coffee beans
- Cardboard
- Stapler
- Satin ribbon (width 0.5) preferably coffee color or jute twine no more than 1 m
- wire or wooden skewer (WIRE NOT MORE THAN 15 CM)
- Glue gun (1-2 MID ROD)
- Plaster or Alabaster, a form for plaster (4 TABLE SPOONS)
- Sacking see photo 6 (10X10 CM)
- Toilet paper
- Adhesive film see photo (10X10cm)
- various accessories (optional)
- Black gouache, either acrylic paint or a black marker
Pens ready ??? Then let's start!)
1. Smile, take a cardboard, half A4 and roll it into a bag) Remember which seeds were stacked? We make the cone so that there is a small hole in the sharp corner, we will insert the wire there in order to make a “bend” in the future. The cones are different, wide or narrow. It all depends on how you come up with the cone. We connect our fist cone with a stapler, and level the bottom of our cone so that everything is smooth)!

2. Next, we continue to smile and for the base of the cone, cut out a circle from a thicker cardboard (in order to better keep its shape), which is circled around the cone, cut out. Cooking wire. Cut a small piece of wire and bend into a fancy curl)
3. Now we glue the bottom of the cone with a self-adhesive film, preferably a dark color) I’ll tell you a secret so that there are no creases in the film, you can treat the edge above the candle and the film will lie evenly) STEM: our trunk will be straight. We take a wooden skewer and wrap it with a coffee-colored satin ribbon or jute twine, fix the ends with glue. If you want a barrel with a spring, take a wire, wind it on a felt-tip pen, carefully remove it, and wind it with tape.

4. using a hot gun, we attach our wire to the crown.

5. In order for the Christmas tree not to lose its shape, we stuff it with crumpled paper) Then the Christmas tree will stand for centuries)


7. take our future Christmas tree and close the cone with our bottom, fasten everything to a thermo-gun. Do not worry, we will hide all traces of glue later)

8. The time has come for paper ..... Using toilet paper we make the volume of our Christmas tree, the closer to the top of the crown, the thinner) Next, take and tint our Christmas tree with gouache, acrylic, or, as in my case, with a usual black marker. So that later, when sizing, white gaps were not visible)

9. Next, we take our mold (in our case, from under the curd) and dilute the alabaster with water to the state of liquid sour cream or as a test for pancakes and fill it in a pot and plant our Christmas tree. We fix, dry. After drying (30-40 minutes), remove the Christmas tree from the mold, if the form does not lend itself, then it is better to cut and remove it)

10. Next, take our burlap, or other material that you have. cut off the desired size with a margin of 4 cm at the edges (take into account the size of your base) and bend our burlap, and glue it with hot glue.

11. That's what we get in the end, we will close these folds later as well)

13. The rest of the space with glue in a chaotic order, in 1 layer, but we take into account that there should be no gaps

14. Using thermal glue, close our burlap)

15. Using coffee, close the joints at the bottom of the cone
16. Add a little decor, be sure to hang some curiosity on the crown, or a bow) And then your Christmas tree will shine. Smiled Yes, these Christmas trees will give only a good mood on a bright holiday!

A huge number of crafts can be done using coffee beans. This is a wonderful decoration element with a pleasant invigorating aroma. In this article, we will consider: what crafts can be made from coffee beans with your own hands.
You will need: coffee grains, polystyrene foam, PVA glue, gypsum, stick for the barrel, brown threads, flower pot, ribbon.
Master Class


You will need: coffee grains, thick cardboard, glue gun, simple pencil, scissors, cotton or linen fabric.
Master Class
- Cut a square out of cardboard of the desired size.
- Cut a piece of fabric of the same size + 2 cm, take a reserve for allowances.
- Glue the fabric to the cardboard and fasten the edges of the fabric to the back.
- Wait for it to dry completely.
- Sketch the drawing with a simple pencil. (It can be a heart, a world map, an inscription, a figure, a declaration of love, a cup of coffee, owls, trees, cats, bears, flowers, and much more ...)
- Glue the coffee grains along the edges of the pattern with the convex part down.
- Glue the coffee beans, filling the middle of the picture with the convex part down.
- Wait until completely dry and decorate to your taste.

You will need: coffee grains, glue gun, cardboard, scissors, hands and numbers for watches.
Master Class
- Cut out the shape of the watch of the desired size from cardboard. It can be a circle, square, rectangle, triangle, heart, and much more ...
- Glue the coffee beans with the convex part down along the edges, then filling the middle.
- Attach the hands and numbers of the clock.
- Decorate to your taste.

You will need: coffee grains, cardboard, PVA glue, scissors, water-based varnish.
Master Class
- Make 2 templates for the frame in this way: cut 2 identical rectangles from cardboard, cut a hole the size of the photo on one of them.
- Set the whole rectangle aside.
- Paste the grains of coffee with the convex part down the frame.
- Wait for it to dry completely.
- Glue the patterns together, leaving room for a photo.
- Decorate to your taste.
We bring to your attention, the second simpler option for making a photo frame from coffee beans. Simply buy or take a ready-made photo frame and glue it with coffee beans.
Coffee mug

You will need: mug, coffee beans, thread, sponges (cotton pads), super glue and brown acrylic paint.
Master Class
- Glue the cotton pads to the mug. (Tight, without gaps).
- Wrap the mug with thread.
- Paint the mug with acrylic paint.
- Glue coffee beans on a mug.
The coffee mug is ready!
Coffee candles

First option
You will need a ready-made candle, it remains only to decorate it with grains. You can glue them with glue or on hot wax.
Second option
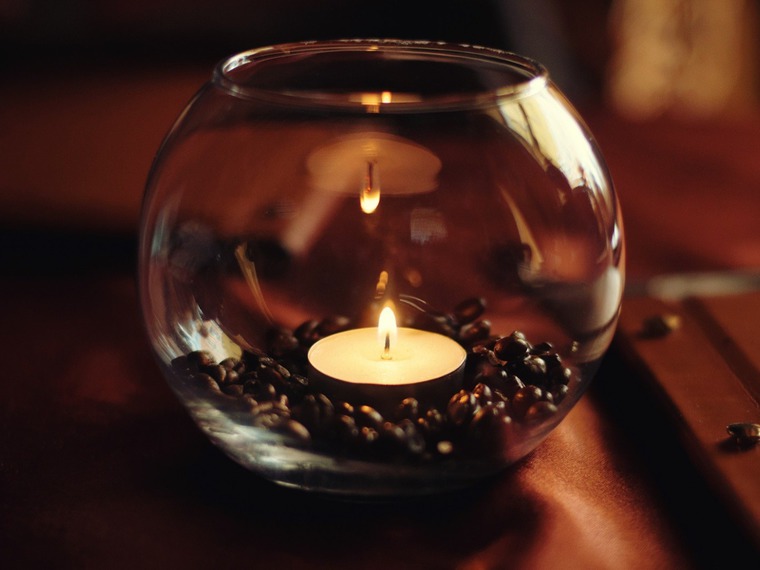
Take a candle and place in a transparent wide container. Cover the space between the candle and the glass with coffee beans.