How to properly cut chicken into portions. Several methods for all culinary occasions
The good thing is that it now takes less time to cut, the pieces have become neater, the breast turns out to be a separate whole piece, and there is much less physical effort when cutting.
So I decided to write an article with detailed instructions for beginners, so that they start right away correctly and don’t have to relearn later 😉, and not just beginners. Probably a lot of housewives cut up chicken as usual, without thinking about how to make this process more convenient and faster.
What you need
- whole fresh chicken
- sharp knife
- cutting board
- PATIENCE)))
****************************************
Photos are clickable, click on them to enlarge
How to properly cut a chicken step by step photo
1. Cutting the chicken this way will give you 8 pieces. The first step, of course, is to wash it thoroughly and dry it lightly with a towel.
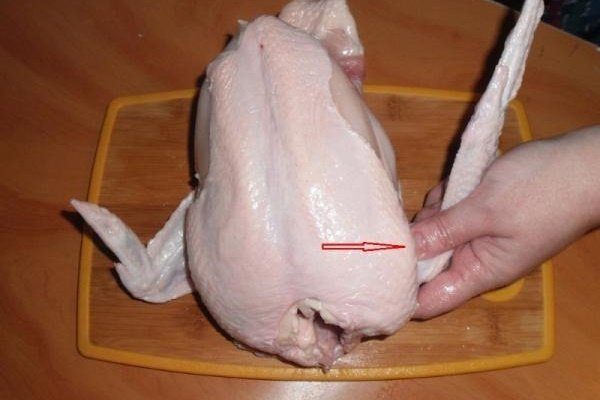
2. First, let's get the chicken legs. Place the carcass on the board, back down, grab the leg and pull it in the direction opposite to the carcass, cut the skin.


3 We hold the leg and thigh with one hand and the carcass with the other. We begin to separate, to do this we tear the thigh off from the carcass, turning it slightly upward. The joints should separate - the femur should come out of the joint.


4. The joints are no longer connected, so now you can easily cut off the leg with the thigh, make a cut, turning the thigh and turning the carcass onto its back, breast up. We finish separating the leg and cut it to the tail.


5. Cut off the second leg in the same way. Now we will separate the wings. By touch we determine where the shoulder joint is located, which connects the wing to the carcass, and cut along the joint.


6. It remains to separate the breast from the back. Look carefully at the photo, it shows the direction in which to cut.
The direction can be determined by the white fat line; they are connected by ribs and cartilage; cutting them is easy. We cut strictly in the indicated direction to divide correctly.


7. We cut off the breast only on one side, we cut it on the other.


8. For me this was the most difficult moment. But it’s already behind us, we’re happy if everything turned out well and we’re not upset if it’s not so good. ;-). Everyone knows that in any business you need to get good at it, you’ll definitely succeed next time!
In the middle of the breast, along its entire length, there is a piece of cartilage on a bone; you need to take it out. We lightly cut the upper part of the breast, where there are two bones, cut just between these bones until we come across a bone from the cartilage, which has a dark color.

9. To pull out the bone with the cartilage, you need to pry this bone with your thumbs; to do this, we begin to break the breast, as it were, into two parts, using little effort, we push the bone up and push our fingers under it.


11. We almost completely removed the cartilage from the chicken meat; it is held only on the bone and a little in the middle. We take hold of the cartilaginous bone and carefully, but with effort, pull it, and the cartilage will be removed after it.


12. We removed the cartilaginous bone and the cartilage itself.

Today, there are several ways to cut chicken, depending on what it will be used for in the future. Several portions are obtained from the parts of the bird, which are then used for frying, boiling, and making barbecue. The chicken is stuffed with meat or vegetables. The main thing is to learn how to properly cut a chicken carcass.
Preparatory process
Before it hits store shelves and tables, the chicken carcass undergoes several stages of preparation. The sequence is done in this order:
- Poultry slaughter. The fed bird is caught, held upside down, placed in a tight space and given water, which allows the intestines to be completely cleaned. Then they use electric current (in industrial farms) or cut off the chicken's head and cut the artery.
- Bleeding the carcass. The chicken carcass is hung by the legs so that the blood drips into the placed container.
- Feather plucking. The bird is first scalded in boiling water, which makes it easy to remove all the feathers from the carcass.
- Evisceration of the entrails. All internal organs are removed from the carcass.
- Cutting into parts. The resulting carcass is cut into portions.
Tools
Before the cutting process, be sure to prepare the tools and work surface. Gutting a carcass is considered a dirty process; it is recommended to cover the surface of the table and all surrounding objects with oilcloth. It is advisable for the hostess to wear an apron and rubber gloves on her hands.
To cut poultry you will need the following tools:
- Cutting board. Working with chicken is not complete without using a cutting board. For cutting meat, it is recommended to choose a hard plastic board. Wooden surfaces absorb odors and are therefore not suitable for this task. Or, if there is no other board other than a wooden one, it is advisable to wrap it with durable film before work.
- Capacity. Be sure to prepare a container - the elongated giblets or ready-made portioned pieces will be placed in it.
- Knives. There are special knives for gutting and cutting - they have curved ends. If such a tool is not at hand, wide and narrow knives made of thick steel and with a strong handle will do.
- Carving fork. With its help, you can carefully remove the heart, lungs, intestines, crop, liver, and stomach from the carcass. The fork allows you to do everything quickly, without putting any effort, without contaminating the surface.
- Kitchen scissors. They are used to cut the tendons of wings and legs. If there are no such scissors, it is quite acceptable to replace them with a sharp knife.
Having a set of kitchen tools on hand is ideal when cutting up chicken. But it is not always possible to purchase a kitchen set. For this reason, it is permissible to use several knives of different sizes. Tools must be well sharpened and washed.
Gutting and removal of unnecessary parts
After plucking the feathers, you need to prepare the chicken carcass for cutting. To do this, the bird is thoroughly cleaned of internal organs. If there are giblets in the carcass, this will lead to rotting and spoilage of the chicken, and in the end you will have to throw it away and it will be unfit for consumption.
Before slaughter, the bird should not be fed for 12 hours so that there are no undigested foods in its intestines, as food residues are completely excreted in the feces. This facilitates the further process of gutting without any difficulties. After removing the internal organs, they do not have to be thrown away; they are useful for preparing poultry feed - they are washed and thoroughly crushed.
What to do and in what order:
- Remove the anus. The chicken carcass is turned over on its back, using a sharp knife, they begin to cut out the anus in a circle, without inserting the blade deeply so as not to pierce the insides. If the intestines accidentally cut through, the remaining contents will come out, causing the meat to completely deteriorate and the chicken to be unfit for food. The anus is not pulled out.
- Make an incision by running the knife from the anus to the keel. This process is carried out equally carefully so as not to damage the bird's intestines.
- Get rid of the entrails. The entrails are removed into a previously prepared container. The intestines are carefully removed by lightly pulling the anus. After removing the intestines, they begin to cut out the stomach and liver. The liver is cut out without separating it from the gallbladder - it is removed afterwards. This minimizes the risk of crushing the bubble and spoiling the product.
- Get the goiter. The bird's crop is usually empty at the time of slaughter. But if the animal was killed without preparation or died as a result of an accident, and its crop is full, to remove it, you need to make an incision in the skin on the neck and pull out the organ through it.
- Remove the genitals. When cutting a chicken, the ovaries are removed, and the testes of a rooster are removed. This process requires a sharp knife.
- Get the heart. It is cut out with the same knife as the genitals.
- Rinse the carcass. After all the insides of the carcass have been removed, it must be rinsed under cold running water.
This gutting system is great for quickly cleaning the carcass and further using the bird for cooking.
In the video, the man explains in detail and shows how to gut a chicken at home. What and how to do:
The classic way to cut a carcass
If you practice, then over time it will take much less time to cut the chicken, and the pieces will turn out neat and the breast will be whole. The housewife will be able to learn to do everything carefully in order not only to leave the surface on which she works clean, but also to minimize waste.
A classic cutting method is proposed. Follow the instructions:
- Wash the carcass well, dry it a little, and pat dry with a kitchen towel.

- Place the carcass on the board so that the back is down. Grab the leg and pull it in the direction opposite to the bird’s body, cut the skin.


- Hold the carcass with one hand, and grab the leg and thigh with the other. Separate the thigh from the carcass, turning it slightly upward. This promotes separation of the joints and the release of the femur.


- Now you can easily cut off the leg and thigh by turning it inside out and turning the carcass onto its back. Make a cut down to the tail to completely separate the leg.


- Cut the second ham in the same way. Next, start separating the wings. Feel the shoulder joint with your hands - it connects the wing to the carcass. Cut through it.

- Separating the breast from the back is not difficult, as long as you cut in the right direction. It is determined using a white fat line.

- Cut the breast from the other side in the same way.


- There is cartilage along the entire length of the breast - you need to get it out. To do this, lightly cut the top of the brisket, where there are two bones. Cut between them until the knife hits the dark cartilage.

- You can't do this without using your hands. In order to remove the bone with cartilage without damaging the carcass, pry this bone with your thumbs, forcefully push it up and push your fingers under it.

- Without removing your fingers, move down the breast, pushing and squeezing the cartilaginous bone.


- The cartilage is almost completely removed. To complete the process, grasp the cartilaginous bone and gently pull it.


- The process of removing bone and cartilage is complete.

- Divide the breast into two parts.


- On the inside of the chicken breast there are rib bones - they are removed by cutting them off with a knife. The chicken fillet is left untouched or cut into two parts.


- The chicken leg is divided into two parts - drumstick and thigh. They cut at the joint.


- The wings are also cut to make them more attractive and provide convenience for further use.

As a result, according to this scheme, the housewife can get 8 or even 10 portioned pieces of carcass. As an additional bonus, the back and bones from the breast can be used to prepare aromatic chicken broth.

In half
Another popular way of cutting a carcass is halving. This method is especially suitable if you want to cook tobacco chicken. They operate according to the following scheme:
- Place the carcass breast side up and hold the bird with your hand. Make incisions on both sides of the spine, which are then removed.
- Cut the breast bone (keel) and then unfold the carcass. The breast bone is removed by simply pulling it out of the flesh.

The chicken is left unfolded or divided lengthwise into two even parts, depending on what dish the hostess will prepare.
For 8 parts
The most economical option is to purchase a chicken and cut it into pieces. In this case, it will be possible to cut the bird into 8 parts; they will later be used for boiling, frying or baking in the oven. An additional bonus when cutting is getting chicken broth for making soups and borscht.
For the cutting process, be sure to use a well-sharpened knife so that there are no difficulties when cutting off parts, cutting the skin and tendons.
After purchasing chilled poultry that has not been frozen, begin the cutting process:

As a result, we managed to obtain 8, almost identical pieces of meat - they will be used to prepare mouth-watering dishes. Cutting a chicken is not a difficult process, especially if you practice regularly.
If you need to cut the chicken into 8 pieces, but the instructions are very difficult to understand how to do this, then a video will come to the rescue, where everything is explained in detail:
No waste
If a housewife knows how to cut up a chicken so that there is no waste, she is a real smart person, because such an activity is an art. This option is considered the most profitable. The process itself is simple and takes minimal time.
They operate according to the following scheme:
- Separate the legs. The carcass is placed on its back, grasped by the leg with one hand and pulled to the side, where its junction with the body is cut. With a sharp movement, turn the leg out of the joint and finally run the knife along the skin so that it is separated from the body.
- Separate the wings. Cut the shoulder joint, completely separate the wing, slightly pulling it to the side.
- Divide in half. Make a cut along the spine and in the middle of the breast of the carcass.
- Separate the breast and back. Run a knife along the junction of the ribs.

If you get a large carcass, each half of the breast is additionally cut into two more parts. Pieces of poultry are hidden in the freezer for storage.
The video shows an amazing way to cut up chicken so that there is no waste left - everything is used for further use as food. A man finishes a carcass in a few minutes without dirtying the work surface:
For equal portions
If previously it was common practice to buy separate sets of chicken parts, and you didn’t have to deal with cutting up chilled carcasses, convenient step-by-step instructions for portioned pieces will come in handy. At first, such a process may seem complicated and incomprehensible, but this is only at the start, and on the second attempt no difficulties will arise.
Cutting poultry into portioned pieces involves obtaining 8 parts and a back. This is very convenient, because you don’t have to spend money on buying ready-made semi-finished products. Cutting process step by step:
- Place the carcass breast side up. Let's start separating the thighs. You need to cut the skin with a knife - for convenience, pull the leg away from the body. Hold the leg in your hand and run the knife along the skin at the base of the thigh. Confidently break off the thigh, moving it to the side - the joints and protruding white bone will be visible.
- Cut the joint at the white bone. Move the knife in the same direction - the thigh will completely move away from the carcass. Repeat the same steps with the second leg.

- From two legs you will get four portions - 2 drumsticks and 2 thighs. To separate chicken legs, use your finger to feel the joint between the bones and press with the blade of a knife.
- The next step is cutting off the wings. Repeat the same steps as with the thigh. Holding the wing with your hand, cut the skin, then bend the wing to the side and cut the joint under the bone. The same is repeated with the second wing.
- Now separate the chicken breast from the back. It is recommended to use kitchen scissors or a sharp knife. The carcass is placed on its side, back up. There is a fat strip on both sides under the breast; they begin to cut it from the bottom up. Next, the carcass is cut to the very top on the left side. Similar actions are carried out on the other side of the chicken carcass. This will separate the back of the chicken from the breast. The back is used for cooking broth.
- Next, you need to start cutting the chicken breast into portioned fillets. First, cut the breast in half, turn it skin side up, and make an incision with a knife exactly in the middle to rest against the bone.

- The breast bone is considered one of the hardest, so you will have to make every effort. If you press well, you will be able to cut the breast along the bone into two equal parts.
- Next, carefully separate the fillet from the rib bones and remove the skin. The fillet is folded to the side and cut off from the bone with the tip of a knife.
This way we managed to get 8 portioned pieces of chicken and a back for preparing chicken broth.
The man in the video shows how to quickly and accurately, without mess, cut a chicken into portioned pieces in his kitchen:
Boneless cutting
When it is necessary to prepare minced meat, meat rolls, or semi-finished products from pulp, the ability to separate meat from bones comes to the rescue. It is important not only to be able to cut meat, but also to maintain the attractive appearance of the pieces. It is best to remove the bones from the entire carcass without damaging the skin.

Farmers who supply chicken products to restaurants may face such a request. Such skill is appreciated and considered a plus for the seller. For boneless cutting, use the sharpest possible knife. The process provides two cutting options: open and closed.
Public method
For the open method of separating meat from the bone, follow this scheme:
- The skin is incised vertically along the entire back. It is acceptable to start with the breast, but this may cause damage to the carcass. The bones in the back are located very close to the skin and can tear it if pressed.
- Using a knife, carefully remove the meat from the skeleton, moving from the tail from bottom to top. The ischium, wing and hip joints are broken to expose the ribs. Use your hands to help move the pulp.
- Free the femur completely by trimming the veins in a circular motion. Move the meat with your fingers.
- Carefully scrape the flesh down to the outermost cartilage, maintaining the connection between the thigh and body. Having reached the bottom point, cut the upper joint.
- Turn the resulting “stocking” inside out and repeat the same on the other side.
- Trim the ribs using scissors. Get rid of the keel and fork bones by trimming the remaining joints.
- Leave the wings on the carcass along with the bones or cut them off from the skin. The process is over.
Private method
In order to use the closed method of boneless cutting of a carcass, follow these recommendations:
- Through the lower hole in the carcass, through which the bird is gutted, cut the tail and expose the ischial frame. The incision is made in jerky movements, moving up to the upper femoral cartilage. For convenience, it is permissible to slightly tuck the skin and pulp during the process. Next, use a blade to carefully cut the joint at the junction.
- The veins are trimmed along the entire circumference of the ham. Where the knee touches the shin, a fracture of the joint is made. The same machinations are carried out on the second side of the carcass.
- Then you need to trim the meat from the ribs to the neck, still tucking in the skin with the flesh already separated.
- The neck is sharply pulled out with hands. The breast fillet is cut off from the body and the wing joints are broken off.
- The fork-shaped bone must be removed, and the flesh of the drumstick must be cleaned around the circumference, cutting the ligaments. The bones are cut off in front of the cartilage, the skeleton is removed and the skin and meat are turned out.
The closed version of cutting meat is great for stuffing a carcass. This way you will be able to prepare incredibly tasty and presentable-looking dishes that will surprise your guests at the festive table.
Cutting a chicken so that it looks presentable, does not lose its attractiveness, and has no bones is difficult, but doable. How to do this is shown in the video:
We take out the breast fillet
Very often, chicken fillet is used for salads or diet food - it has low calorie content, is rich in proteins, and saturates the body.
But when buying a whole chicken, housewives are sometimes faced with the problem of removing chicken breast from the carcass. But this is a simple process that does not require much time:
- An incision is made along the chest ridge, pressing the knife against the bone.
- Carefully trim the meat from the frame.
- Separate the other half of the brisket from the back.

Cutting chicken for rolls and shish kebab
To prepare a delicious dish - a whole chicken roll, you will need to use a closed boneless cutting method. Even if the housewife wants to cook the roll in cling film, or bake it with vegetables, one way or another, removing bones from the carcass is a necessary procedure.
You can prepare chicken kebab from individual parts of the bird. To do this, they use the method of portioning the carcass into 8 or 9 parts - they are marinated and then grilled.

If you use skewers or want to enjoy boneless kebab, the open method for boneless cutting of poultry is suitable. Then simply cut the chicken breast into pieces of the required size.
Cutting up chicken for meatloaf is easy. Having done this, you will be able to prepare an excellent dish that will delight the whole family. Step-by-step instructions in the video:
Secrets of experienced chefs
All chefs have their own tricks when cutting poultry. Many world-famous masters suggest paying attention to the following details:
It is equally important to cook this or that part of the chicken correctly. If you process chicken incorrectly, it can lead to dry flesh, destruction of all beneficial microelements, and deterioration in taste.
There are many ways to cut a chicken depending on the further use of the carcass or its parts. The first time this procedure may seem complicated, but subsequent cuttings will be easy and quick. Still, it is much more economical to get several different parts from one carcass than to buy them separately at exorbitant prices.
A whole chicken carcass is cheaper than ready-made processed parts. But then the question arises - how to cut up a chicken? If done incorrectly, all the meat can be ruined. If the intestines, gall bladder or spleen are opened, the meat will acquire a specific smell and will be bitter. Let's figure out how to quickly disassemble a carcass for different purposes.
Tools: a well-sharpened knife, dishes for storing waste and giblets, a cutting board. The pre-plucked bird is placed on its back and work begins.
To gut and cut chicken you will need a well-sharpened knife.
The evisceration process has several stages, one after another:
- Cutting off paws. To do this, stretch the tendons (bending the knee joints) and cut them with a sharp knife. There is no need to press hard; cut carefully.
- Cutting the skin around the anus. Make the cut carefully and shallowly so as not to touch the internal organs.
- A skin incision in the center of the abdomen. How to do this correctly? We cut the bird in half, from the keel to the anus. The depth of the incision is exactly to the film enveloping the intestines. Again, ensure the integrity of the internal organs. If you are a beginner separator, it is better to tear off the remaining fabric by hand.
- Following this, the intestines, along with the anus, are removed and thrown away.
- Then you need to make cuts to separate the stomach and liver. They will then become components of dishes. The main thing is not to crush the spleen at the same time. It is then cut off, outside the carcass, and placed in a trash bin.
- Goiter extraction. The best option is if the bird was not fed before slaughter. In this case, remove the crop along with the esophagus. In another, cut the neck before gutting. Empty the crop thoroughly. Then disassemble the chicken further. If the bird is killed internally, the neck will also have to be cut - otherwise the crop will not be removed.
 All incisions are made carefully so as not to damage the internal organs.
 If you are dressing a rooster, remove the testes (yellow glands) by pulling them out of the tail through a gentle cut. The chicken's ovaries are also removed. The lungs and heart are removed at the very end of disassembly.
The stomach is emptied additionally: an incision is made, then it is turned inside out, the remaining food is removed and the inner rough layer is disposed of. At the end of gutting, the body of the bird and the offal are thoroughly washed. It is best to do this under running water.
Important. Gutting should be started as soon as possible after plucking - in order to avoid processes that are destructive to the meat, starting in the intestines or crop, and spreading to the meat. Having completed gutting, you can begin cutting.
How to cut a carcass into pieces
How exactly the bird will be handled determines the future method of cooking. You can cook the whole chicken in the oven or on the grill. In other cases, the chicken will have to be cut into pieces.
 A chicken carcass can be cut in different ways.
 There are several parsing options depending on your culinary plans:
- Waste-free cutting. Very popular among housewives, it makes it possible to stock up on a lot of semi-finished products for future use and assemble a set for broth. The bird is cut into medium pieces. The most economical option available.
- Portion cutting. The bird is cut into pieces, getting rid of unnecessary parts. An excellent option for frying, baking, and grilling. The pieces can be made identical or simply symmetrical.
- Boneless cutting. Necessary for creating rolls or minced meat. In this case, the meat is separated from the bones.
Economical way to parse
The washed whole chicken is blotted to remove any drops to make it easier to handle without slipping.
The bird is placed on a cutting board, breast side up, and gradual disassembly begins:
- We cut the chicken at the joints of the thighs and body. The system is the same as for initial claw cutting: the tendons are stretched by flexing the joint and an incision is made. You can immediately cut the thigh and drumstick by feeling their joint and cutting it with a knife.
- Wing separation. To do this, the roof is pulled back and everted until the cartilage comes out. This is what needs to be cut off from the body.
- Cutting the breast. An incision is made along it, and the meat is removed by hooking it with a knife. The result is two pieces of fillet and a back connected to the ribs.
- Disassembly of the back. The spine is cut in half, the ribs are cut off from it. This cutting is convenient when forming a soup set.
- If desired and necessary, excess fat is also removed from the resulting pieces.
As a result of the work we have:
- thighs, breast fillets, wings and drumsticks - for frying, boiling, stewing, baking;
- back, ribs, wing tips - for cooking broth;
- fat - for frying.
 After cutting, you get portioned pieces suitable for cooking.
 Instructions for creating portions
Let's figure out how to disassemble the bird into portioned pieces step by step.
Usually it is cut into six, eight or ten pieces - in proportion to the number of people at the table and the desire to make them larger or smaller. If the whole carcass is already ready, its legs and thighs can be served as whole legs, and the breast will yield two or four servings. The starting point here is the size of the carcass, because a young and small chicken will yield a maximum of four pieces.
Poultry is cut at the joints of the bones (joints), which requires understanding where they are located. Then cutting off the wings and legs from the backbone will be quite easy. For proper cutting, it is best to choose a sharp knife with a large blade. Housewives often use special culinary scissors: such cutting does not require strong physical force.
Portion cutting can be useful, for example, for chicken kebab. This will require some time and skill.
 When cutting into portions, you get 6-8 pieces.
 So, step by step instructions:
- Step 1. Standard. Wash the bird and place it on its back.
- Step 2. Cut off the wings with a well-sharpened blade. The tip of the wing, which has virtually no meat, can be cut off and discarded.
- Step 3. Cut off the legs. Separate the drumstick and thighs. The leg of a large bird can yield four servings.
- Step 4. The breast will also make four pieces. Before cutting it is cut off from the ridge.
The back and throat are not suitable for this dish.
Attention. You need to string the portions onto the skewer carefully, parallel to the bone, and place them quite tightly.
How to separate meat from bones
The most difficult part of cutting up a bird is separating the bones and meat so that the resulting parts or portions are beautiful. The advantage is that if you don’t get attractive portions right away, the resulting pieces can be processed into chopped cutlets or minced meat.
To disassemble, we again need a knife with a sharp blade, a board and special scissors.
The process consists of the following steps:
 A sharp knife is needed to separate chicken meat from the bones.
 - Place the carcass back up.
- Run the blade along the skin along the spine on one side and then on the other. The goal is to cut off as much flesh as possible without crumbling it if possible.
- Cut through the tissue that holds the sternum and spine bones together. In addition, it is necessary to cut the humeral and femoral cartilages. This is where scissors come in handy. To simplify the work, the shoulder or leg is carefully rotated around its axis so that the cartilage becomes visible.
- Remove the ridge carefully. Meat remains must also be carefully cleaned off.
- The leg bones are removed, starting with the femur. Cartilage and other tissues are cut, bones are thoroughly cleaned. You need to work with a knife. You can help yourself with your hands where the blade doesn’t cope very well.
- The wings are simply cut off from the carcass. They are poor in pulp, so there is nothing to peel off them. It is better to add them to the soup set.
- The cut parts are washed thoroughly. It is better if the water is running.
Buying a whole carcass is a very profitable business. Now you can prepare a lot of dishes from poultry, and frozen chicken parts will not take up much space in the refrigerator.
The video shows a detailed process of cutting a chicken carcass into portioned pieces.
Today we will learn how to cut chicken in two different ways. In addition to the video, I will give several photographs, but I warn you right away - at your own peril and risk. Of course, there is nothing special there, but I know that not everyone perceives cut up carcasses normally. I’m not kidding at all, I myself have a couple of friends who cannot see meat on bones, for them this is almost the most disgusting sight.
1) Classic cutting of chicken into 8 parts.
This cutting is very convenient for barbecuing, stewing, baking, etc. To begin with, I give you a video by chef Jason Hill. Very funny, he said absolutely the right thing:
"DON'T WORRY, SHE DOESN'T FEEL ANYTHING, HE'S ALREADY DEAD."
So, knife in hand and forward. The video is in English, but everything is completely clear even without language - I chose the most visual one :)
You will need a whole chicken, a large and of course sharp chef's knife and kitchen scissors.
And now I’ll back everything up with photographs :) Usually I cut up chicken or fish on a plastic board, but it’s small, so now for clarity, I covered the work surface with cling film - don’t be surprised.
1. Place the chicken breast side up on a cutting board. To separate the legs, make cuts between the thigh and body.

2. Pull your leg to the side and bend it outward to break the hip joint.

At this stage, it is also possible to fracture the joint between the tibia and thigh, as shown in the video. Or you can do it another way, I will show you below.
3. Use a knife to carefully cut through the joint to completely separate the leg from the body.

4. If at stage No. 2 you fractured the joint, then simply carefully separate the shin from the thigh with a knife. Or you can cut it right away, just along the line of the joint, without a “fracture”.

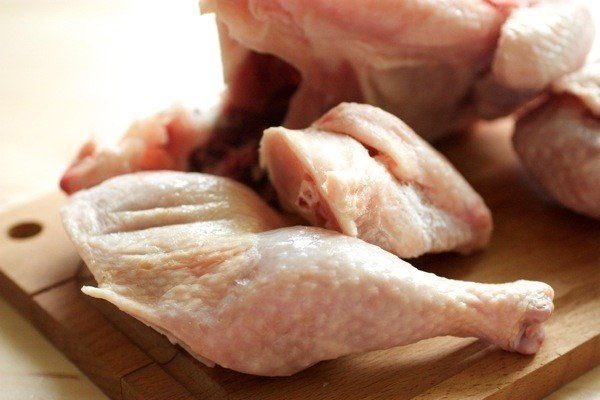
These are the two neat parts we will get. Do the same with the other leg.

5. To separate the wing, pull it away from the body and bend it in the opposite direction to break the joint (similar to what you did with the legs).

6. Cut between the joint and the breast, thus separating the wing. Remove the wing tip and use it later for broth. Do the same with the second wing.

7. Now our task is to separate the breast from the back. Place the carcass breast side up.

8. Using kitchen scissors, cut through the sides of the chicken from start to finish on both sides. It will crunch, don't be alarmed.

Now we have the breast (on the left) separated from the back (spine). We also put the back on the broth, towards our wing tips.

9. Place the breast skin side down, cut it in half (lengthwise), placing the knife exactly in the middle. Press the knife well to cut through the bone and meat.

If desired, parts of the breasts can be cut in half, crosswise.
In total we got 8 parts. Everything is not difficult at all, I am sure that you will do it much more accurately than me :)

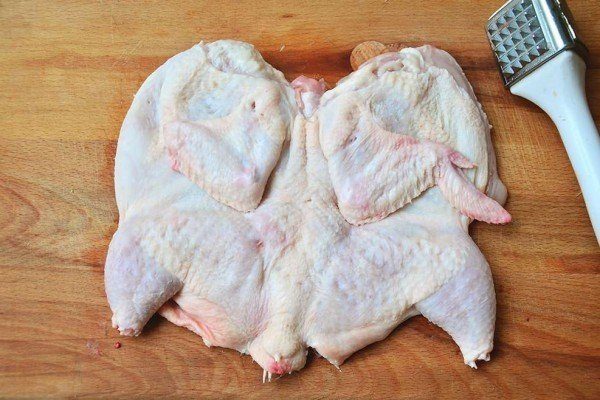
2) Butterfly chicken cutting.
We are talking about chicken cut along the ridge on one side. First a video, and then a couple of photos, but not mine, but Glisslein’s. Alas, I didn’t have a second chicken on hand :)
1. Place the chicken breast side down and, holding it by the tail, cut with scissors or a knife, first on one side of the spine, then on the other. Remove the spine.
2. Cut the breast bone (keel) and open the breast in different directions. Remove the keel by simply pulling it forcefully. Trim excess fat.
3. You can leave the chicken whole, just pay attention to how to hide the legs under the skin.
It’s rare that a housewife thinks about how to cut up a chicken carcass.. Many do this either on a whim or according to an established tradition in the family. Meanwhile, there is a general cutting technology that can not only speed up this process for experienced people, but will also become an indispensable instruction for those just trying their hand at culinary skills.
The method described below will show step-by-step cutting of a carcass into 8 relatively equal-sized pieces. Or even 10 if you separate the wings. And, among other things, the chicken back and cartilage will remain as a pleasant addition - it is hardly suitable for stewing, frying or baking, but will be an excellent addition to the standard soup set.
The advantage of purchasing a whole carcass is obvious- whatever parts you need, they will come out much cheaper than purchasing a separate chicken breast or drumstick. But if you purchase chicken solely for cutting and subsequent freezing, then you need to keep one important rule in mind: preference should be given to chilled products. It is almost always fresh, and even if it is not, it is very easy to recognize by its characteristic smell or appearance.
Unfortunately, this trick won’t work with frozen carcasses. And most often what ends up in the freezer is chicken that has already been in the chilled section for 2 or 3 days - this is how stores and suppliers extend its shelf life. But, you see, such a carcass, and even after repeated defrosting, cutting and freezing, will definitely not be the first freshness.
Useful tricks for the housewife to note

How to Butcher a Chicken - Step-by-Step Guide
The first thing you need to do is to rinse the carcass thoroughly under running water.. After which it is advisable to dry it slightly, using a towel.. And we boldly begin the process of cutting the chicken:

Cut the breast into portions
The basic preparations for cutting the chicken carcass have been completed, it’s time to divide what was received into “portions”. Let's take care of the breast:

Cut the legs into portions
We'll get four more pieces so the chicken will last longer. A whole chicken leg is good, but still a bit large. Therefore, we will divide it into several parts, separating the thighs from the legs. The cutting process is very similar to separating the wings from a chicken carcass: in order to correctly determine the location of the cut, you need to feel the joint connecting the bones. One by one: we straighten the leg, find the articular connection - carefully cut the leg into two parts.
This cutting method allows you to get 8 pieces of chicken using the breast and legs. And 2 more if you separate the wings from the carcass. On top of that, the chicken back and breast bones remain. They can also be cooked, but it’s much better to put them in a separate bag and put them in the freezer - later they will become a good base for rich chicken broth.