How to cook velvet cake. The dessert that everyone knows about is Red Velvet.
Have you noticed that sweet pastries: be it cakes, pastries, or accompany us in the brightest and most joyful events? Birthdays, weddings, New Years - they always come not alone, but with something tasty to boot! The Red Velvet cake, the recipe for which I offer today, is a real holiday in itself. It is so original, beautiful, bright - that as soon as it appears on the table, even an ordinary day will be painted with bright colors. Do you want a holiday? Make Red Velvet!
We will complement the chocolate-vanilla taste of the sponge cake with cream cheese cream. Moderately sweet, it perfectly complements the taste of velvet cakes.
Red sponge cake recipe:
- Wheat flour - 330 g
- Granulated sugar - 300 g
- Butter - 150 g
- Vegetable oil - 150 ml
- Eggs - 3 pcs.
- Buttermilk/milk (you can make an analogue of buttermilk from milk yourself; during preparation I will explain how. To prepare this analogue you will need 1 tablespoon of lemon juice and 270 ml of milk.)
- Red gel dye - 2 tsp.
- Cocoa powder - 1 tbsp. l.
- Baking powder - 1 tsp.
- Soda - 1 tsp.
- Salt - 1/4 tsp.
- Vanilla sugar (1 heaped tablespoon) or vanilla extract (1 tsp) optional

Ingredients for cream cheese:
- Curd cheese - 340 g
- Butter - 115 g
- Powdered sugar - 100 g
- Vanilla extract - 2 tsp.
For a “naked” cake, one portion of cream is enough, but if you want to coat the sides, or make additional decorations on the top of the cake, you will need 2 or even 3 portions (to do this, increase the amount of ingredients proportionally).
How to cook:
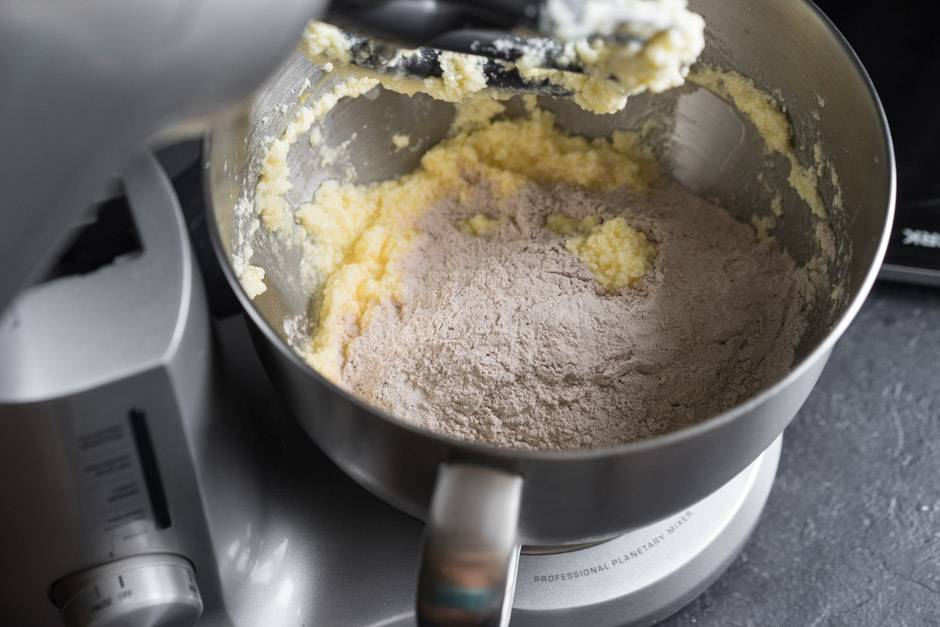
Dry ingredients, except sugar and salt, namely (flour - 330 g, baking powder - 1 teaspoon, soda - 1 teaspoon, cocoa powder - 1 tablespoon), sift through a sieve several times.
Use the highest quality cocoa powder you can find. Dry mixtures such as Nesquik are excluded; I do not recommend using them in baking, or giving them to children either. One tablespoon of high-quality cocoa will be enough in this recipe to give the biscuits a chocolate flavor without killing the color. You can use.
By the way, if you don’t dare add coloring to the dough, you can increase the amount of cocoa to 3 tbsp. spoons and you will get a delicious chocolate cake with a “velvet” structure.

I usually sift the dry mixture 2-3 times, throwing out any lumps that remain at the bottom of the strainer.

Then mix the flour mixture with a whisk or mixer at low speed. The more thoroughly we distribute the baking soda and baking powder in the dough, the more evenly the biscuit will rise.

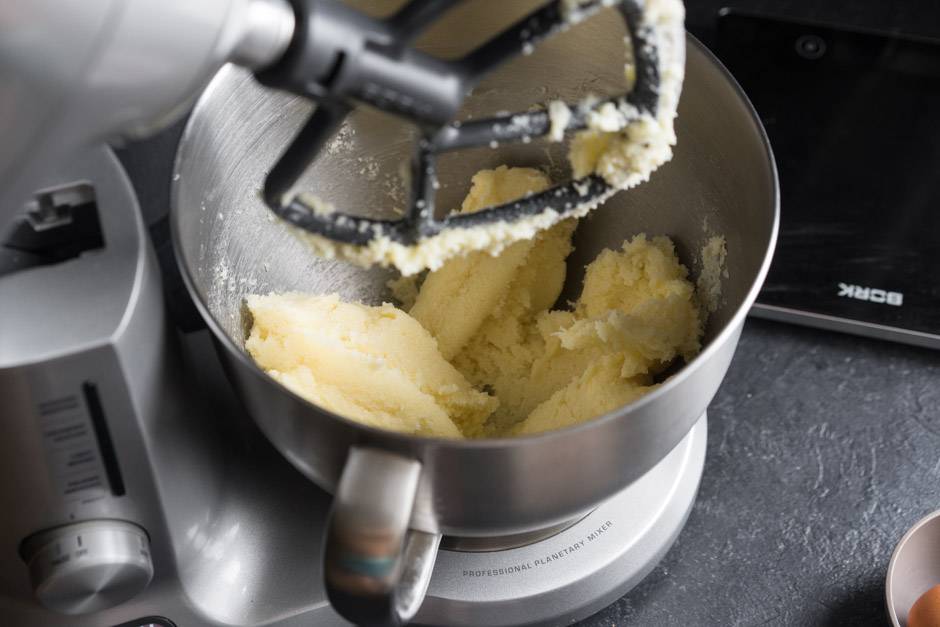
Combine butter at room temperature (150 g) with sugar (300 g) and salt (1/4 tsp), beat at high speed with a mixer.

Salt “works” wonderfully in sweets, bringing out their taste even more, which is why it is often added to sweet dough.

The consistency of the resulting mass will be lumpy, like wet sand.

At this stage you can add 1 tsp. vanilla extract (or replace it with vanilla sugar). 
Now beat in 3 eggs (one at a time), stir the mixture thoroughly after each egg.
After adding the eggs, pour in 150 ml. vegetable oil into the dough and mix.
Use odorless vegetable oil; you can use refined sunflower or corn oil.

If you don't have buttermilk on hand, you can make your own. For this purpose in 270 ml. add 1 tbsp of hot milk. spoon of lemon juice and leave for half an hour. Stir. The result will be a liquid with large flakes of sour milk - what we need for the recipe. The acid contained in buttermilk (kefir) helps develop the color of the biscuit.
Instead of buttermilk, you can use full-fat kefir.
Pour 2 tsp into warm buttermilk. red dye. The liquid will turn bright red, this is what we need to get a bright sponge cake. Stir the buttermilk (kefir) until smooth so that the dye is well dissolved.

Now we begin to add red buttermilk and dry ingredients into the main dough in parts (alternately). Add a little buttermilk (about 1/3), stir, add 1/3 of the flour mixture, stir again with a mixer, then buttermilk again (1/3) and so on until all ingredients are completely added.
The dough for the red velvet cake should be bright red (not pink), only in this case the finished sponge cake will have a bright, rich color.
For coloring, it is recommended to use high-quality concentrated dyes. One of the most common is AmeriColor gel dyes (look at the photo to see what they look like). Shades of Super Red and RED RED in a 50/50 ratio (a teaspoon of each) are perfect for this cake! The cake layers will acquire a beautiful rich color. This time I used only one Super Red AmeriColor dye, the shade turned out not so beautiful, but still bright. 
So, the dough is ready. Now we prepare the baking dishes. I will bake the red sponge cake in three pans of the same size (diameter 18 cm), I will get three cake layers approximately 4-5 cm high, each of which can be cut into two more layers. The result is a tall, multi-layered cake.
If you bake a sponge cake in a large mold, for example, with a diameter of 26 cm, pour all the dough into the mold at once. Cut the finished cake into several layers. It is believed that the less dough is baked at one time, the juicier the cake inside. That is, if you choose between two options: bake one cake in a large-diameter mold and then cut it, or bake all three separately, I would recommend the latter option.
I line the bottom and sides of the pan with baking paper, which I trust. I pour the dough into molds and bake three biscuits at a time in a preheated oven for 30-40 minutes at 180 C.
The oven must be preheated to 180 C. This is very important! The biscuit dough should begin to bake immediately, without having time to settle.

We check the readiness of the biscuit with a wooden stick: inserted into the middle of the biscuit, it should not come out with wet lumps of dough. Next, let the biscuit stand for 10-15 minutes in the mold, after which we take it out and cool it completely on a wire rack. The baked cakes turn out incredibly tender and juicy.
There is another clever trick to make the cake even richer and moist. To do this, you need to wrap each completely cooled biscuit in cling film as tightly as possible and let it sit in the refrigerator for at least 2 hours. The moisture in the cake will not be able to escape from the crumb due to the film, but will be evenly distributed over its entire surface, saturating the biscuit.

I try to bake the sponge the night before I assemble the cake. I wrap it in film, leave it in the refrigerator overnight, and assemble the cake the next morning.
The Red Velvet cake was invented by American confectioners as a version of a wedding cake. Red is the color of passion, but the trick of this delicacy is not only in color, but in a small amount of cocoa, which is added to the biscuit and masked with scarlet dye.
You need to cut the biscuits when they have cooled completely, so they will crumble less and can be cut more evenly.
Cream cheese for red velvet cake
Cream cheese cream goes well with the color and taste of the cakes. I use it for both layering and leveling the cake.
To prepare the cream, we will use Hochland curd cream (you can substitute Philadelphia, Violette and other similar cheeses). Make sure that the packaging does not say “processed cheese”; it should say “creamy”.

Preparing the cream is very simple; no special skills are needed. First, beat the butter (115 g) with powdered sugar (100 g) at high speed, and then add the cream cheese and beat again.
The butter should be at room temperature, softened and well whipped.

Cream cheese, on the other hand, should be very cold, fresh from the refrigerator.

Mix all ingredients into a homogeneous cream. Place in a pastry bag (it makes it easier to apply even layers between the cake layers.)
On the You Tube channel there is a step-by-step video recipe for cream cheese, where I talk about all the little things and nuances of preparation, I invite you to watch:
Squeeze a small amount of cream onto the bottom of the dessert tray so that the bottom cake sticks thoroughly. This will make it easier for us to assemble the cake.

Squeeze the cream out of the pastry bag around the entire surface of the cake.

When the first sponge cake is completely covered, place the next cake layer on top and coat it with cream again.

I got 6 cake layers, I left one thin cake layer for preparing desserts in cups and decorating the cake.

Sometimes I don’t cut the biscuits, the cakes turn out thicker, as, for example, in the photo below.
Regardless of the size of the layers, the sponge cake is juicy and does not require soaking, so you can adjust the thickness of the cakes as you wish.
Be sure to make this cake! It is tasty, tender, and has a chocolate aftertaste.
The assembled cake should stand in the refrigerator for at least 2 hours for better soaking.
Bon appetit!
I'm very interested to see what kind of cakes you turned out. Attach a photo to the comment. If you have any questions, I'm happy to answer, don't hesitate to ask!
In contact with
- Butter 82.5% - 220 g
- Sugar - 395 g
- Eggs - 2 pcs
- Milk 3.5% – 250 g
- Flour - 365 g
- Baking powder - 10 g
- Cocoa - 10 g
- AmeriColor Red Red dye
Here is the most popular and beloved American classic by the whole world, the cake - “Red Velvet” (or “Red velvet cake”). Today you can find it anywhere in the world: in cafes, restaurants, confectionery shops and supermarkets. Many people still think that red velvet is just a sponge cake with dye and a rather loose dough. In fact, this is completely wrong. The most important thing is his cunning character. The red dough does not foretell any surprises, which is why everyone who tries it for the first time is sincerely surprised that at the very end, from somewhere, unexpectedly, a chocolate taste appears! And after that, you can no longer be the same. You'll become a fan of this dessert that looks amazingly delicious and has just enough chocolate flavor to make you happy. And, of course, don’t forget about the texture - every cake secretly dreams of such velvety quality.
There are thousands of recipes. Through experimentation, I found mine. All its advantages can be read in my post. In short, this is true American bliss. A noble cake that will make anyone fall in love with it in a fantastic way. Delicate, loose dough that will melt in your mouth and at the same time make perfect friends with cheese cream. It gives you the opportunity to enjoy a sweet dessert and receive a chocolate reward at the end. Perhaps this is the ideal compromise for two camps: ardent opponents of chocolate and weak-willed chocoholics like me. To bring the idea to the end, I use scraps, creating a velvet coating on the cake, so it can rightfully be called red velvet not only for its inner world, but also for its impeccable appearance. Catchy, bright and very appetizing, he says: “Stay away, with me you can lose your head forever.” In addition, I will tell you how to make decor - another American classic - marshmallow knots.
Andrey Rudkov
If you need any ingredient, confectionery equipment and equipment, come to my store - dvemorkovki.ru. I plan that it will become the most convenient store for those who love to cook. An up-to-date showcase, many payment and delivery methods (all over the world), I have my own store in Moscow and products that I select myself and ingredients that I use on the blog. Come in!
First of all, mix good butter 82.5% (220 g) and sugar (395 g) in a mixer bowl. The butter should be soft. Moreover, it will be good if you take it out of the refrigerator and use it immediately at the moment when it becomes soft.
Do not let the oil sit on the table for a long time, especially in the summer. This may negatively affect the final result.

At the same time, mix the dry ingredients of the future dough in a separate bowl: flour (365 g), baking powder (10 g) and alkalized cocoa(10 g). Use a whisk or even a mixer to make the mixture as smooth as possible.
You must understand that Red Velvet is a special cake; it is important to get a very noticeable chocolate aftertaste. Therefore, the quality of cocoa is very important. The ideal is alkalized cocoa, which has a much stronger taste, color and aroma. I wrote about this in a special post ““, read it!

When the butter and sugar are mixed into a homogeneous mass, you can move on.

You should get a fairly fluffy mass.


Stir the mixture and add half the dry ingredients.
Then half the milk again...

And we'll finish with the dry ingredients.

Make sure that the mass is smooth, homogeneous, pleasantly shiny and has a barely noticeable cocoa color. The dough should be elastic and hold its shape well.

When the basic assembly is ready, apply a final layer of cream, 8-10 mm thick, as I also told you.

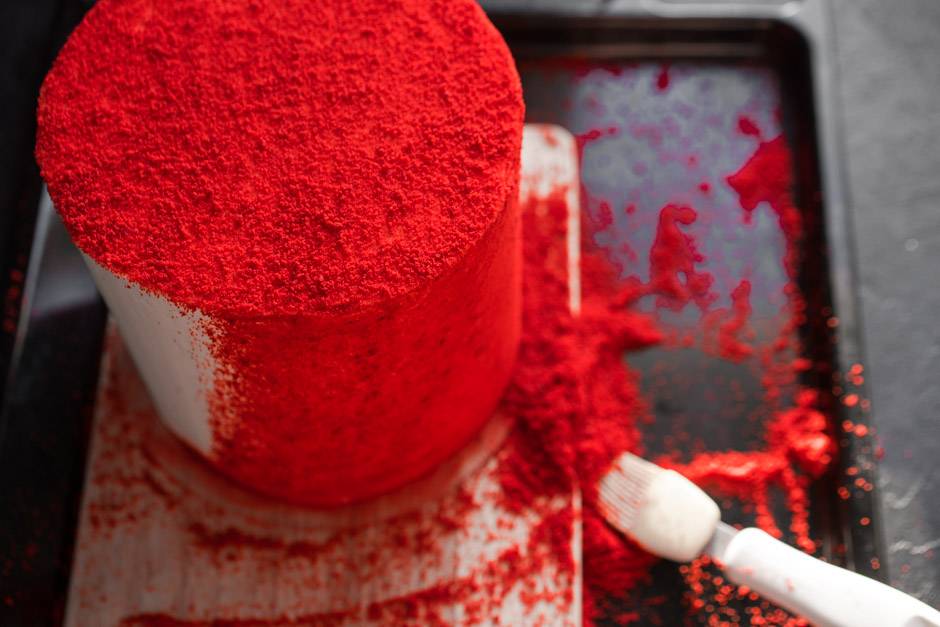
Crumble the resulting trimmings onto a baking sheet and place in the oven, preheated to 100-120 degrees. We need to make sure crackers. This will take approximately 60-80 minutes (depending on the size of the pieces). When baking, stir the scraps occasionally to ensure even drying.
Here it is better to keep them in the oven longer, the result will only be better. The main thing is not to rush.

After this, beat them into crumbs in a blender or food processor. It should be fine and dry, as if you had crushed Yubileiny cookies.

When the cake has stabilized and the cream has cooled enough to be touchable (touch it with your hand, if traces of the cream remain, return it to the refrigerator), place it on a baking sheet. Sprinkle crumbs generously over top.

And begin to carefully distribute the crumbs throughout the cake, while trying not only to cover the entire cake with crumbs, but also to remove the excess. Only then will you have a beautiful cake with right corners, and not a fluffy shapeless cake, as honey cakes are sometimes made in pastry shops)

A soft brush will help with this very well. Simply collect the crumbs at the bottom and roll upwards with the brush. This way it will come out neater and smoother. Step by step, cover the cake with crumbs and skim off any excess. Then you will get that same velvet coating.
I present to you my New Red Velvet with decor.

Here's our cut through six layers of stunning velvety red velvet.

Just notice how loose and tender it is.

Cake Recipes
An original American masterpiece, Red Velvet Cake is very easy to make at home. And the classic red velvet cake recipe is so simple.
3 hours
360 kcal
4.17/5 (29)
Kitchen appliances and utensils: bowl, mixer, baking dish.
Sweet tooth is about my family. And I very often spoil them with something delicious. While flipping through the pages of the Internet, I came across a new recipe for myself and tried to cook it. My sweet tooth appreciated the new product and from time to time asked to make more. This dessert is called Red Velvet or Red Velvet - after all, in its homeland, in the USA, it sounds like “Red Velvet”. This delicacy now serves as a decoration for our holiday table, and guests are delighted with its unusual color and delicate taste.

Original American masterpiece It is very easy to prepare at home, and the classic red velvet cake recipe is so simple that any housewife can handle it.
If you want to pamper your family with an exquisite dessert or surprise your beloved man, the Red Velvet cake is perfect for this purpose.
Before making the red velvet cake, I slightly changed the recipe, since I couldn’t find buttermilk and mascarpone, replacing them with regular full-fat kefir and cottage cheese.
General composition of red velvet cake
Biscuit
To prepare the cakes you need:
- flour – 300 g;
- granulated sugar – 300 g;
- vegetable oil – 1.5 cups;
- chicken egg – 4 pcs;
- full-fat kefir – 200 ml;
- cocoa powder – 50 g;
- baking powder or slaked soda - 2 tsp;
- red food coloring – 2-3 tsp.
Important! Vegetable oil should be odorless. It is better to use refined.
How to replace the dye?
If you make red velvet cake with beets, then you can do without the dye, which is also indicated in the recipe. To do this, take about 200 grams of boiled beets and grind them with a fine grater or blender. Add two tablespoons of lemon juice or vinegar. We put this paste into the dough.

More dye can be replaced any chopped fresh red fruits: cherries, currants, raspberries. You just don’t need to add acid to them.
Preparing the cakes

If you use a slow cooker, then in the next section I will tell you how to make cakes using it.
Sponge cake for red velvet cake in a slow cooker
Preparing the dough as mentioned above. Grease the bowl with oil. And we prepare each half of the dough 50 minutes in the "Baking" mode. Check with a toothpick for doneness. If necessary, add another 20-30 minutes.
Cakes prepared in this way, only without dye, can be used in.
In the meantime, our biscuit halves are cooling, we can make the cream.
Preparing the cream
To do this you need:
- butter – 120 g;
- cottage cheese – 300 g;
- granulated sugar – 200 g.

Red Velvet Cake Decoration

Options
- You can take twice as many ingredients and make two large biscuits which will need to be cut in half. This will make a four-layer cake.

Red Velvet Cake is, without a doubt, a festive dessert. Its rich red cake layers look very impressive against the background of snow-white cream, making the appearance of the cake quite original and sophisticated. In general, this unusual cake has American roots, but today it is baked by chefs from different countries, and if you are comfortable with food dyes and a large amount of fat in desserts, I suggest you try your hand at baking a Red Velvet cake at home.
The recipe for Red Velvet cake at home is quite accessible even to beginners, if you choose the right ingredients, follow the recipe and do not ignore the recommendations.
In general, nothing is difficult if you want to surprise your loved ones with a bright and unusually tasty dessert. So, let's prepare Red Velvet cake: a step-by-step recipe with photos at your service!
Ingredients:
For the cakes (22 cm tin):
- 220 ml. odorless vegetable oil;
- 280 ml. kefir;
- 275 gr. Sahara;
- 280 gr. flour;
- 3 eggs;
- 1 tbsp. with a slide of cocoa;
- 2 tsp baking powder;
- 1 tsp soda;
- 2-3 tsp. food coloring (red strawberries);
For cream:
- 220 gr. butter;
- 550 gr. cream cheese;
- 170 gr. powdered sugar.
How to make a classic red velvet cake:
First, mix flour, baking powder and cocoa powder in a separate dry cup, as required by the homemade Red Velvet cake recipe. The resulting mixture must be sifted through a fine sieve twice. This will make the dry red velvet cake mix as smooth as possible.

Pour the kefir into a convenient deep bowl and add soda to the kefir. Stir and wait a couple of minutes, the soda should be quenched with the kefir mass.

Then add odorless vegetable oil to the kefir. The absence of smell and any taste from the oil is a prerequisite, otherwise the taste of the Red Velvet cake layers will be irrevocably spoiled.

After the oil, add red food coloring to the bowl. If a gel dye is used, then it is simply added to the mass and mixed; if it is a powder dye, as in my version, then the dye is first diluted in a small amount of water and then added to the dough.
The dye should color the oil-kefir mass deep red. Depending on the intensity of the pigment, you may need one to three teaspoons of dry food coloring. Focus on the bright scarlet color of the dough, like in my photo.

Now in a deep and fairly spacious bowl, beat the eggs and sugar until light and fluffy.

Then we begin to introduce the prepared components one by one into this lush sugar-egg mass. First, add about half of the red butter-kefir mass. Mix with a mixer at the lowest speed.

Then add part of the flour mixture and mix the mixture again with a mixer at low speed.

Then we repeat. Add the second part of the red mass, mix, add the rest of the flour mixture, mix and get a thick dough of a rich dark red color.

Pour half of this unusual Red Velvet cake batter into a 20-22 cm pan lined with parchment along the bottom.

Bake the red sponge cake at 180 degrees for about 35-45 minutes. Use a wooden skewer to determine if the red velvet cake is ready.

The result should be two fairly tall sponge cakes. Let them cool on a wire rack. To make the Red Velvet Cake as even as possible when assembling, first cut off the protruding tops of both cake layers, and then cut the cakes lengthwise. The inside of the biscuits has a delicate, porous and fairly moist structure, so it is easiest to cut them with thread. We crush all the cut scraps into crumbs, which we will need to decorate the Red Velvet cake.

Prepare the cream for the Red Velvet cake:
For the cream, first beat soft butter at room temperature with powdered sugar until fluffy.

And then, slowing down the speed of the mixer, we begin to add the chilled cream cheese in parts. The result is a lush snow-white cream.

Since the cakes themselves have a fairly moist structure, there is no need to soak them with anything additional. Just put some of the snow-white cream on the cake, level it evenly and cover with the next cake.

We collect all the cakes. The Red Velvet cake turns out quite tall and even.

Use the remaining cream to spread a thin layer over the top of the cake and level the sides. And then sprinkle with red biscuit crumbs. You can sprinkle the entire cake, giving it a beautiful velvet look, or you can leave space around the edge of the top for cream patterns.
It is incredibly delicate and refined, with a silky, uniform texture. Evokes images of cheesecake, soufflé and grandma's village sour cream. At the same time, the cream is thick and retains its shape well - you can use it to smooth out cakes and create fancy decorations.
Does it seem difficult to prepare such a delicacy? Not at all. Try making red velvet buttercream from the mixture "Vanilla frosting S. Pudov". Just beat the mixture with 200-250 grams of butter. In just 3-4 minutes, the delicious, long-lasting cream for the cake is ready. Easy, right? And imagination is not limited. Any decorations made from butter cream hold their shape well and retain their original appearance.
If you decide to follow the rules and bake an original cake, you will have to spend a little more time on the cream. For the classic Red Velvet recipe, the so-called “cream cheese” is used - a cream based on cream cheese. Not everyone is familiar with it, as it came to us recently from Western cooking. Abroad, cheese cream for cake is prepared from mascarpone, ricotta or Philadelphia. Well, Russian magicians use more affordable creamy curd cheese. In any case, the Vanilla Frosting mixture will come in handy. It makes the right cream for a cake from almost any cheese!
Recipe for red velvet cream based on Philadelphia cheese
Since Red Velvet is American, let's start with the classic recipe for Philadelphia American cheese cream. To produce it, pasteurized milk is taken, which is fermented and then heated.
Beat 170 g of softened butter with 100 g of mixture "Frosting vanilla" about 10 minutes. Add a tablespoon of milk and 180 g of classic Philadelphia cream cheese. Mix everything thoroughly with a wooden spatula. You can cover the cake.
Cream cheese cake cream
Philadelphia is produced by only one company, and it is not easy to find for sale. Therefore, more affordable analogues are also suitable - creamy curd cheeses from the nearest supermarket (Hochland, Almette, Kaymak, etc.) But choose wisely. A good natural product should contain milk or cream, a bacterial starter and salt. If preservatives are indicated, it is better to leave such a product in the store. And no vague “cheese products” - just the word “cheese”.
You can reduce the amount of butter by increasing the amount of cheese. Mix 1 package "Frosting Vanilla" and 115 g softened butter. Beat (5-7 minutes) and add approximately 340 g of cold cream cheese.
Cream cheese cream
Traditional cream cheese cake can be made lighter by replacing the butter with whipped cream.
Whip 300 g of cold cream 33% until the consistency becomes thick. Separately mix 100 g of the mixture "Frosting vanilla" and 400-500 g of cream cheese, beat a little. Next, you should gradually add cream to the resulting cheese mass and stir gently so that the mass does not fall off.
Low-calorie cream for red velvet cake
A low-fat cheese option is ricotta. Suitable for dietary nutrition, as it is based on skim cow's or goat's milk. Although the whole thing is not excluded. Use this delicate, sweetish cheese in the cream recipe so that your conscience is calm regarding the calories you eat.
Salt, which is present in curd cheese, enhances the taste of the cream and makes it less cloying. In the case of cottage cheese or ricotta, you can add a little sea salt for the same purpose.
For a light low-calorie cream, low-fat cheese (ricotta) or soft cottage cheese 0% is used as a basis. It is enough to beat the dairy product with a sweetener (without butter or cream) and put the cream in the refrigerator for a couple of hours. Add a substitute according to taste and shape.