What experiment can you do at home? Chemical and physical experiments for children at home
Children are always trying to learn something new every day and they always have a lot of questions. They can explain certain phenomena, or they can clearly show how this or that thing, this or that phenomenon works. In these experiments, children will not only learn something new, but also learn how to create different crafts with which they can then play.
1. Experiments for children: lemon volcano
You will need:
– 2 lemons (for 1 volcano)
- baking soda
– food coloring or watercolor paints
- dishwashing liquid
– wooden stick or spoon (if desired)
- tray.

1. Cut off the bottom of the lemon so it can be placed on a flat surface.
2. On the back side, cut out a piece of lemon as shown in the image.
* You can cut off half a lemon and make an open volcano.

3. Take the second lemon, cut it in half and squeeze the juice into a cup. This will be the reserved lemon juice.
4. Place the first lemon (with the cut out part) on the tray and use a spoon to “remember” the lemon inside to squeeze out some of the juice. It is important that the juice is inside the lemon.
5. Add food coloring or watercolor inside the lemon, but do not stir.

6. Pour dish soap inside the lemon.
7. Add a full spoon of baking soda to the lemon. The reaction will begin. You can use a stick or spoon to stir everything inside the lemon - the volcano will begin to foam.

8. To make the reaction last longer, you can gradually add more soda, dyes, soap and reserve lemon juice.
2. Home experiments for children: electric eels made from chewing worms

You will need:
– 2 glasses
– small capacity
– 4-6 gummy worms
– 3 tablespoons baking soda
– 1/2 spoon of vinegar
– 1 cup of water
– scissors, kitchen or stationery knife.
1. Using scissors or a knife, cut lengthwise (precisely lengthwise - it won't be easy, but be patient) each worm into 4 (or more) pieces.
* The smaller the piece, the better.
*If the scissors do not cut properly, try washing them with soap and water.

2. Mix water and baking soda in a glass.
3. Add pieces of worms to the solution of water and soda and stir.
4. Leave the worms in the solution for 10-15 minutes.
5. Using a fork, transfer the worm pieces to a small plate.
6. Pour half a spoon of vinegar into an empty glass and start putting worms into it one by one.

* The experiment can be repeated if you wash the worms with plain water. After a few attempts, your worms will begin to dissolve, and then you will have to cut a new batch.
3. Experiments and experiments: a rainbow on paper or how light is reflected on a flat surface

You will need:
– bowl of water
– clear nail polish
- small pieces of black paper.
1. Add 1-2 drops of clear nail polish to a bowl of water. Watch how the varnish spreads through the water.
2. Quickly (after 10 seconds) dip a piece of black paper into the bowl. Take it out and let it dry on a paper towel.

3. After the paper has dried (this happens quickly) start turning the paper and look at the rainbow that appears on it.
* To better see a rainbow on paper, look at it under the sun's rays.


4. Experiments at home: rain cloud in a jar

As small drops of water accumulate in a cloud, they become heavier and heavier. Eventually they will reach such a weight that they can no longer remain in the air and will begin to fall to the ground - this is how rain appears.
This phenomenon can be shown to children using simple materials.
You will need:
- shaving foam
- food coloring.
1. Fill the jar with water.
2. Apply shaving foam on top - it will be a cloud.
3. Have your child start dripping food coloring onto the “cloud” until it starts to “rain” - drops of coloring begin to fall to the bottom of the jar.
During the experiment, explain this phenomenon to your child.

You will need:
– warm water
- sunflower oil
– 4 food colors
1. Fill the jar 3/4 full with warm water.

2. Take a bowl and stir 3-4 tablespoons of oil and a few drops of food coloring in it. In this example, 1 drop of each of the 4 dyes was used - red, yellow, blue and green.

3. Using a fork, stir the coloring and oil.

4. Carefully pour the mixture into a jar of warm water.

5. Watch what happens - the food coloring will begin to slowly fall through the oil into the water, after which each drop will begin to disperse and mix with the other drops.
* Food coloring dissolves in water, but not in oil, because... The density of oil is less than water (that’s why it “floats” on water). The dye droplet is heavier than the oil, so it will begin to sink until it reaches the water, where it will begin to disperse and look like a small fireworks display.
6. Interesting experiments: in a circle in which the colors merge
You will need:
– a wheel cut out of paper, painted in rainbow colors
– elastic band or thick thread
– cardboard
- glue stick
- scissors
– skewer or screwdriver (to make holes in the paper wheel).

1. Select and print the two templates you want to use.

2. Take a piece of cardboard and use a glue stick to glue one template to the cardboard.
3. Cut out the glued circle from cardboard.
4. Glue the second template to the back of the cardboard circle.
5. Use a skewer or screwdriver to make two holes in the circle.

6. Thread the thread through the holes and tie the ends into a knot.
Now you can spin your top and watch how the colors merge on the circles.


7. Experiments for children at home: jellyfish in a jar

You will need:
– a small transparent plastic bag
– transparent plastic bottle
- food coloring
- scissors.

1. Place the plastic bag on a flat surface and smooth it out.
2. Cut off the bottom and handles of the bag.
3. Cut the bag lengthwise on the right and left so that you have two sheets of polyethylene. You will need one sheet.
4. Find the center of the plastic sheet and fold it like a ball to make a jellyfish head. Tie a thread in the area of the “neck” of the jellyfish, but not too tightly - you need to leave a small hole through which to pour water into the jellyfish’s head.
5. There is a head, now let's move on to the tentacles. Make cuts in the sheet - from the bottom to the head. You need approximately 8-10 tentacles.
6. Cut each tentacle into 3-4 smaller pieces.

7. Pour some water into the jellyfish's head, leaving room for air so the jellyfish can "float" in the bottle.
8. Fill a bottle with water and put your jellyfish in it.

9. Add a couple drops of blue or green food coloring.
* Close the lid tightly to prevent water from spilling out.
* Let the children turn the bottle over and watch the jellyfish swim in it.
8. Chemical experiments: magic crystals in a glass

You will need:
– glass glass or bowl
– plastic bowl
– 1 cup Epsom salts (magnesium sulfate) – used in bath salts
– 1 cup hot water
- food coloring.
1. Place Epsom salts in a bowl and add hot water. You can add a couple of drops of food coloring to the bowl.
2. Stir the contents of the bowl for 1-2 minutes. Most of the salt granules should dissolve.

3. Pour the solution into a glass or glass and place it in the freezer for 10-15 minutes. Don't worry, the solution is not so hot that the glass will crack.
2In high school, people start studying chemistry no earlier than the 8th grade; children perceive this science as too difficult. But you can prepare a student for the subject in a very simple and non-boring way - by organizing a chemistry experiment at home. Such mini-experiments will help you look at science from a different perspective, and showing “chemical tricks” at a children’s party will significantly increase the degree of fun.
Fireproof banknote
To perform an incredibly impressive but simple trick, you will need:
- bill;
- aqueous-alcohol solution with an alcohol content of about 50%;
- salt;
- tweezers or tweezers.
A pinch of salt must be added to the solution. Next, a bill is placed into the solution using tweezers. For those who are conducting such an experiment in chemistry for the first time, it is better to take a banknote of a lower denomination!
After the money is thoroughly wet, you should pick it up again with tweezers and lightly shake off the excess liquid from the paper. Now you can set it on fire! The fire will pass through the entire bill, but not a single edge will even turn brown. This happens because the alcohol contained in the solution burns. In turn, the water with which the paper is saturated does not have time to evaporate.
Crystal eggs

Growing crystals is one of the popular hobbies that entertaining chemistry offers. Experiments with crystallization are most often carried out on sugar, but sugar crystals no longer surprise anyone. We offer a new and unusual sight - crystals grown on eggs!
Crystal eggs can be obtained using:
- alum (sold in pharmacies);
- PVA glue;
- dyes.
The crystals on the eggs will grow very quickly, in just a day. It is necessary to first wash the shell and dry it thoroughly. After which the eggs are smeared with glue and sprinkled with alum. Now they need to lie down for several hours to dry again.
Next, the dye must be dissolved in two glasses of plain water. You can choose the amount of dye yourself; in this case, only the intensity of the color of the crystals depends on it. The eggs are placed in the dye for a day or a day. The longer the egg sits in the solution, the larger the crystals grow. It is worth taking out the finished crystal eggs carefully - they are quite fragile.
Balloon on a bottle
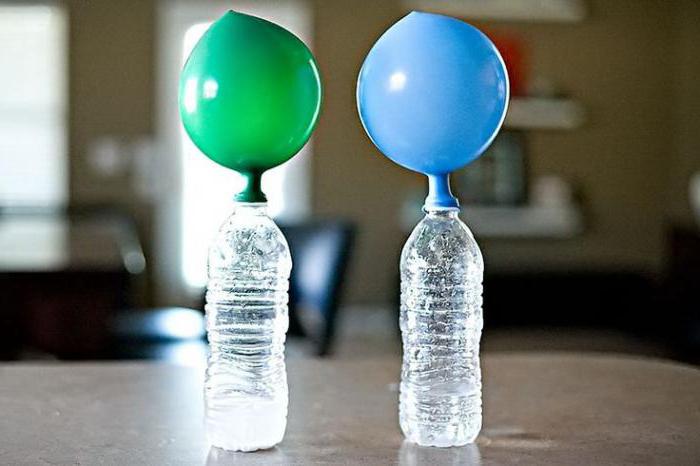
How can you inflate a balloon without helium without any physical effort? To do this, you can use regular baking soda and vinegar, which are in every mother’s kitchen cupboard. To conduct this experiment in chemistry, you will need:
- balloon;
- bottle;
- 3-4 teaspoons of soda;
- table vinegar.
The soda is poured directly into the ball using a funnel or spoon. After which it is put on a bottle with a small amount of vinegar. As soon as the soda from the balloon begins to spill into the bottle, it begins to swell, as if from helium. This happens because vinegar reacts with baking soda, releasing carbon dioxide. The balloon is inflated thanks to the gas in a few seconds, just catch it!
Multi-colored layers in a bottle

The following chemistry experiment will clearly explain to your child the concept of liquid density. For this you will need:
- a quarter cup of sunflower oil;
- a quarter glass of water, tinted in any bright color;
- a quarter cup of sugar syrup (to make the trick more effective, you should also add coloring to it).
The child can predict in advance what will happen when all these liquids are mixed. He will like the result - the syrup will settle down as the densest one, the water will be located in the middle, and the oil will remain on top. You can experiment with colors and liquids, creating unimaginable compositions. For example, by adding different amounts of sugar to syrup, you can get several liquids of different densities.
Laboratory experiments in chemistry can be anything but boring. These eye-catching yet simple tricks will help encourage your child to study science and will simply provide some entertainment on a rainy day.
Chemist is a very interesting and multifaceted profession, uniting under its wing many different specialists: chemical scientists, chemical technologists, analytical chemists, petrochemists, chemistry teachers, pharmacists and many others. We decided to celebrate the upcoming Chemist’s Day 2017 with them, so we selected several interesting and impressive experiments in the field under consideration, which even those who are as far from the profession of a chemist as possible can repeat. The best chemical experiments at home - read, watch and remember!
When is Chemist's Day celebrated?
Before we begin to consider our chemical experiments, let us clarify that traditionally Chemist’s Day is celebrated in the countries of the post-Soviet space at the very end of spring, namely on the last Sunday of May. This means that the date is not fixed: for example, in 2017 Chemist’s Day is celebrated on May 28. And if you work in the chemical industry, or are studying a specialty in this area, or are otherwise directly related to chemistry on duty, then you have every right to join the celebration on this day.
Chemical experiments at home
Now let's get down to the main thing and begin to perform interesting chemical experiments: it is best to do this together with young children, who will definitely perceive what is happening as a magic trick. Moreover, we tried to select chemical experiments for which reagents can be easily obtained at a pharmacy or store.
Experiment No. 1 - Chemical traffic light
Let's start with a very simple and beautiful experiment, which received this name for good reason, because the liquid participating in the experiment will change its color exactly to the colors of the traffic light - red, yellow and green.
You will need:
- indigo carmine;
- glucose;
- caustic soda;
- water;
- 2 transparent glass containers.
Don't let the names of some ingredients scare you - you can easily buy glucose tablets at a pharmacy, indigo carmine is sold in stores as a food coloring, and you can find caustic soda in a hardware store. It is better to take tall containers, with a wide base and a narrower neck, for example, flasks, to make them easier to shake.


But what is interesting about chemical experiments is that there is an explanation for everything:
- By mixing glucose with caustic soda, i.e. sodium hydroxide, we obtained an alkaline solution of glucose. Then, by mixing it with a solution of indigo carmine, we oxidize the liquid with oxygen, which it was saturated with during pouring from the flask - this is the reason for the appearance of the green color. Next, glucose begins to work as a reducing agent, gradually changing color to yellow. But by shaking the flask, we saturate the liquid with oxygen again, allowing the chemical reaction to go through this circle again.
You will get an idea of how interesting it looks in real life from this short video:
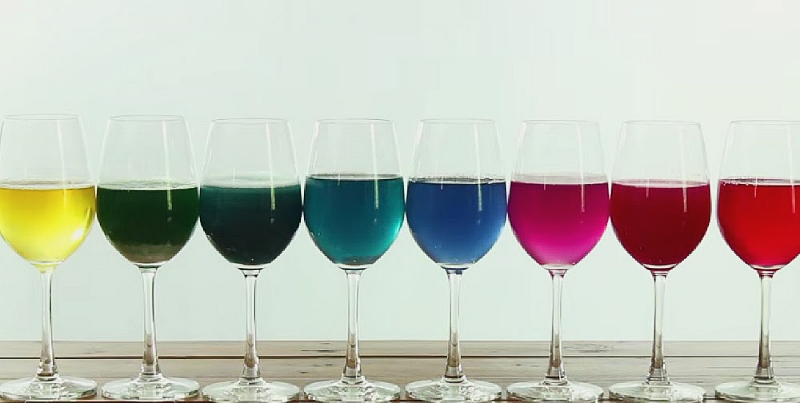
Experiment No. 2 - Universal acidity indicator from cabbage
Children love interesting chemical experiments with colorful liquids, it’s no secret. But we, as adults, responsibly declare that such chemical experiments look very spectacular and interesting. Therefore, we advise you to conduct another “color” experiment at home - a demonstration of the amazing properties of red cabbage. It, like many other vegetables and fruits, contains anthocyanins - natural indicator dyes that change color depending on the pH level - i.e. degree of acidity of the environment. This property of cabbage will be useful to us in order to obtain further multi-colored solutions.
What we need:
- 1/4 red cabbage;
- lemon juice;
- baking soda solution;
- vinegar;
- sugar solution;
- Sprite type drink;
- disinfectant;
- bleach;
- water;
- 8 flasks or glasses.
Many of the substances on this list are quite dangerous, so be careful when performing simple chemical experiments at home, wear gloves and, if possible, safety glasses. And don’t let children get too close - they may knock over the reagents or the final contents of the colored cones and even want to try them, which should not be allowed.

Let's get started:

How do these chemical experiments explain the color changes?
- The fact is that light falls on all objects that we see - and it contains all the colors of the rainbow. Moreover, each color in the spectrum has its own wavelength, and molecules of different shapes, in turn, reflect and absorb these waves. The wave that is reflected from the molecule is the one that we see, and this determines what color we perceive - because other waves are simply absorbed. And depending on what substance we add to the indicator, it begins to reflect only rays of a certain color. Nothing complicated!
For a slightly different version of this chemical experiment, with fewer reagents, see the video:
Experiment No. 3 - Dancing jelly worms
We continue to do chemical experiments at home - and we will conduct the third experiment on everyone’s favorite jelly candies in the form of worms. Even adults will find it funny, and children will be absolutely delighted.
Take the following ingredients:
- a handful of gummy worms;
- vinegar essence;
- ordinary water;
- baking soda;
- glasses - 2 pcs.

When choosing suitable candies, choose smooth, chewy worms without sugar coating. To make them less heavy and easier to move, cut each candy lengthwise into two halves. So, let's begin some interesting chemical experiments:
- Make a solution of warm water and 3 tablespoons of soda in one glass.
- Place the worms there and keep them there for about fifteen minutes.
- Fill another deep glass with essence. Now you can slowly drop the jellies into the vinegar, watching how they begin to move up and down, which is in some way similar to a dance:
Why is this happening?
- It's simple: baking soda, in which the worms are soaked for a quarter of an hour, is sodium bicarbonate, and the essence is an 80% solution of acetic acid. When they react, water, carbon dioxide in the form of small bubbles and sodium salt of acetic acid are formed. It is carbon dioxide in the form of bubbles that the worm becomes overgrown with, rises up, and then descends when they burst. But the process still continues, causing the candy to rise on the resulting bubbles and fall until it is completely completed.
And if you are seriously interested in chemistry, and want Chemist’s Day to become your professional holiday in the future, then you will probably be interested in watching the following video, which details the typical everyday life of chemistry students and their fascinating educational and scientific activities:
Take it for yourself and tell your friends!
Read also on our website:
show more
Our presentation of entertaining physics will tell you why in nature there cannot be two identical snowflakes and why an electric locomotive driver backs up before moving, where the largest reserves of water are located, and what invention of Pythagoras helps fight alcoholism.
And learn with them peace and wonders of physical phenomena? Then we invite you to our “experimental laboratory”, in which we will tell you how to create simple, but very interesting experiments for children.
Experiments with eggs
Egg with salt
The egg will sink to the bottom if you place it in a glass of plain water, but what happens if you add salt? The result is very interesting and can clearly show interesting facts about density.
You will need:
- Salt
- Tumbler.
Instructions:
1. Fill half the glass with water.
2. Add a lot of salt to the glass (about 6 tablespoons).
3. We interfere.
4. Carefully lower the egg into the water and watch what happens.
Explanation
Salt water has a higher density than regular tap water. It is the salt that brings the egg to the surface. And if you add fresh water to the existing salt water, the egg will gradually sink to the bottom.
Egg in a bottle

Did you know that a boiled whole egg can easily be placed in a bottle?
You will need:
- A bottle with a neck diameter smaller than the diameter of an egg
- Hard boiled egg
- Matches
- Some paper
- Vegetable oil.
Instructions:
1. Lubricate the neck of the bottle with vegetable oil.
2. Now set fire to the paper (you can just use a few matches) and immediately throw it into the bottle.
3. Place an egg on the neck.
When the fire goes out, the egg will be inside the bottle.
Explanation
The fire provokes heating of the air in the bottle, which comes out. After the fire goes out, the air in the bottle will begin to cool and compress. Therefore, a low pressure is created in the bottle, and the external pressure forces the egg into the bottle.
Ball experiment

This experiment shows how rubber and orange peel interact with each other.
You will need:
- Balloon
- Orange.
Instructions:
1. Inflate the balloon.
2. Peel the orange, but do not throw away the orange peel (zest).
3. Squeeze the orange zest over the ball until it pops.
Explanation.
Orange zest contains the substance limonene. It is capable of dissolving rubber, which is what happens to the ball.
Candle experiment

An interesting experiment showing ignition of a candle from a distance.
You will need:
- Regular candle
- Matches or lighter.
Instructions:
1. Light a candle.
2. After a few seconds, put it out.
3. Now bring the burning flame close to the smoke coming from the candle. The candle will start burning again.
Explanation
The smoke rising from an extinguished candle contains paraffin, which quickly ignites. The burning paraffin vapor reaches the wick, and the candle begins to burn again.
Soda with vinegar

A balloon that inflates itself is a very interesting sight.
You will need:
- Bottle
- Glass of vinegar
- 4 teaspoons soda
- Balloon.
Instructions:
1. Pour a glass of vinegar into the bottle.
2. Pour baking soda into the ball.
3. We put the ball on the neck of the bottle.
4. Slowly place the ball vertically while pouring the baking soda into the bottle with vinegar.
5. We watch the balloon inflate.
Explanation
If you add baking soda to vinegar, a process called soda slaking occurs. During this process, carbon dioxide is released, which inflates our balloon.
Invisible ink

Play secret agent with your child and create your own invisible ink.
You will need:
- Half a lemon
- Spoon
- A bowl
- Cotton swab
- White paper
- Lamp.
Instructions:
1. Squeeze some lemon juice into a bowl and add the same amount of water.
2. Dip a cotton swab into the mixture and write something on white paper.
3. Wait until the juice dries and becomes completely invisible.
4. When you are ready to read the secret message or show it to someone else, heat the paper by holding it close to a light bulb or fire.
Explanation
Lemon juice is an organic substance that oxidizes and turns brown when heated. Diluted lemon juice in water makes it hard to see on paper, and no one will know there is lemon juice until it warms up.
Other substances which work on the same principle:
- Orange juice
- Milk
- Onion juice
- Vinegar
- Wine.
How to make lava

You will need:
- Sunflower oil
- Juice or food coloring
- Transparent vessel (can be a glass)
- Any effervescent tablets.
Instructions:
1. First, pour the juice into a glass so that it fills approximately 70% of the container’s volume.
2. Fill the rest of the glass with sunflower oil.
3. Now wait until the juice separates from the sunflower oil.
4. We throw a tablet into a glass and observe an effect similar to lava. When the tablet dissolves, you can throw another one.
Explanation
Oil separates from water because it has a lower density. Dissolving in the juice, the tablet releases carbon dioxide, which captures parts of the juice and lifts it to the top. The gas leaves the glass completely when it reaches the top, causing the juice particles to fall back down.
The tablet fizzes due to the fact that it contains citric acid and soda (sodium bicarbonate). Both of these ingredients react with water to form sodium citrate and carbon dioxide gas.
Ice experiment

At first glance, you might think that the ice cube on top will eventually melt, which should cause the water to spill, but is this really so?
You will need:
- Cup
- Ice cubes.
Instructions:
1. Fill the glass with warm water to the very top.
2. Carefully lower the ice cubes.
3. Watch the water level carefully.
As the ice melts, the water level does not change at all.
Explanation
When water freezes to ice, it expands, increasing its volume (which is why even heating pipes can burst in winter). The water from melted ice takes up less space than the ice itself. Therefore, when the ice cube melts, the water level remains approximately the same.
How to make a parachute

find out about air resistance, making a small parachute.
You will need:
- Plastic bag or other lightweight material
- Scissors
- A small load (possibly some kind of figurine).
Instructions:
1. Cut a large square from a plastic bag.
2. Now we cut the edges so that we get an octagon (eight identical sides).
3. Now we tie 8 pieces of thread to each corner.
4. Don't forget to make a small hole in the middle of the parachute.
5. Tie the other ends of the threads to a small weight.
6. We use a chair or find a high point to launch the parachute and check how it flies. Remember that the parachute should fly as slowly as possible.
Explanation
When the parachute is released, the weight pulls it down, but with the help of the lines, the parachute takes up a large area that resists the air, causing the weight to slowly descend. The larger the surface area of the parachute, the more that surface resists falling, and the slower the parachute will descend.
A small hole in the middle of the parachute allows air to flow through it slowly, rather than having the parachute tumble to one side.
How to make a tornado

Find out, how to make a tornado in a bottle with this fun science experiment for kids. The items used in the experiment are easy to find in everyday life. Made home mini tornado much safer than the tornadoes shown on television in the American steppes.
At-home experiments are a great way to introduce children to the basics of physics and chemistry, and make complex, abstract laws and terms easier to understand through visual demonstrations. Moreover, to carry them out you do not need to acquire expensive reagents or special equipment. After all, without thinking, we carry out experiments every day at home - from adding slaked soda to dough to connecting batteries to a flashlight. Read on to learn how to conduct interesting experiments easily, simply, and safely.
Chemical experiments at home
Does the image of a professor with a glass flask and singed eyebrows immediately come to mind? Don't worry, our chemical experiments at home are completely safe, interesting and useful. Thanks to them, the child will easily remember what exo- and endothermic reactions are and what the difference is between them.
So let's make hatchable dinosaur eggs that can be used as bath bombs.
For the experience you need:
- small dinosaur figurines;
- baking soda;
- vegetable oil;
- lemon acid;
- food coloring or liquid watercolor paints.
Procedure for conducting the experiment
- Place ½ cup baking soda in a small bowl and add about ¼ tsp. liquid colors (or dissolve 1-2 drops of food coloring in ¼ teaspoon of water), mix the baking soda with your fingers to create an even color.
- Add 1 tbsp. l. citric acid. Mix dry ingredients thoroughly.
- Add 1 tsp. vegetable oil.
- You should have a crumbly dough that barely sticks together when pressed. If it doesn’t want to stick together at all, then slowly add ¼ tsp. butter until you reach the desired consistency.
- Now take the dinosaur figurine and mold the dough into an egg shape. It will be very fragile at first, so you should set it aside overnight (at least 10 hours) to harden.
- Then you can start a fun experiment: fill the bathtub with water and throw an egg into it. It will fizz furiously as it dissolves in the water. It will be cold when touched because it is an endothermic reaction between an acid and alkali, absorbing heat from the environment.

Please note that the bath may become slippery due to the addition of oil.
Elephant toothpaste
Experiments at home, the results of which can be felt and touched, are very popular with children. That includes this fun project that ends with lots of dense, fluffy colored foam.
To carry it out you will need:
- safety glasses for children;
- dry active yeast;
- warm water;
- hydrogen peroxide 6%;
- dishwashing detergent or liquid soap (not antibacterial);
- funnel;
- plastic glitter (necessarily non-metallic);
- food colorings;
- 0.5 liter bottle (it is best to take a bottle with a wide bottom for greater stability, but a regular plastic one will do).

The experiment itself is extremely simple:
- 1 tsp. dilute dry yeast in 2 tbsp. l. warm water.
- In a bottle placed in a sink or dish with high sides, pour ½ cup of hydrogen peroxide, a drop of dye, glitter and a little dishwashing liquid (several presses on the dispenser).
- Insert the funnel and pour in the yeast. The reaction will begin immediately, so act quickly.
The yeast acts as a catalyst and accelerates the release of hydrogen peroxide, and when the gas reacts with soap, it creates a huge amount of foam. This is an exothermic reaction, releasing heat, so if you touch the bottle after the “eruption” has stopped, it will be warm. Since the hydrogen immediately evaporates, you're left with just soap scum to play with.
Physics experiments at home
Did you know that lemon can be used as a battery? True, very low-power. Experiments at home with citrus fruits will demonstrate to children the operation of a battery and a closed electrical circuit.
For the experiment you will need:
- lemons - 4 pcs.;
- galvanized nails - 4 pcs.;
- small pieces of copper (you can take coins) - 4 pcs.;
- alligator clips with short wires (about 20 cm) - 5 pcs.;
- small light bulb or flashlight - 1 pc.

Let there be light
Here's how to do the experiment:
- Roll on a hard surface, then squeeze the lemons lightly to release the juice inside the skins.
- Insert one galvanized nail and one piece of copper into each lemon. Place them on the same line.
- Connect one end of the wire to a galvanized nail and the other to a piece of copper in another lemon. Repeat this step until all the fruits are connected.
- When you're done, you should be left with 1 nail and 1 piece of copper that are not connected to anything. Prepare your light bulb, determine the polarity of the battery.
- Connect the remaining piece of copper (plus) and the nail (minus) to the plus and minus of the flashlight. Thus, a chain of connected lemons is a battery.
- Turn on a light bulb that will run on fruit energy!
To repeat such experiments at home, potatoes, especially green ones, are also suitable.
How it works? The citric acid found in lemon reacts with two different metals, which causes the ions to move in one direction, creating an electrical current. All chemical sources of electricity operate on this principle.
Summer fun
You don't have to stay indoors to do some experiments. Some experiments will work better outside, and you won't have to clean anything up after they're done. These include interesting experiments at home with air bubbles, not simple ones, but huge ones.

To make them you will need:
- 2 wooden sticks 50-100 cm long (depending on the age and height of the child);
- 2 metal screw-in ears;
- 1 metal washer;
- 3 m of cotton cord;
- bucket with water;
- any detergent - for dishes, shampoo, liquid soap.
Here's how to conduct spectacular experiments for children at home:
- Screw metal tabs into the ends of the sticks.
- Cut the cotton cord into two parts, 1 and 2 m long. You may not strictly adhere to these measurements, but it is important that the proportion between them is maintained at 1 to 2.
- Place a washer on a long piece of rope so that it hangs evenly in the center, and tie both ropes to the eyes on the sticks, forming a loop.
- Mix a small amount of detergent in a bucket of water.
- Gently dip the loop of the sticks into the liquid and begin blowing giant bubbles. To separate them from each other, carefully bring the ends of the two sticks together.

What is the scientific component of this experiment? Explain to children that bubbles are held together by surface tension, the attractive force that holds the molecules of any liquid together. Its effect is manifested in the fact that spilled water collects into drops, which tend to take on a spherical shape, as the most compact of all existing in nature, or in the fact that water, when poured, collects into cylindrical streams. The bubble has a layer of liquid molecules on both sides sandwiched by soap molecules, which increase its surface tension when distributed over the surface of the bubble and prevent it from quickly evaporating. While the sticks are kept open, the water is held in the form of a cylinder; as soon as they are closed, it tends to a spherical shape.
These are the kinds of experiments you can do at home with children.