DIY gingerbread house. Gingerbread dough: recipe
Hello, friends! How are you? What's new? How do you spend your time? And again I wanted something sweet, and so to speak, so that it would turn anyone’s head. Today we will prepare a house, but not a simple one, but a gingerbread one.
How cool it looks, especially if you baked it for the New Year or Christmas, because it can be decorated in a winter style, which means that there will be snow on the roof, and patterns can be drawn on the windows.
I wish that after reading this post, you will not only be able to bake these delicious treats, but also share your thoughts about it below this article. By the way, you can also do this for such houses, it will be delicious and fun. There will definitely not be anyone indifferent, you’ll see!
Where does the construction of any house begin? Of course, from his project, let it be residential, toy or even edible, as in our case. Yes, and I tell you this condition for a reason, and you yourself understand everything perfectly well. In a nutshell, you first have to make mock-ups, or what you call them, blanks of all the parts.
This is not so difficult to do. After all, you can find such works on the Internet or draw yourself, be it small or large details.

So, the first stage of work is drawing individual details of the future house. I suggest you use a ready-made life-size template of a small small house, here it is:

Or you can take this diagram as a basis and make different versions of large houses:

In general, you can use the following trick and literally in a couple of minutes make stencils with your own hands from a regular A4 sheet. How, see for yourself.
This is the simplest master class, even a beginner or first grader can do it. This is the result, as it turns out in this photo, it looks harmonious and all the details are like a glove, which means that you did everything right.

We will need:
- A4 sheet of paper - 3 pcs.
Stages of work:
1. Fold a sheet of A4 paper in half. This will be the roof.

2. We bend the second sheet like an airplane; we all made them once in childhood. This will be a wall, it will be a little larger than the roof, so remove a little of the excess.

3. In this case, I think everything is clear here, because you know all the outlines of the house.
 4. And this is what should happen.

5. From the third sheet you must make a copy of the second sheet, that is, another wall.
6. Next, cut off one half from the roof model, and make a side wall from the other, remember that gingerbread walls are thicker than a sheet of paper and therefore make extra. It’s better to design all this, just like it is shown in the photo.


7. You should end up with two of each piece.

Making gingerbread dough at home
You can use any recipe for gingerbread dough as a basis. Remember in the last article we made gingerbread cookies from different ingredients, but most of all I like the recipe with gingerbread and honey. You are already familiar with it, but for those who are on my site for the first time, I remind you how to make it.
We will need:
- granulated sugar - 450 g
- boiling water - 1 tbsp.
- butter - 160 g
- honey - 450 g
- egg - 3 pcs.
- soda - 1 tsp
- salt - a pinch
- cocoa powder - 2 tsp
- spices: cardamom, cinnamon, nutmeg, ground ginger 0.5 tsp each
- flour - 1.3 kg

Cooking method:
1. Mix all the spices together in one container. Next, pour some of the granulated sugar into a pan with a thick bottom and make a burnt mixture. The sugar should melt over medium heat.
Important! Make sure that the sugar does not burn, otherwise there will be an unpleasant hint of bitterness.

2. As soon as the color turns deep brown, pour in 1 cup of boiling water. Everything will sizzle and bubble, stir and continue cooking, add the remaining sugar. Remember to stir constantly, cook for about 4 minutes.

3. Sugar crystals should completely dissolve. Remove the hot pan from the stove and let it cool just a little for just a couple of minutes, then add all the honey and butter. Stir. The butter should melt into the hot mixture. Sift 1 cup of flour through a sieve, stir and cool to room temperature.

5. While the mixture is cooling, sift the remaining flour and all the spices, cocoa and salt with soda in another container.

6. Scramble the eggs with a fork and add them to the already warm gingerbread dough, stir. Add the remaining flour mixture in portions.

8. When it becomes very difficult to use a spatula, sprinkle the work surface with flour and knead the dough.

9. You will get such a ball, gradually the dough will become obedient and soft, do not use all the flour, feel it, it should stick to your hands and the table, but not critical.

10. Cut it into 4 parts and place it in the refrigerator for 1 day.

11. At the same time, do not forget to put each piece in a separate food bag so that it does not get airy.


Step-by-step instructions for making your own gingerbread house
Prepare everything you need for work; in principle, any housewife has this in her kitchen. These are, first of all, culinary tools, and, of course, ready-made diagrams or patterns for the house and, accordingly, the dough itself.
We will need:
- Pizza knife
- rolling pin
- stack
- silicone mat
- parchment paper
- templates

Cooking method:
1. Take the dough out of the refrigerator, but again, be careful when doing this, since you won’t be able to handle all the dough at once; take it in parts.

2. Take one piece and, using a rolling pin, roll it into a large and thin layer, 5 mm thick.
Important! If you roll out the dough thinner, the gingerbread house will be dry, and if it is thicker, it will be convex. By the way, in my last post I shared with you some tricks on how to roll out the dough very thinly and evenly.
Roll out either on a silicone mat or immediately on parchment paper to make it easier to transfer to a baking sheet.

3. Then take the parts and cut them out of cardboard. You can take absolutely any type of house to suit your taste. At least make a castle.

4. Place the pieces on the prepared dough and use a pizza cutter to cut into pieces.

5. Make straight and confident movements with the knife.

6. And then adjust all the parts with a stack so that all the cuts are even.

7. Now transfer the parchment sheet to a baking sheet and put it in the oven to bake.

8. Bake at 200 degrees, baking time will be approximately 10 minutes, but it can be 7 minutes, use your oven as a guide. Cool the parts, and only then remove them from the baking sheet.

9. The base for the house can also be made from gingerbread dough, or you can take a regular dish. If you decide to make a backing from dough, then the thickness should be greater, namely 7 mm.

Making icing to decorate a house
To make the cottage look unforgettable, we must decorate it very beautifully, give it a finished appearance so that it reminds us of a fairy tale or a miracle that is about to happen.
For this purpose, we will learn how to make the so-called icing, otherwise you can say cream or glaze.
We will need:
- citric acid - a pinch
- protein - 1 pc.
- powdered sugar - 150-200 g

Cooking method:
1. Make the glaze by crushing citric acid in a mortar. Sift the powdered sugar through a strainer twice, this is necessary for the smoothness and viscousness of the glaze.

2. Beat the egg whites first with a fork and then take a mixer. Beat until foamy at low speed.

3. Add powdered sugar in portions and beat each time. Halfway through the process, add a pinch of citric acid. The glaze for pouring is ready, it falls off the fork slowly and keeps the pattern very well and does not spread.

4. Wrap part of the glaze with cling film, and the film should touch the surface of the glaze, otherwise it will dry out, move it to the side.

5. The glaze for drawing will be thicker, but not much, add even more powder to it, the glaze retains its shape and does not flow off the fork and form peaks. Transfer it to a piping bag. This glaze will be called pouring, if it is very thick, add a little ordinary boiled water to it.

6. Now look at all the end sides, if you see any unevenness, rub them out with a fine grater.

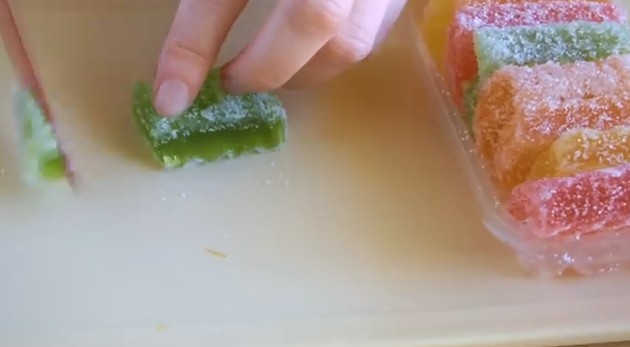
7. Glaze the windows, cut off the sugar on all sides of the marmalade cube.
8. Line the inside of the window frame with painting icing. And then glue two pieces of marmalade. Leave to dry with the marmalade facing up.

9. Each house needs a pipe; outline the edges of the parts with drawing cream. Place the filling icing in the center and smooth it out with a stick or toothpick, just touching the outline.

10. Immediately make a brickwork of candies like tic-tac or something similar ememdems for example.

11. Paint the back wall of the house with decorative patterns; they are easy to make even for beginners. Draw a line along the edge first and then fill it. Add a lace net or urban patterns to the edge. Make patterns in the form of twigs.

12. When the marmalade window has set, trace the outside of the frame.

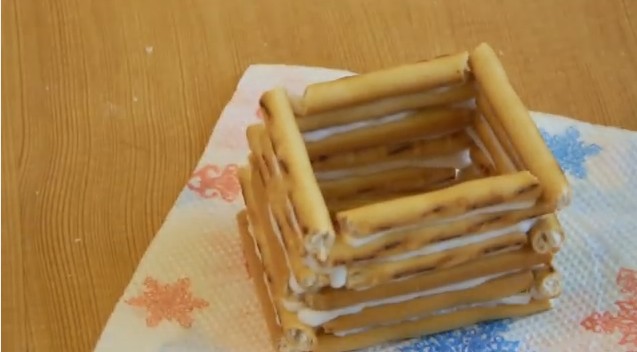
13. And now you can also make a well from sweet or salty straws. The length of the sticks is 3-4 cm; when assembling, alternate the sticks so that the walls of the well do not have holes.
14. There is no need to cover the gingerbread cookies; they will dry out.

1. Now, another important point, we assemble the gingerbread cottage and place it on a stand. Prepare another portion for painting and filling.

2. Glue the walls end to end with painting glaze. Use any objects that are suitable in height, such as a glass, as a support.

3. Glue the roof pieces and fill any holes that are left with icing.

4. Let this white icing dry. By the way, you can, of course, paint it with multi-colored flowers; use dyes for this purpose. Once the house is strong and dry, place it on a gingerbread base.

5. The edges of the substrate can also be outlined with cream and filled in in some places.

6. You can fill almost the entire surface with glaze. Place a well and also a container for water in the corner; you can bake small strips of cookies in advance.

7. Decorate the roof and attic beautifully.


9. You can lay out a woodpile of straws, each row can be coated with glaze.

10. This is roughly what happened.


12. Lay out the roof of the house from corn flakes. It will look funny and original.

13. Place multi-colored raisin balls and nuts on the pipe.

14. Use any of your favorite sweets to make it look insanely delicious and gorgeous.

15. Here is its top view, elegant and at the same time not very complicated, so to speak, from scrap materials, it turned out to be a fairy-tale house.

16. Such a yummy and delicacy will delight you and your guests! Be creative and amazing! Creative success to you!

A simple recipe for sweet pastries without honey
Now let's make another palace, or whatever else you can call this culinary masterpiece. This option will be simple, the patterns will not be complicated and you, as a beginner, will definitely be able to handle it.
We all sometimes look for just such recipes in order to whip up something extraordinarily beautiful and tasty.
We will need:
- Sugar - 250 g
- Flour - 480 g
- Water (or orange juice + water) – 125 g
- Eggs - 1 piece +2 yolks (or 2 eggs)
- Oil - 100 g
- Cocoa - 20 g
- Spices - 1 tbsp
- Soda - 0.5 tsp
- Salt - 1 pinch
Cooking method:
1. First of all, you need to print or draw layouts or diagrams of the final product. You can use this pattern.

2. Next, knead the dough. Since in the previous version we made the dough with honey, let's make it chocolate this time. By the way, you can use this gingerbread dough to bake fragrant gingerbreads or cookies.
To begin, grate the zest of one orange on a fine grater. Squeeze the juice out of the orange pulp and make sure that the liquid mass is 125 ml; add water if necessary.

3. Take a bowl and sift flour and cocoa into it through a sieve. Next, add the spices ginger and nutmeg, you can also add cinnamon, cloves, coriander, cardamom, etc. There should be one tablespoon of spices in total.
After this, add soda and salt, stir all the dry ingredients with a regular whisk.

Take one egg and two yolks and break them into another container, stir with a fork.
4. Add granulated sugar to a frying pan or triple bottom pan. Turn the mixture on low heat. Melt the sugar.
Place the orange juice in another saucepan and bring it to a boil.

5. When you see that the caramel begins to sizzle and boil around the edges, stir it with a spoon so that nothing burns. When you see smoke, immediately pour orange boiling water in a thin stream.

Be careful and careful not to get burned. Next on the list, add butter and zest, stir and cook until the butter and sugar grains are completely dissolved. After all, let the mixture cool to room temperature.
And only after that add the egg mixture, mix + flour with spices. Add flour gradually, you don’t need to add everything. The dough should turn out liquid, so pour it on the table and sprinkle with flour. Knead the dough. The dough will be soft and elastic, after it is ready, pack it in a bag and place it in the refrigerator to rest and let it stand there for one day.
6. Well, then all you have to do is roll out the dough thinly into a circle or layer, thickness 4-5 mm, and cut out the necessary parts according to the templates. Then place them on a baking sheet covered with parchment paper and bake at 180 degrees for 10 minutes.

3. After the cookies are baked, let them cool, and then carefully fold the house. To connect the elements, dip the side parts in liquid honey or boiled condensed milk.

4. Or you can add it to cream or glaze; take the icing recipe from the previous recipe.

5. After this, decorate all parts of the house with glaze to your taste.

6. You can use small candies or confectionery powder, because such delicious houses can be made for any holiday, even Easter.

7. The house needs to be placed on the base, it can also be baked from dough, or you can simply place it on any tray. Bon appetit, friends! Have a great mood and positivity, with such a marvelous palace you will definitely have it.

House made of sweet straws
If you have very little time, and you are about to expect guests and no dessert is ready for tea, then you can use my previous post about cookies and gingerbread, or make a treat from sweet straws.
1. All you need is a straw and any cream or boiled condensed milk. Connect the sticks together to create the image of the walls. As you can see in these pictures.

2. Decorate the top with candies or something else, such as raisins and nuts.

How to make a gingerbread house out of cookies with kids
You can also make such creations with your kids from regular crackers or crumbly cookies. The main thing is to make the patterns correctly, but it is not difficult at all, take a look here.

Then connect the sides and decorate with Ememdems assorted sweets; you can also use marshmallows, marshmallows and marmalade.

Video on how to make a quick gingerbread house at home
I suggest you watch the videos from the YouTube channel, I hope they will also be useful to you, especially since everything is shown and told live, it will be much easier to prepare such a delicacy:
And now I offer you some ideas for decorating houses.
You can decorate it in New Year’s style and place it on a mug for each of the guests.

It looks really great and original.

Or these New Year's houses.


They are often also made for Easter as souvenirs.

That's it, I'm ending this post. Happy mood and good luck to everyone! Positive and creative success to everyone! Bye!
One of the popular decorations for the New Year or Christmas is a do-it-yourself gingerbread house. The process of delicious baking is simple if you make the pattern correctly, assemble and paint all the necessary parts. Make a traditional Christmas dish and it will transport everyone in your family to a fairytale during the holidays.
How to make a gingerbread house
A step-by-step master class will help you create a festive mood for adults and children.DIY gingerbread houseIt’s very easy to do: first you need to build a pattern for the parts of the hut, then bake them and connect them one by one. To make the resulting picture realistic, you can “bring” light into the house: put a candle inside, LED lighting, or cover the windows with colored caramel or marmalade.
Gingerbread house template
According to the calculated scheme, you can create not only an edible house, but also an entire gingerbread castle, the main thing is desire. So,gingerbread house patternconsists of preparing templates for future walls, roofs and other details for decoration. Prepare the stencils:
- For the roof - two rectangles 9x14 cm;
- For front walls – 10.7x12 cm;
- For the other two walls - 16x10.5 cm.
The dough must be rolled out on parchment into a layer whose thickness is at least 5 mm. If you make the workpiece thinner, the gingerbread will end up being too dry. The template is applied to the rolled out workpiece, parts are cut out along the contour of the stencil, after which the trimmings are removed, and the cut out elements are transferred to a baking sheet along with paper and sent to bake. Windows and doors are cut out using pre-prepared stencils while the dough is still hot.
How to assemble
In order for the fabulous New Year's gingerbread to last longer, it must be glued correctly. To do this, you need to prepare caramel syrup: pour 100 grams of granulated sugar into a saucepan with a thick bottom, add 40 ml of water, cook, stirring all the time until a thick golden liquid forms. After the fastening product is ready, you must immediatelyassemble a gingerbread house. This process is step-by-step:
- Dip the end of the side wall and the front into hot caramel, glue them together and attach them to the base, which can be either cardboard or a baked layer of dough.
- Attach the second wall and back side. To prevent the caramel from hardening while you are fastening the gingerbread house, it is advisable to cover the dish with a lid and periodically warm it up.
- Dip the ends of the roof into caramel and attach it to stable walls. Leave the house for an hour so that it sticks together well.
Gingerbread House Recipes
Knowing how to prepare the dough and delicious icing, all you have to do is put all the details of the house together. It is worth noting that with chocolate dough the house will look more elegant, and the glaze can be made lemony so that the taste has a slight sourness. Look at the recipe for a gingerbread house, and the photo will show what result you will get in the end if you do everything step by step.

Gingerbread dough for a house
If desired, the gingerbread house can be made chocolate, as in the photo, by adding a little more cocoa to the main ingredients. So, for the test you will need:
- baking powder – 2 tsp;
- liquid honey – 500 g;
- butter (or margarine) – 300 g;
- flour – 1250 g;
- sugar – 500 g;
- cocoa – 50 g;
- cognac – 3 tbsp. l.;
- nutmeg – 1 tsp;
- ground ginger, cloves, cinnamon - 1 tsp each;
- lemon zest, anise, cardamom - 1 tsp each. l.;
- vanilla – 1 pinch;
- eggs – 2 pcs.;
- salt – 0.5 tsp.
To knead correctlygingerbread house dough,you need to do everything step by step. The cooking process consists of the following steps:
- Place butter, honey, and granulated sugar into a saucepan. Heat everything over low heat, constantly stirring with a spoon, but do not bring to a boil. When the sugar crystals dissolve, remove the bowl from the heat and set aside to allow the mixture to cool.
- Combine half the required amount of flour with the zest, add cocoa, baking powder (soda is not recommended for this dish) and all the spices. It is recommended to grind seasonings into powder before adding.
- Combine the warm honey-butter mixture with the eggs, but do not beat them with a mixer, but simply stir with a fork. Add cognac.
- Gently stir the spiced flour into the honey mixture. Leave a little of the loose mixture, and for now bring the workpiece to a dense elastic consistency.
- Wrap the dough in film and put it in the cold (preferably overnight) so that it reveals its properties.
- Mix the present dough with the remaining flour so that it remains elastic but does not become hard. You may not need to pour in the entire bulk mixture; here you need to make a test figure: roll out a layer (about 5 mm), cut out a small element from it. If it has not lost its shape, then the dough is ready.
- Bake the shapes cut out according to the template at 180 degrees.

Glaze
Experienced chefs recommend different ways to prepare a tasty mass, which is suitable for holding together the parts of the house and decorating this festive dish. For example,icing for gingerbread houseyou need to do this:
- Chilled for half an hour, mix the whites (of one egg) with juice squeezed from lemon (1 tbsp.). Beat them into foam using a blender or mixer.
- Gradually add powdered sugar (up to 200 g), without turning off the kitchen appliances. Beat the ingredients into a stiff mass, as in the photo, add more powder if necessary.
Before you prepare a New Year's house, you should familiarize yourself with one more component. Icing is a mixture that can replace caramel and glaze. To prepare, you will need a couple of drops of lemon juice, about 5-6 egg whites, food coloring and powdered sugar. Next, you need to beat the whites with powder until thick, add the dye of the desired color and lemon juice. It is advisable to make icing in small multi-colored portions, because the mixture dries quickly.
How to bake a gingerbread house
When all the details of the house are cut out to fit the stencil, you can begin to place them in an oven heated to a temperature of 180 degrees. Tobake a gingerbread house, it doesn’t take much time: the dough is prepared for about 10 minutes, then an elegant fairy-tale cake is assembled from the hardened elements. The parts are attached to each other using viscous caramel, and the delicious New Year's dish is decorated with protein glaze.
Video
There are enough ideas, get inspired and create your own beautiful house. You'll have a great time!
And I will do everything so that you don’t have any problems with the test, or with the templates, or with the design!

Fairytale gingerbread houses belong to and, just like gifts under the Christmas tree. Whether it's made or purchased, every gingerbread house can be charmingly decorated with icing and sweets.
Let's start with the test for the house.
I. Culinary master class Gingerbread house dough recipe
First: building a house is not a quick task, plan the minimum 2 days for the house:
- on the 1st day you must bake the dough for the house and let it cool well so that the house is stable;
- on the 2nd day you can assemble the house and decorate it... Or you can decorate it already on the 3rd day.
Second: buy all the necessary ingredients for the house in advance, think about lighting (LED is most suitable for lighting the house). Make a list so you don't forget anything.
1. Dough
Products for 1 house
1 kg flour + for dusting
300 g cold butter, cubes
2 tbsp. seasonings for gingerbread
If you don’t want to buy a ready-made mixture, then prepare it yourself according to the recipe:
35% coriander, 30% cinnamon, 10% cardamom, 10% nutmeg, and 5% each of cloves, star anise and allspice.
- for 20 g of mixture
7 g coriander
6 g cinnamon
2 g cardamom
2 g nutmeg
1 g cloves
1 g star anise
1 g allspice
(Mix everything and grind in a coffee grinder. Store for no more than a month in a hermetically sealed glass jar).
2 tbsp. ginger powder
1 tbsp. baking soda
450 g brown sugar
3 large eggs
225 g syrup
Cooking
- Place half the flour (500 g) along with the butter in a large bowl.
- Knead until no lumps are felt.
- Add:
- flour (another 500 g)
- seasonings
- soda
- a pinch of salt
- Knead and add sugar.
- Beat eggs and syrup until smooth.
- Add to flour mixture.
- Knead with your hands until the dough is elastic.
- The dough can be used immediately to prepare the house or, wrapped in cling film, placed in the refrigerator.
2. Dough with honey
150 g butter
350 g sugar
350 g honey
900 g flour
2 tablespoons cocoa powder
2 packets of spices
2 tablespoons of potash (buy at the pharmacy!)
2 eggs
Cooking
- In a large saucepan over medium heat, heat the butter with the sugar and honey.
- Stir until sugar dissolves.
- Remove from heat and let cool.
- In a large bowl, mix flour with cocoa and spices.
- Beat the eggs with a whisk and stir into the cooled honey mixture.
- Dissolve potash in 4 tablespoons of water.
- Add the honey and egg mixture and dissolved potash to the flour.
- It is best to mix the dough into a smooth dough in a food processor.
- Wrap the gingerbread dough in plastic wrap and refrigerate overnight.
II. Gingerbread house: how to make templates
Preheat the stove in advance 200°C.
Prepare templates for the house by cutting them out of thick cardboard.
Label the parts of the house. You can use the template provided or use your own.
Divide the dough into 4 parts.
On baking paper, roll out each piece of dough to a thickness of 6 mm.
Using a small sharp knife, cut out the shapes of the house according to the templates.
You will need 2 templates for the wall, 2 templates for the roof and 2 templates for the side parts.
Don't throw away the leftovers - they will come in handy.
Place the cut out dough templates on a baking sheet along with paper.
Roll out the remaining dough again to a thickness of 3 mm and cut for tiles 75 circles diameter 3-4 cm.
If you have leftover dough, you can also cut out animal figures or Christmas trees.
Bake parts for the house 8-12 minutes until the dough is firm and brown.
Bake “tiles” 6-9 minutes.
Leave each baking sheet for 3-4 minutes to cool, then adjust all the templates, aligning the edges with the templates.
Use a small sharp knife to cut out windows, doors and other openings - for example, for lighting you will need a hole in the upper part of the side.
What else can you bake from gingerbread dough?

Christmas wreath.

Christmas trees and animals.
Various figures.

And decorate the cake.
III. Culinary master class Gingerbread house: assembling and decorating the house
To assemble the house you will need icing sugar.
Products
2 egg whites
750 g powdered sugar
Cooking

Mix 250 g of powdered sugar with water to a thick and viscous mass.
Dip each “tile” ¼ of the way into the glaze and place on a wire rack to dry.
Mix 500 g of powdered sugar and 2 egg whites to form a thick viscous paste.
Fill the cornets - one cornet with a nozzle with a small hole and the second with a nozzle with a larger hole.
Keep the glaze in the bowl covered at all times.


Glue the tiles on the roof.

To assemble the house, apply glaze to the edges of the house parts and “glue” them together, pressing them together.

Additionally, “support” the house from the inside until everything is thoroughly dry.
Decorate the house with icing.


When the house has dried well, you can “glue” the roof and continue decorating the house using all kinds of sweets.

It is best to participate at least in the process of assembling the house two.
In the video you will find the most beautiful houses to follow. Enjoy watching!
SNOW- crush the lollipops with a rolling pin, mix with coconut flakes and powdered sugar.

MINI gingerbread houses for cups or muffins they look really cute! -You can build a small village on the table. These sweet houses can be served with a cup of tea and hot chocolate.
lollipops can be used as lanterns.

And do it USEFUL house , decorating it with corn and other flakes, cereals, nuts, and seeds.

Gingerbread house with TREES. To be able to place the 3D Christmas tree in front of the gingerbread house, cut out the Christmas tree shape twice. The first tree is cut from bottom to middle, and the second tree is cut from top to bottom to the middle. They can then be moved into a cross like a 3D tree.
TREES. Cute snow-covered Christmas trees can be easily made using star-shaped cookies of different sizes. Glue them together and then decorate with icing.

...or these Christmas trees.

Modern gingerbread house with concave or convex walls . To curve the sides of the gingerbread walls, place them on a pipe or flower pot immediately after baking and let them cool.
Gingerbread house like BOX for cookies.

If the roof is held in place by tape, the house can also be used as a cookie box. Which present!
Gingerbread house with LIGHTING . Of course, you can draw the windows, or you can make them look like real ones... LED lighting will provide a romantic winter evening in the house.
Windows for a gingerbread house can be made like this:
- cut the marmalade very thinly and paste it in place of the window;
- crush the candies and put them in the window, heat them in the oven until the caramel dissolves. In this case, it is better to underbake the cakes a little the first time.
— cook the caramel and pour it into the window template (on foil). The remainder of the caramel can be used to glue the house together.

Place around the house various figures .

Children will be very happy if you give them such a house, but they will be even happier if you make it together.

By the way, there should be no excuses that there is no time! - in the end, you can make a house from ready-made cookies and sweets .

Is there a house or not? “Your children will make this decision.” But know that the house remains edible 1 week.
And to help you too - infographics for making a gingerbread house.


Hello, dear hostesses. Today we will bake a gingerbread house. From the very beginning to the bitter end. The article turned out to be big. But this is because I told all the secrets and nuances. I laid straws wherever a novice cook might fall.
I set a goal for myself warn you against all possible mistakes in advance so that you get a wonderful gingerbread house the first time.
You will know all the tricks and all the tricks. I will offer you a choice several ways to glue a gingerbread house, and you will choose the one that seems most convenient for you.
And if you still have any questions, ask them in the comments to this article.
I’ll tell you the time right away, so that you know , How many hours will the entire process of making a gingerbread house take?
- Kneading dough 20 minutes + time to keep it in the refrigerator for 1 hour (so make the dough the night before, in cellophane and in the refrigerator it will last well even for a couple of days)
- House drawing on cardboard for 20 minutes (can also be done ahead of time)
- Rolling out the dough And cutting out parts gingerbread house 10 min
- Baking 15 minutes
- Preparing glaze for gluing and decorating(while the house is baking for the same 15 minutes)
- Decoration details cream and culinary tinsel 10-30 min (depending on you)
- Assembling a gingerbread house(20-30 min), with assistants faster (or slower).
- Drying the house(10 min if my way)
- Roof installation(20 -40 minutes, if you also use toothpicks, you will quickly fix it)
- Decorating a gingerbread house sweets, cream, laying edible tiles on the house (from 30 minutes to infinity, because there is no limit to perfection).
The minimum is 3 hours without rest breaks and with the condition that the dough has already been in the refrigerator for the allotted time.
Many housewives make a gingerbread house not in one day, but in stages:
- 1 day - dough and baking walls for gingerbread house
- Day 2 – gluing a gingerbread house
- Day 3 – decoration, decoration of gingerbread house
If you want the process to be a little faster, you can make a simplified version of a gingerbread house in the form of a gingerbread hut.

Or make a house from ready-made store-bought cakes (by the way, there are cakes specifically for gingerbread houses with cut-out windows), or from chocolate bars, or from large cookies(photo below).

Step 1. Prepare the dough
200 g butter(crush with a fork or chop with a knife)
5 spoons of liquid honey(if the honey is candied, heat it in a water bath or very low heat, stirring continuously)
200 g sugar
1 packet of baking powder
4 egg yolks(!!! Before separating the yolks from the whites, read the instructions below)
4 cups flour(this is approximately, depends on the size of the eggs)
Salt And Spices of your choice, 1 tsp each.: ground ginger, cinnamon, zest of 1 lemon, cardamom, anise
ATTENTION!!! Instructions for properly separating whites from yolks
We will need the whites from these eggs for gluing and decorating the house. We will beat them with powdered sugar. In order for the protein cream to turn out as it should, follow the following rules:
1. Break the eggs with clean and DRY hands, and the whites should also plop into the DRY bowl. One drop of water - and it's all gone.
2. Not a single particle of yolk should get into the whites - otherwise the cream will not form a foam (separate the white from each egg over a separate dry bowl and, if it separates without any yolk, pour it from the bowl into a bowl with other whites).
3. Since we will be whipping the cream later, when we put the walls of the house up to bake, place the dishes with the whites much higher so as not to accidentally splash water into it.
So, from the above ingredients, knead the dough, wrap it in film and put it in the refrigerator for an hour or two. Let it lie there, and we’ll go cut out a template of our future house from paper.
Step 2. Cut out the template from cardboard
If you are not confident in your own architectural or culinary abilities, then you can make a simplified design of a gingerbread house - a kind of gingerbread hut (see photo above). As you can see in the photo, such a gingerbread house does not have side walls, only triangular facades and a roof. A very convenient option for those who prefer a simpler design.
You choose the dimensions of the gingerbread house yourself - for the above amount of dough the height of the facade of your house should be equal in size to your palm. The main thing is that the parts fit together in size. I depicted how to achieve this in the diagram below using the example of a drawing of a simple gingerbread house.

As you can see, the matching sizes of the parts are as follows:
The side wall must be the same height as the side of the front (value b)
And the roof slope is the same length as the side side (value b) and the same height as the upper line of the slope of the front part (value a), the height of the slope can be made larger so that the roof overhangs in the form of a canopy.
Step 3. Roll out the dough and cut out the pieces
Chilled dough place on parchment or paper and roll it out with a rolling pin. Be sure to lay parchment down; it is needed to transfer our cut out house parts onto a baking tray. If you carry parts in your hands, they can stretch, become deformed, and then when assembling the house they will not match each other in size.
The thickness of the dough layer should be at least 0.5 cm.
The picture below shows one trick, allowing you to roll out the dough to an even thickness. On the sides of the dough, even before rolling, we place 2 slats with the height we need 0.5 cm and roll out the dough by rolling our rolling pin along these slats (a foam profile from a hardware store is ideal as slats; a 2-meter profile costs half a dollar).

On the rolled out dough put a cardboard template and cut it out with a knife, very convenient to cut with a pizza wheel. You can immediately cut out windows on the raw dough, or later on the baked parts (see photo below). From the remains of the dough we cut out figures of Christmas trees, animals, a pipe, a porch, a fence - whatever your imagination tells you and what the dough is enough for.
Right on the parchment where we rolled out, and transfer the figures to a baking sheet, cutting off a piece of parchment with the part with scissors (photo below, left).

The baking tray must be level, otherwise the house may also end up with curved walls (and try connecting them later).
We bake the gingerbread house parts at a temperature of about 200-220 gr. WITH(medium heat) approx. 10-12 minutes. Remove from the oven as soon as the cakes are already yellow, but not yet brown (photo above, right). While the cakes are hot, you can easily cut out windows from them if you want.

But it’s better not to overdo it at first, because you can simply paint windows on the walls of the house with protein cream, like here:

And when you bake your next gingerbread house, you can not only cut out the windows, but also “glaze” with marmalade or caramel.
Step 4. Make glaze for decoration and gluing
Ingredients: for 1 protein, 200 gr. powdered sugar + 1 tsp. lemon juice (or a little vinegar, or dry citric acid). Acid is needed not only for taste; thanks to it, the glaze turns out to be more elastic, tight, and sticky.
If you don't have powdered sugar , don’t worry, I’ll tell you a secret, I personally always make this same glaze with regular sugar. The main thing here is that there is sugar fine-crystalline, so to speak, finely ground (this is often found on sale), such sugar has time to melt in the egg white during the beating process. And to ensure that it melts (even coarsely crystalline ones), even before whipping, you can simply let it sit in lightly beaten egg whites, during this time it will melt, and the cream, after whipping with sugar, will also turn out as it should. Beat the whites gradually adding sugar with a tablespoon until the foam becomes stiff and standing as in the photo below. You can also make your own powdered sugar, resins sugar in a coffee grinder.
In the photo below, I made and photographed 2 types of glaze in the first bowl from sugar, in the second from powdered sugar - there is no difference in stickiness, moreover, sugar is much more pleasant to the taste, and even cheaper. That’s why I personally choose sugar icing – and you can try both and decide for yourself which one you prefer.

Process:
First, beat the whites without anything until they form a foam, then gradually add the powder, one tablespoon at a time, without stopping beating. As soon as the cream becomes tight and holds its shape, it is ready, even if you did not pour out all the powder. Eggs also come in different sizes. For small eggs, you don’t need as much powder as in the recipe.
If desired glaze can be tinted by adding cocoa or food coloring.
ATTENTION, dyes for Easter eggs, are only suitable if they do not contain salt, or the packaging says “Can be used for confectionery”. You don't want a salty glaze.
Because the glaze has the properties to harden quickly, then after cooking it is better to cover it with a damp (not wet) towel. Otherwise, while you are fiddling with the cakes, the icing will harden, but if you work quickly (in the spirit of Yulia Vysotskaya), then you don’t need a towel; the icing will not harden in half an hour.
Better yet, cook first one portion of glaze from 2 egg whites(for decorating the walls of the house), and then a second batch of glaze(for gluing house parts). It will be smarter that way.
Step 5. Decorate the walls
Even before gluing the gingerbread house together, we paint the walls and roof.

It is convenient to write using pastry syringe or pastry bag. But if you have neither one nor the other, then read the following note:
How to make a pastry bag yourself in 1 minute.
We take a regular stationery file (or a clean, thick cellophane bag), cut off (straightly or diagonally) the bottom corner to make a tiny hole, load a portion of cream into the file and roll up the top of the file (like a carpet) and fix it with a stapler in several places (if not in stapler at home, paper clips will do, or you can sew it up with a needle and thread). Done - you can extrude patterns.
We draw windows, decorate with small candies, multi-colored confectionery sprinkles, almonds, and glue patterns cut from ordinary marmalade.
You can depict a Christmas tree on one of the walls. Paint it with white cream and stick it with candies like toys, or lay out a Christmas tree using the mosaic technique of triangular-shaped marmalades.
The roof can also be decorated before assembly, but I find it more convenient to decorate the roof already on the gingerbread house itself. I posted a lot of ideas for decorating a house in a special article , there you will also find many photographs of different gingerbread houses.
Step 6. Select a base
Decide right away what your gingerbread house will stand on.. This could be another dough crust, an elegant dish, a tray, a cutting board, or a candy box. Once you glue the house together, you will not be able to transfer it to another dish. You will only move it along with the base on which you will glue it.
It is not advisable to choose dishes made of plastic. Because when you want your house, glued with protein cream, to harden in 10 minutes in a warm oven (and not in 3-4 hours indoors), you will not be able to do this, since plastic releases toxins when heated, and this is for us Of course it's not necessary.
Take the cakes and, without gluing, join them on this base, see if the house fits on the dish, if the parts fit together. If there are uneven, lopsided walls somewhere, now is the time to straighten them with a knife.
Step 7. Choosing what to glue the house together with
1. Protein glaze
See the white glaze recipe above. It is convenient to apply the glaze for gluing parts using a pastry bag or little bag (read a little higher on how to make a little bag yourself in 1 minute), or just with a spoon.
If the icing doesn't stick well to the cake, lightly moisten the gluing area with water using a brush. The glaze can be applied simultaneously to both parts in the places where they are glued, and then pressed against each other. Hold it with your hands for a while, and then simply support the walls with improvised jars. And so, together with the jars, send them to dry.


To make the gingerbread house glue faster, I do this: I heat the empty oven until hot, but not red-hot. I turn off the OVEN (that is, the fire does not burn in the oven!!!) and place my gingerbread house in this heated environment for 2-10 minutes. The time depends on the “degree of heating” of the oven. I open it periodically and check it with my finger. When our protein cream begins to turn into marshmallows (you will feel this to the touch, or the cream may look slightly browned around the edges) - carefully take it out. Your gingerbread house is held together with strong frosted cream.
2. Melted chocolate
MELTED CHOCOLATE (melt the tiles in a steam bath, this chocolate glue quickly hardens, and the house does not need to be held additionally after gluing.
3. Caramel glue
CARAMEL GLUE : 100 gr. sugar + 2 tbsp. water + a little bit of citric acid.
Acid is needed to prevent the “saccharification” of caramel. Anyone who has made caramel knows that sometimes it does not crystallize into candy, but is completely candied into fragile crumbs. But citric acid will not allow this.
Cook the sugar and water at a light bubbling stage, stirring continuously until a drop of such syrup begins to crystallize on a cold saucer, that is, harden into caramel.
4. Butterscotch glue
TOFFEE GLUE: 100 gr. sugar and 2 tbsp. Cook the sour cream at the boiling stage, stirring continuously until a drop of such syrup, dropped into a glass of cold water, lands on the bottom of this glass in the form of a soft toffee that stretches to the touch.
During cooking, you can add a spoonful of cocoa to this toffee glue - you get chocolate toffee.
You need to glue the parts of the house with hot glue, until the glue cools down. That is, either act very quickly, or keep the pan with the syrup in a hot water bath (that is, we immerse a small pan with hot sweet glue in a larger pan with boiling water in it).
Gluing with caramel, toffee or chocolate looks something like this.

Keep the remaining caramel in a boiling water bath so that it does not harden. We will need it as an excellent glue for laying tiles on the roof of a gingerbread house. And if you want to glaze windows with such caramel, read this article.
Step 8. Making the tiles
Now we glue the roof in the same way. This connection must be as strong as possible so that the roof halves do not move off the house.
Some people attach the roof by inserting skewers or toothpicks in the place where the roof meets the front facade of the house.
I simply apply a generous amount of white glaze to the top edges of the walls of the gingerbread house and once the 2 halves of the roof are fitted, I immediately apply a thick layer of sticky cream along the entire ridge (top of the roof). The glued roof can be supported on both sides with suitable sized jars until the glue completely hardens. .
Once the roof is glued, you can lay tiles:

The tiles can be simply painted with egg white glaze, lined with almonds, chocolate bars, crunchy pads, jelly beans, or whatever you like. You can glue tiles for white glaze or caramel glue. You will read more about the types of sweet tiles and how to lay them in our next article - there you will also learn many more techniques for decorating a gingerbread house.
I will be glad to see your questions, suggestions and photographs of baked gingerbread houses in the comments to this article.
GINGERBREAD HOUSE. Part 1 - all the secrets of mastery.
4.4 /5 - Ratings: 37The eve of the New Year and Christmas is the time for some festive magic - a gingerbread house!
- 40 g chilled aquafaba (chickpea broth)
- 180 g powdered sugar
- 20 g corn starch
Additionally:
- zip bag or pastry syringe with a thin nozzle
- tassel
- roof tape
- piece of foil for windows
Package:
- cardboard
- polypropylene film
- ribbon
How to make a gingerbread house with your own hands - master class with step-by-step photos:
- Prepare the ingredients you will need to make the dough:

- Prepare the dough. First you need to melt the sugar. To do this, pour it into a deep bowl, preferably made of stainless steel, since scratches may remain on enamel dishes. Place the bowl with sugar on the heat a little less than medium. Stir occasionally, it is better to use a long-handled spoon for this if you have one.
The sugar will begin to turn into yellow lumps. When the sugar becomes half liquid, reduce the heat to low. As a result, it should completely melt and flow from the spoon in a thin stream. If the sugar is stirred too rarely or overheated, it may overheat and foam will appear on top - in this case, when adding tea, it may begin to “spit.”

- While the sugar is melting, you need to brew tea, add jam and stir until the jam dissolves. Before adding tea with jam to sugar, you should weigh it again, since hot tea evaporates quickly, you may have to add a little water to it.

Tea with jam
- Add tea little by little to the melted sugar without removing from the heat, first literally a teaspoon at a time, then gradually increasing the portion, stir vigorously after each addition. The sugar will sizzle and bubble strongly. It is impossible to photograph this process, as there is a lot of steam and the lens fogs up.
- When all the tea has been mixed in, increase the heat to high and bring the syrup to a boil. Then immediately remove from the heat and place the bowl with the syrup in cold water so that the syrup cools quickly and does not evaporate. Cool to barely warm or cold temperature, then add butter and honey (I have flower in one spoon, buckwheat in the other), stir until the honey dissolves.

Syrup made from sugar, tea, butter and honey
- In a separate bowl, mix the sifted flour and spices. Pour in the syrup, strained through a sieve (we strain in case there are any undissolved pieces of sugar, honey or jam left). Mix some of the flour with the liquid. Quench the baking soda with lemon juice and add to the dough.
Mix the dough with a spoon, then knead with your hands for about 10 minutes. If you are making a double portion of dough for a gingerbread house, you need to knead for 20 minutes. If the dough is poorly kneaded, the gingerbread cookies may bubble during baking and the surface will be uneven. The dough will turn out very viscous and sticky - there is no need to add flour, this is how it should be.

Knead the lean dough
- Place the finished dough in a plastic container, close the lid tightly and refrigerate at least overnight. If the dough is not infused enough, the gingerbread cookies may again turn out uneven.
In an airtight container in the refrigerator, the dough can be stored for quite a long time, even a whole month, and you can take it out and bake it at any time.

- To make a template for a gingerbread house, you need to print it on A4 sheet - regular office paper will do (click on the photo to enlarge). If it is not possible to print, you can draw according to the given dimensions, then cut out.

This Lenten gingerbread house turns out to be small. And if you make it larger, you will need to build some kind of spacers from bamboo sticks to strengthen it, since this dough is too soft for large houses - their walls may bend or break under their own weight.
- Remove the dough from the refrigerator, cut off a third or half (depending on the size of your rolling mat). Cover the rest of the dough again and put it in the refrigerator.

- Press a piece of dough with your hand to form a flat layer, and sprinkle it well with flour on all sides.

- Roll out to a thickness of 5 mm, adding flour if necessary so that the dough does not stick to either the mat or the rolling pin.

Roll
- Attach paper templates to the test and cut out the house blanks. The stand and the lower part of the roof can be cut with a wavy knife. First cut windows in the walls, then the outline. You need to cut carefully, not with a too sharp knife, so as not to damage the rolling mat.


Cutting out blanks
- Place the cut out pieces on a baking sheet (I needed two baking sheets to fit all the pieces). Make holes in the upper part of the roof parts with a straw (you can do this immediately after baking, while the gingerbread cookies are still hot - then the holes will be larger and it will be easier to thread the ribbon through).

For baking, you can use a baking sheet with ungreased parchment or a baking sheet with a silicone mat sprinkled with flour. I like to bake on a baking sheet with a silicone mat and Teflon parchment on top of it, then the bottom surface of the gingerbread cookies turns out smooth, but on regular parchment it turns out slightly wavy, since the parchment wrinkles during baking.
Gingerbread cookies should be baked at 160 degrees for 10 minutes. You can check readiness by lightly patting (without pressing) the surface of the gingerbread with your fingertip - it should be firm and not squashed. The gingerbread cookies should not brown, and their bottom surface should not become hard - if this happens, reduce the baking time.
- After you can no longer cut anything out of the rolled out layer of dough, you need to collect the scraps, knead them, roll out the resulting piece of dough again and cut out more parts. After this, collect the scraps again and knead. This last piece of dough has already collected a lot of flour during two rollings, so you can’t use it for the parts of the house - they may turn out too thick or crooked. You can’t put it in the refrigerator either - it will harden too much and it will be very difficult to roll it out later.
Best of this piece make small gingerbread cookies. Then you can put them inside the house, or you can put them in small glass jars tied with a ribbon, it will turn out very beautiful. Small gingerbread cookies, after they have cooled, should be immediately placed in a plastic container, jar or bag and sealed tightly so that they do not dry out.

- While the vegan gingerbread house pieces are baking, let's take care of the windows. You can leave them empty, or you can make marmalade windows. Cut pectin marmalade or thick apple jam to a thickness of 5 mm, then cut out 5 squares from this layer, the same size as windows in a paper template. You can cut it by eye, not necessarily to a perfectly accurate size. Place the squares on pieces of foil like in the photo:

Cutting out the marmalade
- Place freshly baked hot parts directly from the baking sheet, as if stringing windows onto marmalade, lightly pressing on the edges of the windows. The marmalade will melt from the hot gingerbread, exactly take the shape of a window and stick. There is no need to remove the foil yet; we will remove it while assembling the house.

Here are all the necessary details:

Finished house parts
- While the parts are cooling, you need to make a glaze primer. The primer is needed so that the glaze adheres more firmly to parts covered with glaze, and parts not covered with glaze do not become deformed. Large gingerbread cookies, after lying for several hours, begin to bend - the edges bend upward. To avoid this, they need to be coated with a primer. In addition, primed gingerbreads acquire a beautiful brown color and chocolate flavor.
From the amount of ingredients indicated in the recipe, you get a little more than 100 g of primer. For the gingerbread house you need very little, so most of it will remain. It can be stored in the freezer in a small closed jar or glass, defrosting the jar in lukewarm water as needed and stirring well. Can be used not only for gingerbread cookies, but also to cover cupcakes, sweet pies, etc.
So, mix powdered sugar, starch and cocoa. Add half the water, stir, then add a little more water and stir until you get a thick mass. Continue stirring until there are no lumps left. Pour in the remaining water and stir.

The glaze should be quite liquid and flow from the spoon in a thin stream. If you do not have precise scales, you can measure the ingredients for the primer with teaspoons: 0.5 tsp. cocoa, 2 tsp. starch, 6 tsp. powdered sugar. Add water little by little until the desired consistency is achieved.
Pour the finished primer into a jar or glass and cover.
- When the gingerbreads cool, they will become a little denser. Then the side walls and the top edge of the roof will need to be slightly trimmed using a fine grater at an angle of 45 degrees so that they fit together well during assembly.

We comb the edges at 45 degrees
- Cover the parts of the gingerbread house with a primer using a brush. Any synthetic brush from an office supply store will do, just wash it well with soap. You need to prime as thinly as possible, spreading it over the surface as much as possible.

The side and bottom ends of the walls also need to be primed, since glaze will be applied to these parts when assembling the house. There is no need to prime the back of the gingerbread cookies. When the primer dries and stops shining (this happens quite quickly), you can start painting the gingerbread cookies.
- let's produce The glaze will need to be divided into two parts - for the outline and for the filling. Add powdered sugar to the glaze for the contour until you obtain a consistency where the glaze does not flow from a spoon, but slowly slides and falls in a clot. Add water little by little, a few drops at a time, to the glaze for pouring and stir until the glaze begins to slowly flow from the spoon in a thick stream.

- To draw the outline, you can use a special pastry syringe with a thin nozzle, or you can put the icing in a zip-lock bag, cut off a tiny corner and draw by squeezing the icing out of the bag.
Before filling in the background, it is better to trace the gingerbread along the contour so that later you get neat edges. It is convenient to fill with a soft brush. Circle the windows not close to the marmalade so that the glaze does not get soggy.

Apply glaze to parts
- When the surface of the fill has set and ceases to shine, you can apply patterns on top of the fill, just be careful, since it has not yet hardened inside and may wrinkle. We paint a gingerbread house, as your imagination dictates, you can also involve children in this activity - it will be good entertainment for New Year's morning. Then leave it to dry for several hours.

- When the parts are dry, you can start assemble a house. If it is made for a gift or for long-term storage, then you need to make a box for it. In other cases, you can simply collect it on some flat dish or tray.
The box is made of cardboard, with low sides, slightly larger than the size of the stand; at the bottom it is better to make several layers of cardboard so as not to sag (if the cardboard is laminated, like mine, the box needs to be wiped with alcohol, and if it is some other cardboard, then lined inside with parchment or napkins).

- Place the baked stand in a box or on a tray (once the gingerbread house is assembled, it cannot be picked up by the stand and lifted, so it should be immediately put in its place). Take two adjacent walls, apply glaze to the bottom end of both walls and to one side end of one of the walls.

- Glue the walls to the stand, gluing them together at the same time. Hold them in this position for a minute until the glaze sets.

Install on a stand
- Take another wall, apply glaze to the bottom and one side end. Glue to the stand and to one of the walls.


- On the last wall, apply glaze to the bottom end and both side ends. Glue to the stand and walls.


Installing the remaining walls
- Coat the corners of the house with glaze.

- Place the roof parts at an angle and lace them with a ribbon and tie a bow.

- Remove the foil from the windows, put small gingerbread cookies inside the house (you can also put sweets or a small gift). Apply glaze to the top of the walls.

- Carefully install the roof on top, making sure that it lies symmetrically. Your homemade eggless gingerbread house is ready!

Gingerbread house
Now you can wrap it in transparent polypropylene film (this kind of film is sold in florist shops; they also wrap flowers in it) and tie it beautifully with a ribbon. Or you can just cover it well with a plastic bag so it doesn’t get stale.
Do not leave the gingerbread house uncovered for several days or it may become tough. As a last resort, if it has become stale, it can be revived by leaving it overnight wrapped in a bag with apple peel - gingerbreads absorb moisture from the air well.

Bon appetit! Happy New Year and Merry Christmas!