How to pack a chocolate bar for the New Year in the form of a snowman. Festive New Year's packaging for chocolate in the shape of a snowman Chocolate decorated in the shape of a snowman with corrugated paper
Good children's associations with the New Year are, of course, Father Frost, Snow Maiden, for us they are chocolate and very kind. A fairytale house made of chocolate, a chocolate snowman and a chocolate Christmas tree will be a wonderful addition to the winter holidays.
New Year's holidays are filled with the expectation of a miracle. Sweet chocolate figures make fairy-tale dreams come true, delightful Snow Maidens, Christmas trees, and Santa Clauses will decorate the festive evening. Kids and adults will happily enjoy New Year's figures made from delicious chocolate. Colleagues and friends will gladly accept an original themed gift!
We help you with pre-holiday worries and guarantee a fresh chocolate gift with delivery on time. Each figurine is the author’s own design and is not replicated, which means chocolate animals will be an original gift.
We offer you a quick and effective solution for chocolate gifts for every holiday of the year. We can offer you ready-made chocolate figures; you can also create an original individual gift from chocolate. We will produce an order for an original chocolate figurine in individual packaging with high quality and on time.
On the website in the “Chocolate Figures” section you will find a large selection of chocolate figures with photographs, detailed descriptions and prices depending on the circulation and type of chocolate. The advanced search, available on all pages of the catalog, will help you find all possible options for a holiday-themed chocolate gift, in accordance with the desired sizes.
We work all over Russia, we ship by all means of transport. Detailed information about each chocolate product in the catalog contains information about the price and delivery time, depending on the circulation and production features.
What is an integral part of a children's New Year's gift? Of course, sweets! Surely you, when going to visit friends who have a child, bought him chocolate. And if you present it in a special way, decorated in New Year’s style, the gift will turn into not only a tasty, but also a fun surprise. An ordinary chocolate bar can be beautifully packaged by making a snowman out of it. So, he will tell you in detail and consistently how to make the packaging for the Snowman chocolate bar with your own hands, the master class offered below.
To create a festive New Year's packaging for a chocolate bar in the shape of a snowman you will need:
- any chocolate bar;
- a sheet of white paper;
- PVA glue;
- some orange paper;
- double sided tape;
- a simple pencil;
- black felt-tip pen or gel pen;
- two scraps of fabric for a hat and scarf;
- stapler;
- paper for buttons.

The procedure for creating New Year's packaging for the Snowman chocolate bar with your own hands
1. Cut out a piece of white paper into which you can wrap the chocolate so that the edges overlap. Instead of snow-white paper, you can use soft blue, but in this case, you need to use contrasting material for the hat and scarf so that the packaging looks festive.
By the way, you can also make a cute one that can be hung on the Christmas tree. Children will also love this souvenir.

2. Glue the edges of the base of our Snowman chocolate package on the back side using double-sided tape. Scotch tape will help us do this as carefully as possible.

3. Using a simple pencil, draw a funny face on the front part without drawing the nose. When everything is drawn correctly, you can outline the sketch with a black felt-tip pen.


4. We make the nose from a piece of orange paper, rolling it into a cone and pressing it a little. Glue it with glue.

5. We cut out buttons from colored paper, but when creating a festive New Year's packaging for a chocolate bar in the shape of a snowman, you can use your imagination and use real buttons, for example. We also plant them on glue.
6. Cut out two flaps from the fabric - one for the scarf (longer and narrower), the second for the hat. The width of the fabric for the hat should be such that it fits tightly around the chocolate bar and can also be overlapped.

7. The fabric for the hat on the back side must be fastened with a stapler, and the remaining area must be tied with a beautiful ribbon.

8. Tie a scarf. That’s it, the packaging for the “Snowman” chocolate bar is ready with your own hands, the master class, we hope, will help you create the same one.
If you think about it, every little thing can become an incredible gift. Much depends on how it is presented and played out. Originality and non-standard approach are extremely important. Even something as small as a chocolate bar can become a real masterpiece.
Therefore, we will tell you how to make a Snowman chocolate package with your own hands - very unusual, fun and festive!
With these funny snowmen you can please your loved ones, friends, colleagues and everyone else during the upcoming New Year holidays, weekends and holidays. Moreover, everyone loves chocolate, and such packaging is very simple to make.
First, wrap a chocolate bar or a box of chocolates in a white sheet of paper and secure it with glue or tape - this is the base, the body of the snowman.
Now let's start making the Snowman chocolate packaging clothes. We need a little bit of any matter. You can use an old T-shirt, dress or scarf. In our example, a vest is used.
Wrap the top of the snowman with fabric. We fasten the edges. We wrap the fabric on top - you get a cute hat. Now use scissors to cut the fringe on top, as shown in the picture.


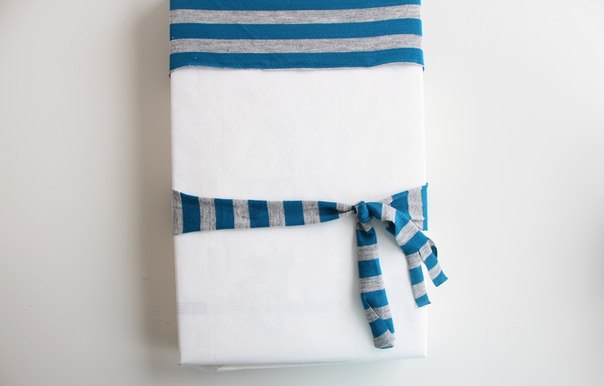
We make a belt from a thin strip and tie a chocolate bar in the middle.
From a piece of fabric or colored paper we make and glue a carrot nose. We also glue black buttons instead of eyes and a smile - we imitate coals.

The buttons on the snowman's clothes can be colored.

An important point: on the reverse side you can write a few warm words of congratulations on or (if it is winter).
On the magical New Year holiday, all gifts should be wrapped in an unusual way, even if it’s a simple chocolate bar.
Ordinary chocolates, which are given in packs during the New Year holidays, can be unforgettably decorated by turning them into a snowman.
Watch a master class with a video on how to decorate a chocolate bar in the shape of a snowman using available materials that can be found in every home.
Anyone can make such a craft for the New Year with their own hands, but the recipient will have a lot of impressions!
What do you need:
- big chocolate bar
- thick white paper (a piece of whatman paper)
- double sided tape
- pencil
- black gel pen or marker
- orange corrugated paper
- glue "Moment-Crystal"
- Red pencil
- cotton swab
- new bright sock
- needle and thread
When buying sweets and chocolate, look at the expiration date of the sweets; it is best to purchase products released no earlier than October, then they will definitely delight all those with a sweet tooth with their excellent taste.

How to make new packaging for the Snowman chocolate bar
1. Cut out a piece of paper of suitable size to wrap the length of the chocolate bar and seal it on the back side.
2. Seal with a strip of double-sided tape, as shown in the video, first securing one side with a piece of tape so that the chocolate does not “move” inside.
3. Draw the snowman's eyes on the front side, first with a pencil, and then outline with a pen or marker. Alternatively, if you find it in a craft store, glue on “running eyes.”
4. Make a nose out of orange paper by rolling it into a tube and twisting the end of the carrot. Then crumple the tube a little for greater realism and charm of our fairy-tale hero.
If you don’t have such paper on hand, you can use fabric or just draw a nose. Or print a ready-made face from the Internet.
5. Mark the place for the nose and draw a snowman’s smile with a pencil.
6. Then glue the nose with Moment-Crystal glue.
7. To make a blush on the cheeks, draw boldly on a piece of paper with a red pencil, collect the paint with a cotton swab and rub the snowman’s cheeks.
8. For the cap, cut the toe behind the heel so that the heel remains on the side we will use.
9. Turn the sock inside out and sew up the hole that appears at the cut point, as in the video.
10. Gather the heel to create a pompom.
11. Put a hat on the snowman.
12. For the scarf, cut the remaining part of the sock in a spiral (in a circle) to create a strip of the same width.
13. Wrap around the chocolate once or twice and tie.
14. Secure the ends of the scarf with tape. Draw the buttons.
15. Decorate the snowman with shiny fluffy wire (tinsel, rain), attach fir branches, berries, beads, whatever New Year’s decor you have in your house.
All is ready! Watch the video.
Ideas for decorating a chocolate bar in the shape of a snowman photo


DIY sock snowman
You will need:
A pair of long white socks
Scissors
Rubber
Thread and needle or PVA glue
Beads, pins or buttons
A small piece of fabric.

1. Cut off the top of one sock, starting from the heel.

2. Turn the cut piece of sock (the top part) inside out and attach an elastic band to one end.

3. Turn the sock inside out again and fill it with rice. Do this so that the bottom of the sock has a round shape, and there is still some rice left at the top.


4. Secure the top end of the sock with another elastic band.
4. Now put on another elastic band just above the middle. Do this so as to form two balls - one large on the bottom and a small one on top.

5. All that remains is to decorate the snowman:
*Use a piece of fabric to add a scarf to the snowman.
*Use beads, pins or buttons to make eyes and nose.

*Use the remaining piece of sock as a snowman hat. To secure it, you can use a thread and a needle or PVA glue.

* Sew a medium and large button onto the snowman.
* You can sew a piece of fabric cut in the shape of a flower to the hat.

DIY snowman made of cardboard and white thread

You will need:
White thick thread
Plates or compasses (to draw a large circle)
Thick cardboard or foam
Buttons
Orange cardboard or faux carrot (for making a snowman's nose)
Scissors or utility knife
A piece of fabric for a scarf
Wire and twine

1. Using a compass or plates of different diameters, draw three circles of different sizes on cardboard or foam.
2. Cut out the drawn circles - if you have cardboard, then use scissors for cutting, and if foam plastic, then a stationery knife.
3. From pieces of cotton wool, scrunch up many balls and place them evenly on each cut out circle.
4. Now you need to wrap each circle with cotton balls with white thread. To do this, first secure one end of the thread to one circle with glue. Start winding the thread around.
Repeat the same with the remaining circles.
5. Connecting the circles. Place one circle partially on top of the other and use glue to connect the large circle to the medium one and the medium one to the small one.
6. Prepare the snowman’s hat and hands. For the arms, you can use wire wrapped in twine or thin branches attached with glue to the circle.
To make the hat, use wire or cut a hat out of black cardstock and glue it to a small circle.
7. Glue the buttons to the middle circle. You can also glue buttons on the top circle to act as eyes.
8. Cut out a carrot from orange cardstock and glue it to a small circle. If you have an artificial carrot, you can simply glue it to the center of the small circle.
DIY "Chocolate Snowman" craft

You will need:
White chocolate
A little dark chocolate
Butter
Container for melted chocolate
Baking paper

1. Inflate a small balloon.
2. Melt white chocolate in a container. This can be done either in the microwave (read the microwave instructions carefully) or on the stove.
3. Spread the ball with butter (a little more than half) to prevent it from sticking to the chocolate.
4. Dip the ball into a bowl of melted white chocolate. If necessary, dip the ball several times to create a thick layer.
5. Quickly remove the ball and place it on baking paper. Let a little chocolate flow down - this will be a stand for the snowman vase.
6. To make the eyes and mouth, you can melt just a little dark chocolate, dip a match into it and apply a few dots on the white chocolate vase.
If you want to add a nose, you can cut out a small triangle from the peel of an apple or orange, dip it in white chocolate and glue it on.
* You can also use edible paints to decorate the snowman and his face.
7. The balloon can be deflated to create an edible chocolate bowl for candies and marshmallows.
Snowmen made from light bulbs for the New Year

You will need:
Bulb
PVA glue
Super glue
Sequins
Small branch from a tree
Fabric paints, gouache or markers

1. Apply glue to the light bulb.
2. Cover the light bulb with glitter. Wait for the glue to dry.
* You can find glitter glue in stores - then you won’t need separate glue, and you can apply glitter straight from the tube.

3. Tie a string or ribbon around the light bulb so you can hang it on the tree.

4. Divide the twig into two parts and use superglue to attach them to the light bulb so that they look like the arms of a snowman.

5. Using paints or markers, draw the snowman's eyes, mouth, buttons and nose.


What can you make a snowman from: bottle caps

You will need:
Bottle caps (one snowman needs 3 caps)
Acrylic paint (white, black, orange and red)
Tassels
Glue stick or hot glue
Buttons
Scissors
Glitter (if desired)
1. Paint the entire inside of each lid with white paint. It may be necessary to apply several coats. If you wish, you can paint the outside as well, but this is not necessary. Wait for the paint to dry.

2. Prepare a small piece of tape and glue 3 painted lids to it. Apply a little glue between the caps to hold them together.

3. Make a loop at the end of the braid and secure it with glue.
4. Using a thin brush, carefully draw the eyes, nose, mouth and buttons of the snowman.
5. When the paint is dry, you can add some glitter.
6. To make a scarf, tie a braid or thin rope around the snowman. You can glue a small button to the scarf.

DIY Christmas snowmen made from wooden spoons

You will need:
Wooden spoon
Acrylic paint
Markers
A small piece of fabric (to create a snowman scarf)
1. Paint a wooden spoon with white paint. Leave to dry.

2. Use markers to draw a face for the snowman.

3. Tie a scarf from any piece of fabric.

You can put such a snowman in a vase or tie it to a Christmas tree or to a certain gift as a decoration.
Try making several of these snowmen with different faces.
DIY snowman from a jar (master class)

You will need:
Any glass jar
PVA glue
Buttons
Plasticine or colored clay
A small battery-powered candle
Thin pipe cleaners (white and red) and pompoms if you want to make headphones for your snowman (optional).
1. First, glue two buttons to the jar - the eyes of the snowman, then attach the nose from plasticine or clay. If necessary, the nose can be secured with superglue.

2. Apply PVA glue to the entire surface of the can.
3. Sprinkle the jar with salt or artificial snow and leave to dry.
The snowman is ready, but you can decorate it. In this example, it is decorated with headphones.

To make headphones:
4. Prepare a red and white thin pipe cleaner and intertwine them as shown in the image. After this, bend them in an arch so that the ends touch the edges of the jar or jar lid and do not fall off.

5. Glue red pom poms to the ends of the pipe cleaners.
6. Place the headphones on the snowman.
7. Add a battery-powered candle to the jar and you're done!

DIY big snowman

You will need:
Circles made of thick cardboard, plywood or chipboard
Scissors or saw
PVA glue
White acrylic paint
Markers
Salt or artificial snow
Brush (if necessary)
1. Cut three circles of different diameters from a sheet of cardboard or plywood.

2. Paint each circle with white paint and leave to dry. If necessary, cover the circles with a second coat of paint.
5. Using colored markers, draw the snowman's eyes, mouth, nose, and buttons.
6. Apply glue to the snowman with a brush and sprinkle it with salt or artificial snow.

3. Glue the circles together as shown in the image.
4. Prepare the braid and glue it to the back of the future snowman.

Wait until the glue dries and you can hang your piece on the wall or place it next to the Christmas tree.
Snowman made from plastic cups

You will need:
Plastic cups
Stapler
Colored paper or pom-poms in black and red
Scarf or fabric for a snowman scarf
Superglue (if necessary)

1. Start folding the cups in a circle as shown in the image, securing them with a stapler. You will get a big circle.

* Do everything on a flat surface.
2. Start making a second circle, placing some cups on top of the others and securing everything with a stapler.
* Decide on the size of the future snowman and, based on this, choose the size of the circles and continue placing them one on top of the other until you get a hemisphere.
3. Flip the hemisphere over and complete the circles to make it almost a full sphere - leave a small hole so that the snowman can stand better and also so that a small lamp can be placed inside.

4. As you know, a snowman is made of several balls, which means you will need to make another smaller sphere for the snowman’s head.
5. Using a stapler, connect the head to the body of the snowman.
6. Wrap a scarf around the junction of the two spheres.
7. To make the snowman’s eyes and buttons, you can insert sheets of black paper or pom-poms crumpled into a ball into the cups.
* In the center of the balls that play the role of eyes, you can glue small white circles - pupils.
*You can also just cut out some paper circles and glue them to the cups.
*For the nose, you can make a small cone out of orange or red paper.
If you wish, you can put a cap or a simple hat on the snowman.

DIY snowman made of threads

You will need:
PVA glue
Cotton threads
Colored paper or plastic (toy) eyes
Scotch tape (if necessary).

1. Inflate three balloons of different sizes - for the torso and head.

2. Prepare a thread and soak it with PVA glue. There are two ways to do this - pour glue into a container and put a thread in it, or thread the thread into a needle, pierce the tube with glue with the needle and pull until the entire thread is saturated with it.

3. Start wrapping the balls with thread. Try to make sure that there are no large empty spaces on the ball.


4. Leave all the balls in a warm place for the glue to dry. This may take a day.
5. When the glue has dried, the balls can be burst and carefully pulled out.

6. Now you need to glue the balls to each other. If there is no or not enough glue, the balls can be connected with thread.

7. If you wish, you can make handles for the snowman. They are made in the same way as the body, only even smaller balls are used.

8. To make a snowman smile, simply glue on a thick thread.
Also glue plastic (toy) eyes or cut them out of paper.
For the nose, you can use a fake carrot or make a cone out of orange paper and glue it (or secure it with tape).

9. Add a scarf to the snowman.
If you wish, you can cut out circles from colored paper and glue them as buttons.
* You can make a broom from branches, and put a plastic bucket or a cap made of fabric or paper on your head.