How to make a Christmas tree from tea bags. How to make a New Year's composition from candies
New Year is a time of gifts and miracles! Only sometimes it is very difficult to decide on a gift. And if you are going to make a gift with your own hands, then you should get pretty creative.
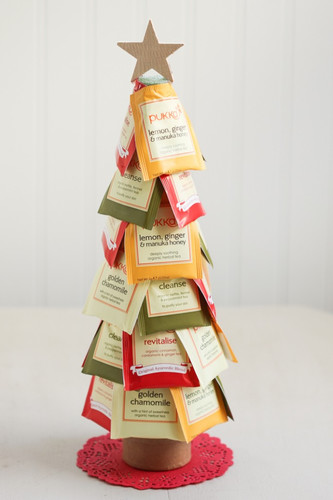
I would like to bring to your attention an excellent gift option - Tea Tree. But since the main tree of the New Year is a Christmas tree, that means we will make a Christmas tea tree.


It is very easy to make such a gift, and you can give it to a loved one, or as a compliment you can give it to a good housewife, teacher or neighbor. In any case, such a gift will delight and impress everyone and will become the central element of a festive tea party. In addition, this is a very budget-friendly gift option!
In its creation, you can use palettes of all colors and any tea aromas.

To create a tree, we need:
Polystyrene foam cones
- individually packaged sachets (their number depends on how large the cone is)
- glue gun
- a small box to use as a base
- wooden stars or other star baubles for decoration
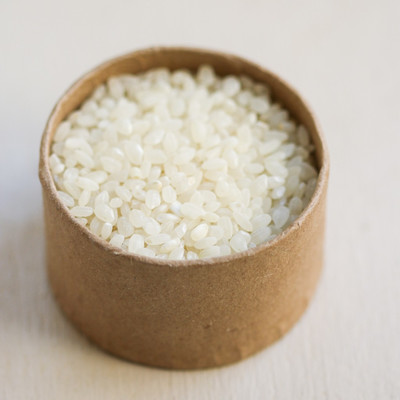
- rice
Let's start by attaching the tea bags starting from the base of the cone. Place a thin line of hot glue along the top edge of the back of the tea bag and then attach it to the cone. Keep the tea bag in place while the glue dries.

When attaching the next tea bag, slightly overlap the previous one. Finish covering the entire base and then repeat the gluing process until you reach the top.

Using glue, glue a small box to the base of the cone.
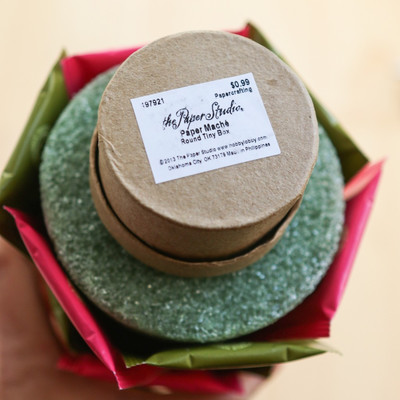
For added stability, add some rice to the bottom of the box to act as a weight, then use glue to seal the top of the box.
Attach the wooden star to the top of the cone, again using hot glue.
When it's time to drink your tea, carefully tear the tea bags off the tea tree and enjoy!

- Rate - Excellent Good Not bad Bad Terrible
Be sure to read other interesting articles:
Useful tips
For the New Year, you can surprise your friends and family by giving them a beautiful handmade gift.
Since the Christmas tree is one of the main symbols of the New Year, it is ideal as a gift.
You can make just a beautiful Christmas tree, or you can decorate it with candies, so you get not just a decoration, but a useful element of the New Year's sweet table.
On our website you will also find:
Here are some of the most interesting ways to make a Christmas tree from candies with your own hands:
Christmas tree made of candies and bottles of champagne

You will need:
Empty bottle of champagne or wine
Scissors
Lots of small candies
Bright ribbon.
1. Place a piece of tape on each candy.
2. Start sticking the candies to the bottle using tape, starting at the bottom and working your way up to the neck of the bottle.
*Make sure that one end of the candy touches the end of the adjacent candy.
3. Glue each next row slightly higher than the previous one so that the candies overlap each other - this will make the tree more magnificent.
4. There should not be more than 4 candies on the top of the head. You can also add a bow or tape a star on it.
5. Pull the curled ribbon down from the top of the tree.
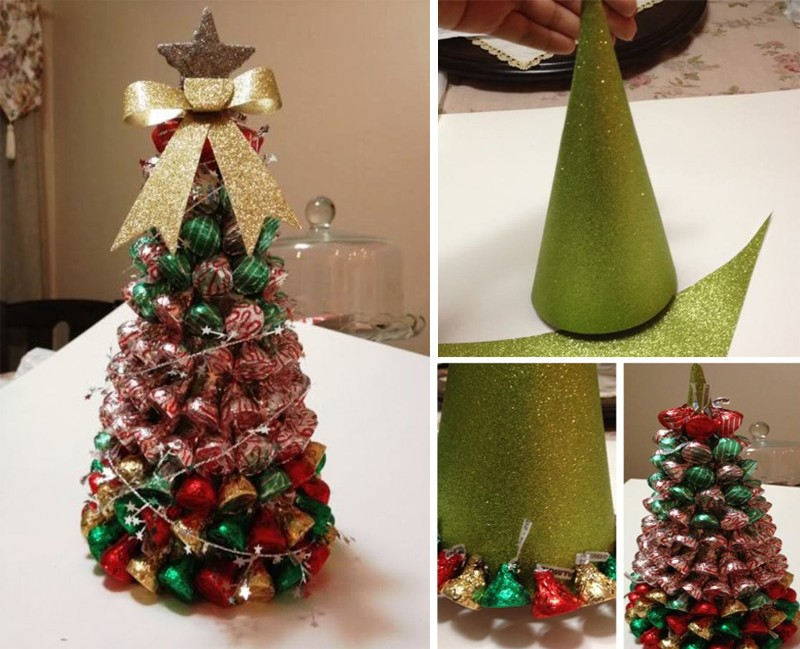
Christmas tree made of sweets and tinsel (master class)

You will need:
Double-sided tape
Regular tape
Small candies
Cardboard and scissors (for making a cone)

1. Using simple tape, glue candies to the cone, leaving small spaces between the rows of candies for tinsel.
2. Place double-sided tape in the gaps between the rows of candies and begin gluing tinsel to it.
3. Glue 3-4 candies to the top of the cone and also wrap them with tinsel.
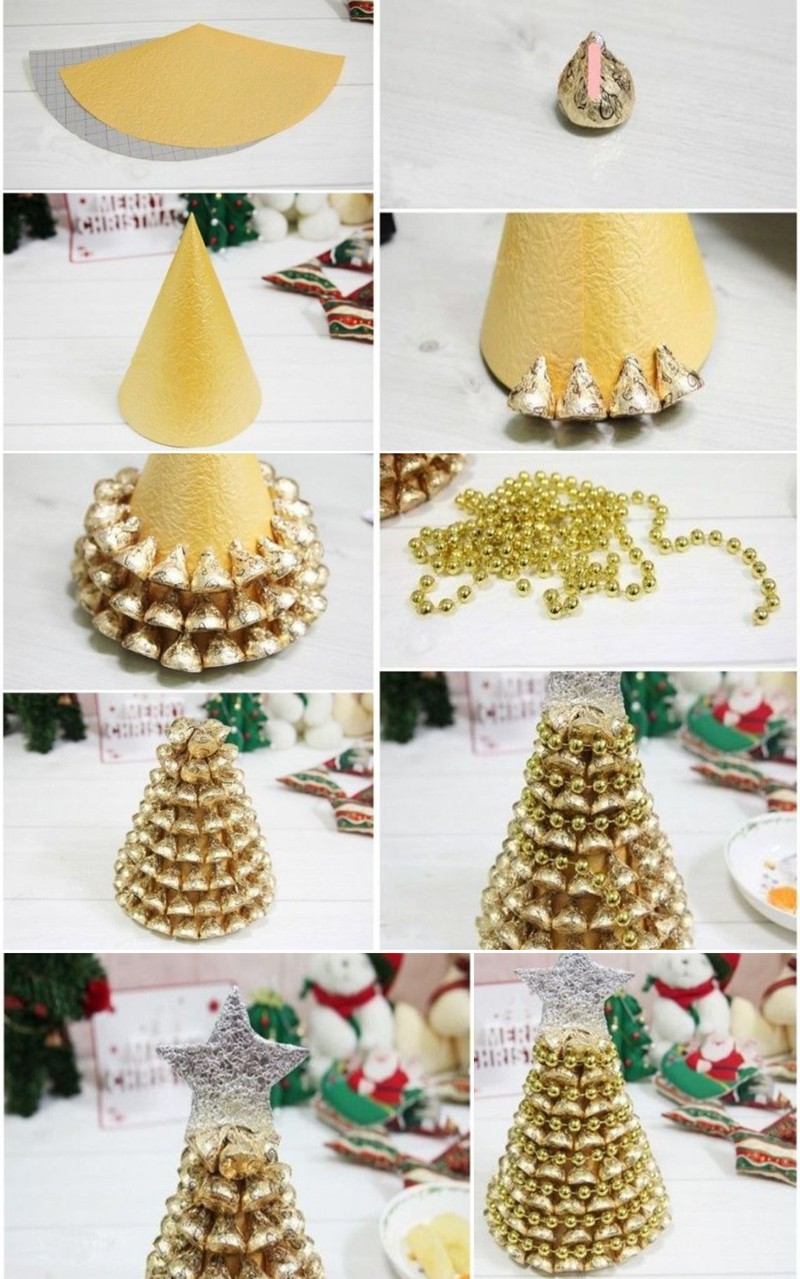
DIY golden Christmas tree made from candies (photo instructions)

You will need:
Cardboard and scissors (to create a cone)
Double-sided tape or glue (PVA or hot glue)
Candies wrapped in gold foil (other candies if desired)
Beads on a string.
1. Cut out part of a circle from cardboard, twist it to form a cone, and secure the ends with glue.

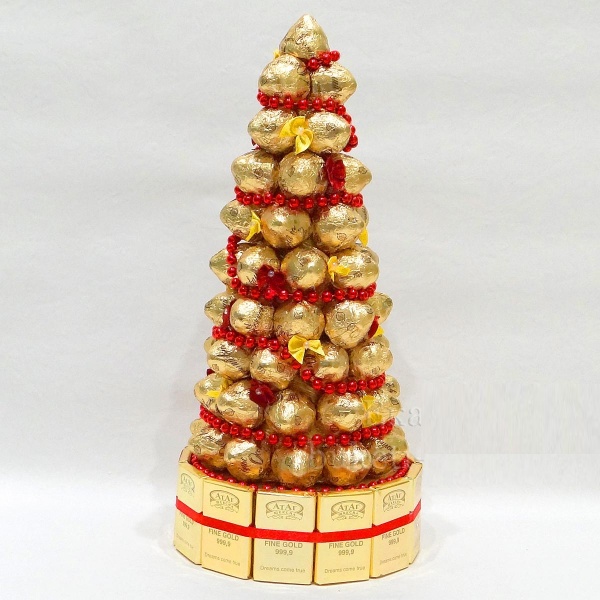
2. Using double-sided tape or glue, begin gluing (from bottom to top) the golden candies to the cone. They should fit closely together to hide as many empty spaces as possible.


3. The gaps between the candies can be covered with beautiful beads on a string or tinsel of a suitable color.

4. You can make a star, and, if necessary, paint it or cover it with foil. You can add a bow.

DIY chocolate candy tree (master class)

You will need:
Thick cardboard and scissors (to create a cone)
Glue (PVA or hot glue) or tape
Scissors
Chocolates (truffles) in shiny wrapper.

1. Roll a cone out of cardboard and secure the ends. Cut off any excess so that the cone sits evenly on the table.
2. Using tape or glue, begin gluing the candies to the cone. Cover the entire surface of the cone with candy.

3. Start decorating the tree to your liking. You can use beads, tinsel, bows, ribbons, “rain”, and you can attach a star made of paper or foil to the top of the head.
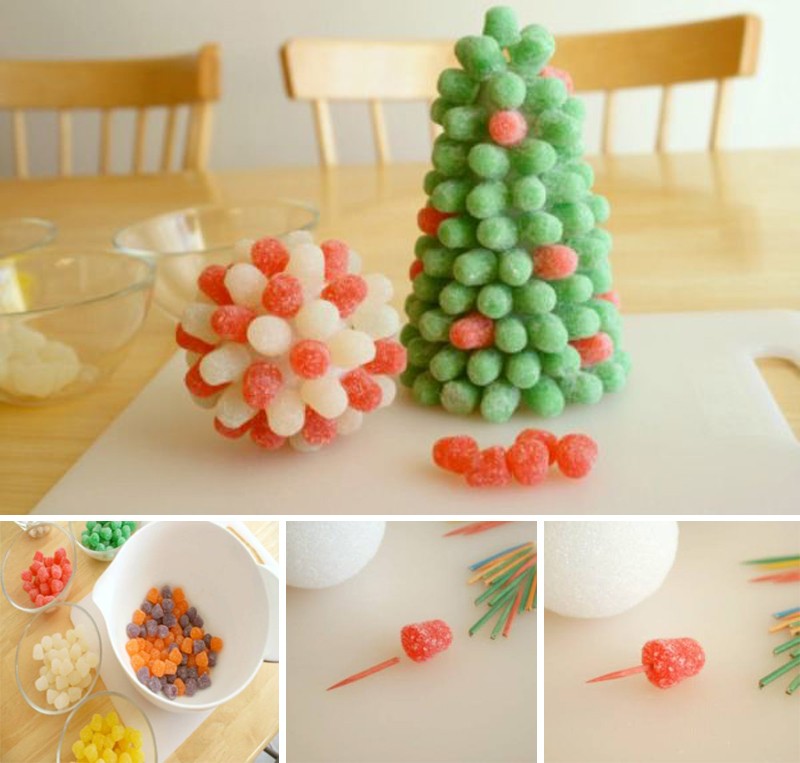
How to make a Christmas tree from soft candies

You will need:
Foam cone
Lots of soft (jelly) candies of different colors
Toothpicks.

Use toothpicks to attach the candies to the cone.

You don't have to use the whole toothpick - you can break it into two pieces.
Simply insert one end of the toothpick into the candy and the other end into the cone and fill the entire tree with candy.
How to make a gift tree from candies with your own hands

You will need:
Several candies
Green cardboard
Scissors
Red ribbon
PVA glue.
Text instructions after the video.
1. Cut a strip of green cardboard measuring 25 cm x 5 cm.
2. Divide this strip into three parts, which will then need to be bent - make marks for future folds at 8 cm, 16 cm and 24 cm.
Also divide this strip in half lengthwise.
3. Fold the strip in half lengthwise, apply PVA glue to one half and glue both halves together.
4. Using the marks made in step 2, fold the strip into a triangle. You have now created a frame for your future candy packaging in the shape of a green Christmas tree.
5. We make shelves for candies inside the packaging:
5.1. Prepare a strip of paper measuring 25 cm x 5 cm, and make marks on it every 2.5 cm (i.e. 2.5 cm, 5 cm, 7.5 cm, etc.).
5.2. Cut the strip in half lengthwise.
5.3. Cut one of the halves in half crosswise at the 10 cm mark.
You will have 3 stripes: 10 cm, 15 cm and 25 cm.
5.4. Fold each strip as shown in the image (zigzag) to create several triangles.
6. Insert your shelves inside the frame (Christmas tree): the long strip is folded into shelves for the bottom row, the middle one for the middle row and the small one is folded into a triangle and inserted into the top of the “Christmas tree”.
7. Start inserting candies into the cells of your Christmas tree.
8. Take a ribbon 45 cm long and tie it to the Christmas tree.
If you wish, you can make a trunk for your Christmas tree out of brown cardboard. You can also put sweets in it (see video). It can be glued using double-sided tape.
*You can decorate the Christmas tree as you like.
A simple candy tree (step by step photo)

You will need:
Paper cone
Corrugated paper
Candies
Decorations to taste (ribbon, beads, artificial flowers, Christmas tree decorations).


Everyone loves tea... Yes, some prefer coffee, others like cocoa. But hardly anyone will refuse a cup of strong, fragrant, aromatic tea. Tea as a gift is a universal and absolutely neutral solution. A tea gift can be given to anyone - be it a colleague, boss, teacher, doctor, hairdresser or old friend. Neither gender, nor age, nor interests, nor the character of the addressee matter. Everyone loves tea...
The gift should not only be pleasant, but also beautiful. Both packaging and design are important. If you decide to give tea, you can purchase a “take and give” product. Many manufacturers have products in gift format. Loose and bagged tea is sold in beautiful tin cans, wooden boxes, and boxes. In principle, such a gift does not require additional elegant packaging.

Gift products from tea producers
However, you can approach the formation of a gift creatively, that is, you can independently choose both the product and the “frame” for it.
How interesting is it to give tea as a gift? We bring to your attention 10 ideas.
1. Tea maker set
When compiling sets, tea is complemented with related products. This could be cookies, sweets, a jar of honey, an original teaspoon, a pair of teas, a teapot, a box of brown sugar, lollipops, lemons, etc. You can accompany the gift with a book - for example, a tea encyclopedia or a publication of tea recipes.

The gift set is presented in a box, basket or bag (a rough linen bag would be appropriate).
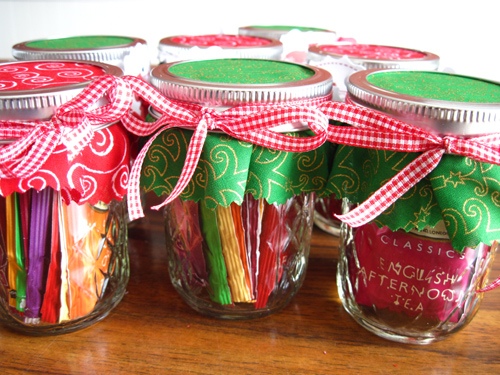
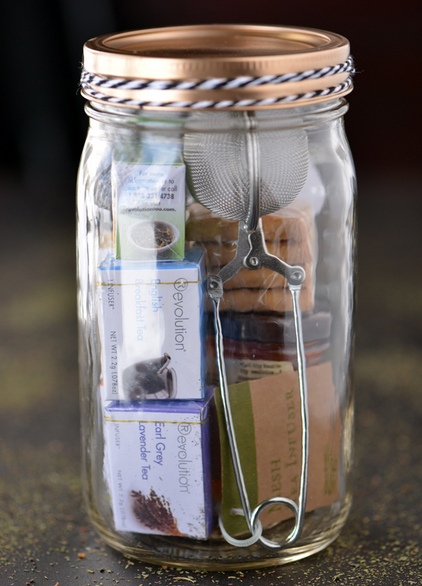
2. Tea jar
An option similar to the previous one, but in a more modest embodiment. Today it is fashionable to present transparent jars with simple gifts.
You can take a special storage jar with a glass lid on a clip. However, an ordinary jar with a metal or nylon lid looks no worse. It will not be difficult to decorate it with a label, tag, “hat”, lace, or a tag on a rope. You can place funny or heartfelt inscriptions on the paper design, for example:
- Sweet holidays to you
- Keep calm and drink tea
- And let the whole world wait…
- Antistress
- Natural sedative
What should I put inside? Assorted tea in bags, small packs of loose tea, candy, teapot, stevia packets, etc. In general, everything related to tea drinking fits in a jar.
3. Teapot with filling
Tea bags or a tea set can be placed directly into a new teapot, which will become both part of a gift and a “gift box”.
The kettle can be anything: ceramic, plastic, metal, glass. Each option is good in its own way. The advantage of transparent is that it does not hide its delicious contents from view.
4. "Full Cup"
A small tea set can also be assembled directly in a mug. A lot can fit in a container with a volume of more than 350-400 ml: for example, a dozen small sweets, about 15 tea bags and a spoon.


It is advisable to wrap the mug with the filling in a transparent package.
5. Tea house
In kitchenware stores you can find very beautiful and cozy house jars (they are also called dispensers) for tea bags. Bought, filled and presented. Simple and beautiful.

6. Tea cake
Edible and inedible gift “cakes” are made from a variety of things: sweets, chocolates, money, toys and even diapers for newborns. A similar structure can be made from tea (from small boxes or tea bags). The gift will be more interesting and tasty if you combine tea with chocolate.
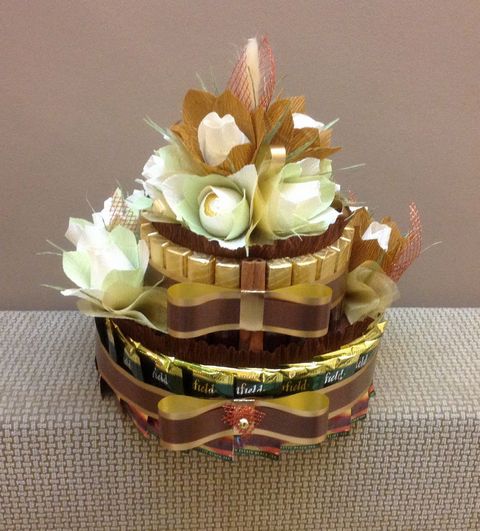
Low cylinders made of cardboard, polystyrene foam, etc. or cylindrical cans-boxes with sweets are used as a base.

The base of this “cake” is a cylindrical tin box of cookies. Link to the needlewoman
Tea bags are secured with paper clips or with an elastic ring, on top of which a decorative braid is placed.
7. Tea box
We select any cute little box and fill it with tea - an elegant gift is ready.
You can, of course, immediately buy tea in a box - many manufacturers have such gift sets. But, firstly, ready-made kits can be quite expensive. Secondly, they do not always present exactly the tea that you would like to present.
8. Tea Christmas wreath
This is a gift idea for New Year and Christmas. Such homemade gifts are presented only to fairly close people.

A popular tea wreath model is a cardboard ring to which wooden clothespins are glued. The tea bags are fixed on them. It is also necessary to provide a ribbon for hanging the wreath.

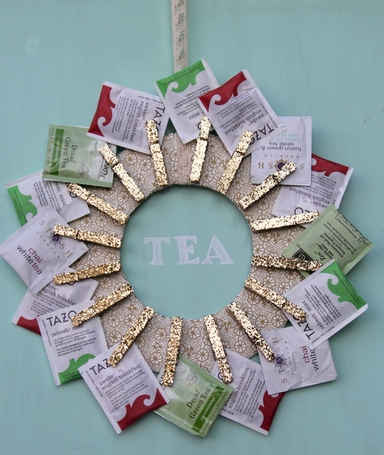
Along with tea bags, you can attach chocolates to clothespins.
9. Tea tree
Another tea gift idea for New Year and Christmas. Now it is fashionable to give gifts to friends, family and colleagues. Some of these Christmas trees are eaten and drunk with pleasure after the holidays (if they are made from candies, cookies, tea, etc.).

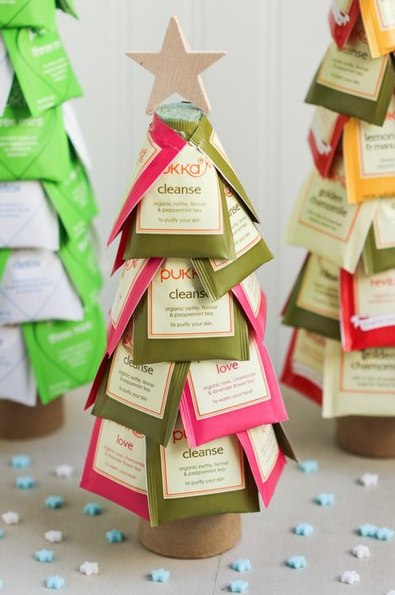

Photo of a Christmas tree made from greenfield bags
What would New Year be without sweets and candy?! We've been good all year, so on the last day of December we look forward to some sweet treats to make the coming year as sweet as these candies.
However, candies in the New Year can be used not only as a sweet treat, but also as decoration, for example, you can use them to make an original New Year tree. By the way, a DIY candy tree can completely replace the usual forest beauty, and after the holidays are over, you don’t need to think about how to put it away :) In addition, a candy tree will be a wonderful themed gift for friends and family, and the fact is that a handmade gift will certainly please the recipient.
When making a Christmas tree from candies, you can use sweets of your choice: these can be either chocolates or lollipops. You shouldn’t ignore soft gelatin candies: they will make a very original Christmas tree. If you are preparing a Christmas tree as a gift for an adult, you can make it using a bottle of champagne!
However, there are plenty of ideas, all that remains is to find the time and realize your potential!
#1 New Year tree made of candies and tinsel
The easiest option for a New Year's tree made of candies is to combine candies with New Year's tinsel. To make such a Christmas tree you will need candy, a thick sheet of paper, glue or tape, and tinsel.
#2 Golden Christmas tree made from candies
The Christmas tree is magical and doesn’t have to be green. Although in the winter season any tree in a green robe looks magical! But we will create our own magic - a golden Christmas tree. For this we will need: candies in gold wrapping, a thick sheet of paper, glue or tape, beads on a string for decoration.
Making this Christmas tree depends on whether you want to give it as a gift or simply use it as a decorative element. If the New Year tree is being prepared for a gift, then the bottle must be full, otherwise it won’t turn out very well... In any case, you will need: a bottle of champagne, candy, tape, ribbon for decoration.

#4 Christmas tree made of chocolates
You will need thick paper or cardboard to create the base cone, chocolates, tape or glue, and ribbon or bow for decoration.
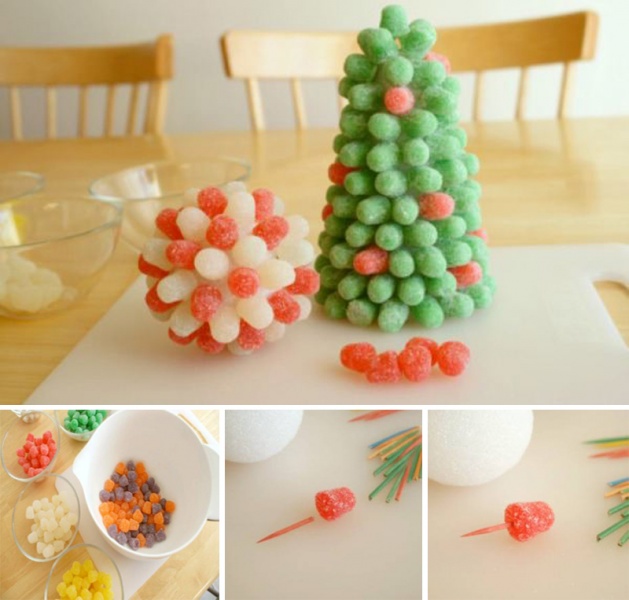
#5 Christmas tree made from gelatin candies
A Christmas tree made from soft gelatin candies will be original. You will need: foam for the base cone, gelatin candies, toothpicks.
#6 Christmas tree made from Candy Cane candies
No less interesting is the idea of creating a New Year tree from candy canes in the shape of a stick. In our country, such candies are not usually associated with the New Year holidays, but in American films you can often find them. However, the idea is quite original, so if you want, it’s worth a try. You will need: a lot of lollipop sticks or Candy Canes, a foam cone, glue or you can melt some candy and glue it on.

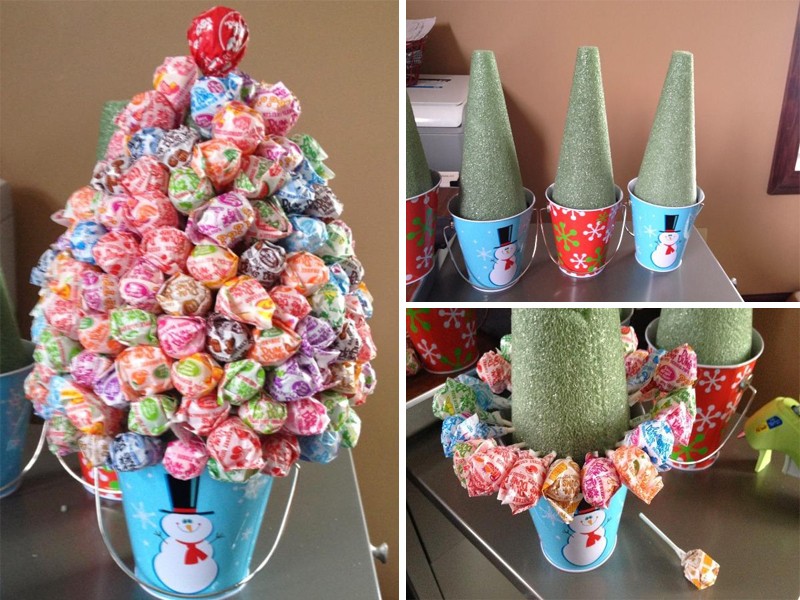
#7 Christmas tree made from lollipops
For such a Christmas tree you will need a foam cone, lollipops (for example, lollipops), and any decorative elements.
#8 Christmas tree made from candies in original packaging
You can make a Christmas tree from candies in a variety of ways, including packing candies in a box in the shape of a Christmas tree. An excellent decoration for the table and a wonderful gift for loved ones!

Now that the technology for making a Christmas tree from candies with your own hands is clear to you, all that remains is to turn on your imagination and make a unique Christmas tree that will fill the holiday with joy and add a little miracle to it.
Well, we have selected for you 10+ more ideas for New Year trees made from candies, looking at which you can be inspired to create a new masterpiece. And who knows, maybe next year the entire Internet will be talking about your incredibly cool DIY Christmas tree.


Content
Probably not a single holiday is complete without a sweet table. For some, skipping the main courses and going straight to cakes, pastries or sweets is a nice thing to do. We're not talking about kids, for whom there can never be enough sweets. Since the long-awaited New Year's Eve awaits us, it's time to think about how to create New Year's compositions from candies. Stock up on resources, use your imagination, call the children and let’s create together.
Christmas trees made from candies
Let's combine these two New Year's attributes and try to make an alternative to a live Christmas tree - a sweet tree.
The easiest option is to glue various candies onto a cardboard base in the shape of a cone and decorate the composition with beads, rain and other decor. If the candy wrapper itself is beautiful, then you can glue it right away, but if you want all the candies to be in the same style, then just wrap each one in foil.
The combination of sweets and small chocolate bars looks good. For a sweet Christmas tree, you can also use unpackaged gummies or jelly candies. Use skewers and a foam cone base.
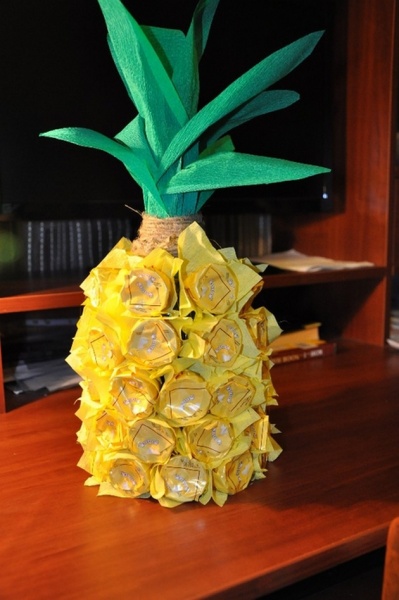
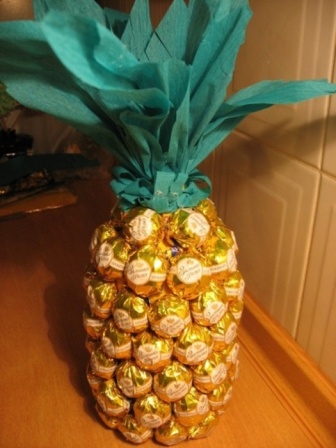
"Pineapple" from candies
For this pineapple we need:
- a bottle of champagne;
- candies;
- glue gun;
- corrugated paper in green and orange colors;
- glue gun;
- twine for decoration.
First, each candy needs to be decorated in orange paper, as shown in the photo:
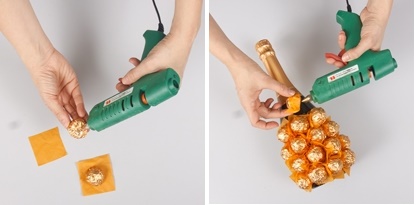
This will make it easier to attach the candies to the bottle, and the composition will look more like a pineapple. After this, all the candies in a checkerboard pattern need to be glued to the bottle.
To decorate the top we use green paper petals, which can be tied to the neck of the bottle with twine or twine.
How many people there are, so many options for creating a “pineapple”. We invite you to take a look at some of them.

Please note that some needlewomen pre-wrap the bottle with fabric or paper.
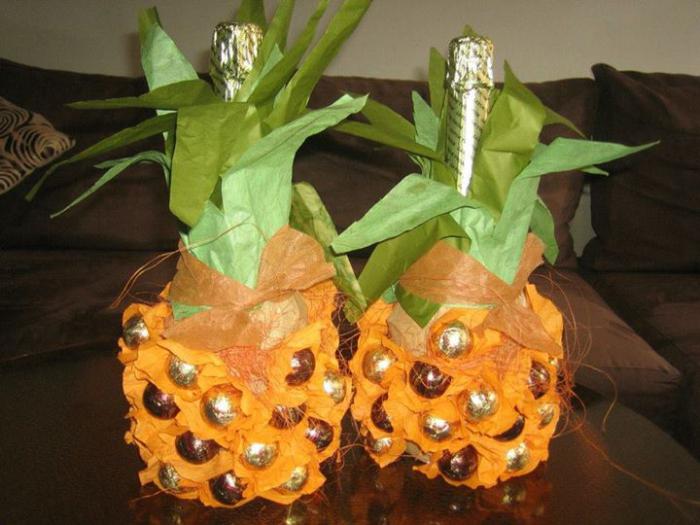
Improvise, look for your own design option for a bottle of champagne.
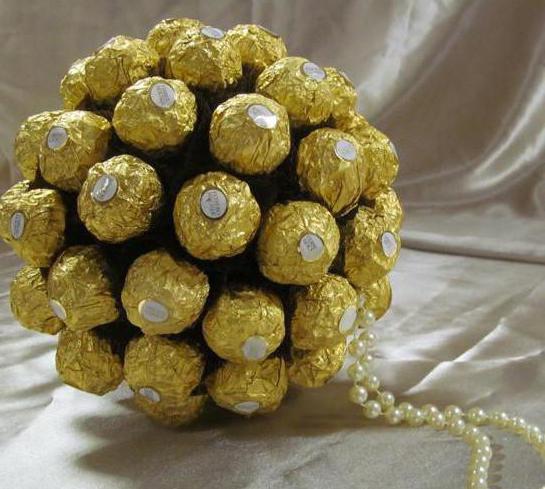
Decorative candy ball
The principle of creating a decorative ball can be exactly the same as in the case of a New Year tree. We can use a foam ball and put jelly candies on it using skewers:

You can use a thick blank ball to cover it with various other candies:

The ball turns out to be quite weighty, so we’re not sure whether it can be hung on a Christmas tree, but it’s very suitable as a decoration for the New Year’s table:
How to make a candy wreath
And again the principle is the same - we take a foam base and decorate it with lollipops, chocolates, gummies, jelly candies and other sweets. If the candies themselves are quite voluminous, then you can use a cardboard blank in the form of a wreath.
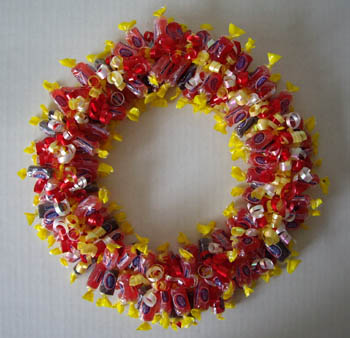
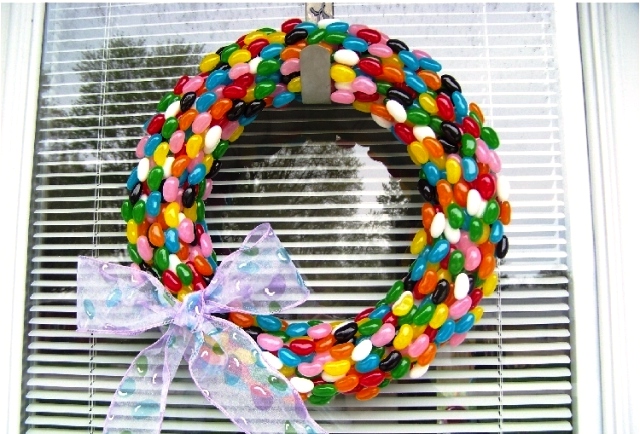
You can put jelly or marmalade candies on the foam. Use wooden skewers. The wreath can be hung on the front door of the children's room and each child who enters can pull out a piece of candy from the wreath as a sweet bonus.

You can even use marshmallows of different sizes and shapes instead of candies.
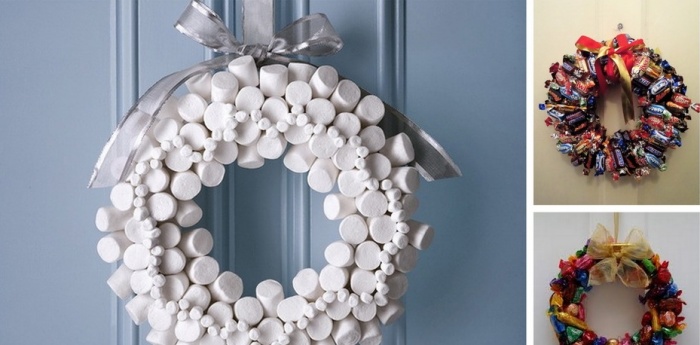
If you do not plan to eat the Christmas and New Year wreath in the future, then you can decorate it with multi-colored candies and open it with varnish.
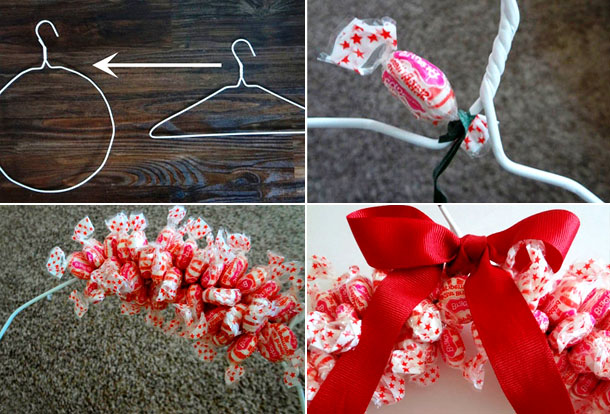
If you don’t have thick cardboard or foam blanks on hand, you can glue the candies to a hoop using tape or use a metal hanger, which you first need to bend and form a circle out of it. The hook is useful for hanging a wreath.
New Year's candy compositions
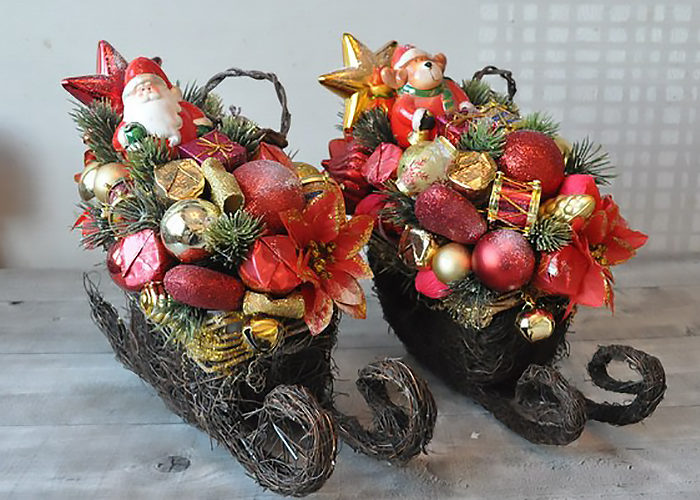
For the New Year, you usually don’t need to invent a wheel, but you just need to create things that will be beautiful, bright, and if also tasty, then, in general, beauty! Therefore, ordinary New Year's compositions can be supplemented with several beautiful candies and it will already be original and festive.
For example, for the following composition you will need:
- base in the form of a wicker sleigh (you can choose any other);
- floral sponge;
- fir branches;
- small Christmas balls;
- beads or Christmas tree beads;
- sweets;
- any other decor.
The floral sponge should be placed inside the workpiece and all the elements of the future composition should be placed on it. If necessary, use wooden skewers or a glue gun.
You can choose a wooden chest as a base. It is easier to assemble a composition, change parts, add or remove.
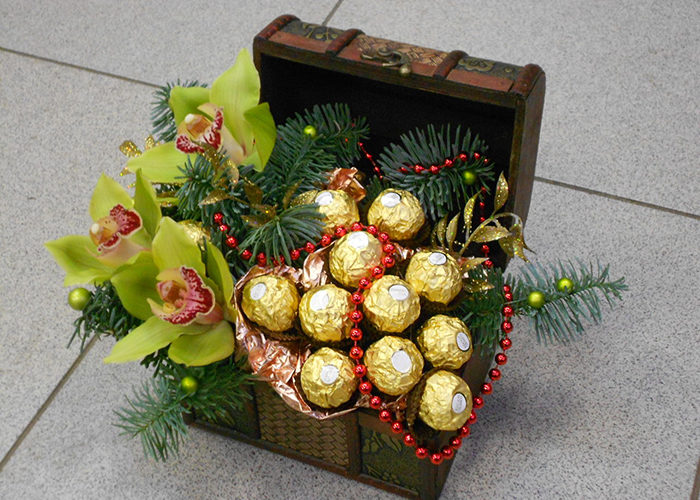
The candies themselves can serve as the basis for a New Year's composition. The candies can be tied with floral ribbon, and any decor that you like can be placed on top.

You can make a bag with candies and cones, Christmas tree branches and glass toys. Similar bags are sold in craft stores or you can sew them yourself.

New Year's candy clock
This is another composition that deserves its own chapter. For it we will need the following materials:
- candies, you can choose the option with flat candies, or you can take more voluminous ones, but not round ones;
- thick cardboard;
- Styrofoam;
- glue gun;
- shiny wrapping paper;
- packing tape;
- crepe paper;
- beads of different colors and coffee beans.
To begin, you need to cut out two circles from cardboard and crepe paper. The diameter will correspond to the size of the future watch.
We cut out one circle from foam plastic - this will be the base of the clock.
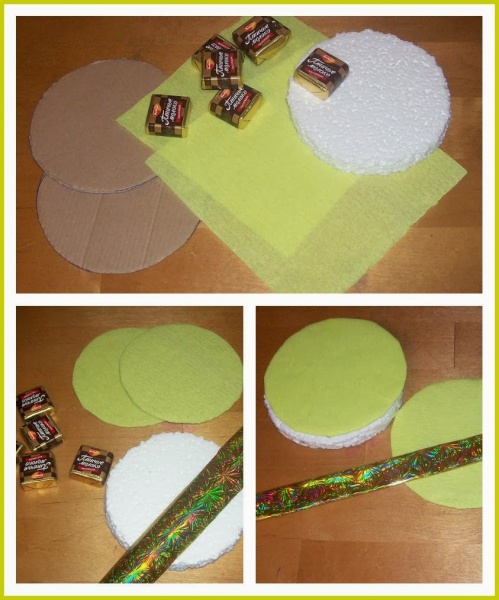
You need to cover the cardboard blanks with crepe paper, and then glue them on both sides to the foam.
Use shiny gift paper to decorate the edges of the clock. After this, you can start attaching the candies. Use a glue gun for these jobs.

Please note that the reverse side of the watch can be decorated with pasta, which must first be painted in any color you like. To make the candies stick better to the structure, they can be additionally secured with floral tape.
We lay out the numbers and hands of the New Year's clock using coffee beans and beads.
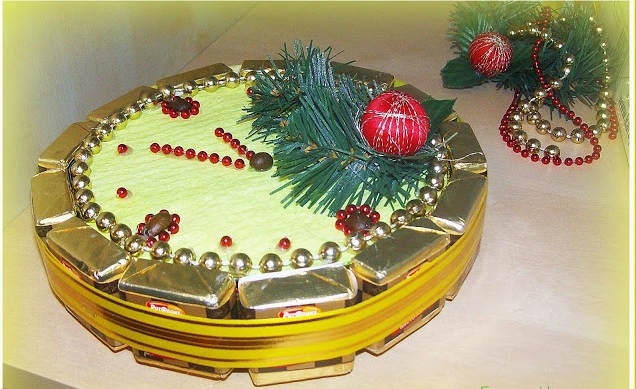
Depending on what material for the dial, what candies and colored paper you choose, the design of the watch itself will depend, which, by the way, can turn into a New Year's alarm clock.

To create such a watch, you can use a ready-made printed dial, you can even take a real dial (a design that will show the time), you can use small chocolate bars, various multi-colored dragees or lollipops, and chocolate medals as decoration.
New Year's horseshoe made of candies
Luckily, you can make a New Year's horseshoe from candies, which can be either a separate decorative element or as part of an entire composition.
Use thick cardboard as a base, corrugated paper to cover the cardboard, and pretty candies to decorate the entire piece. Again, you can use chocolate medals.
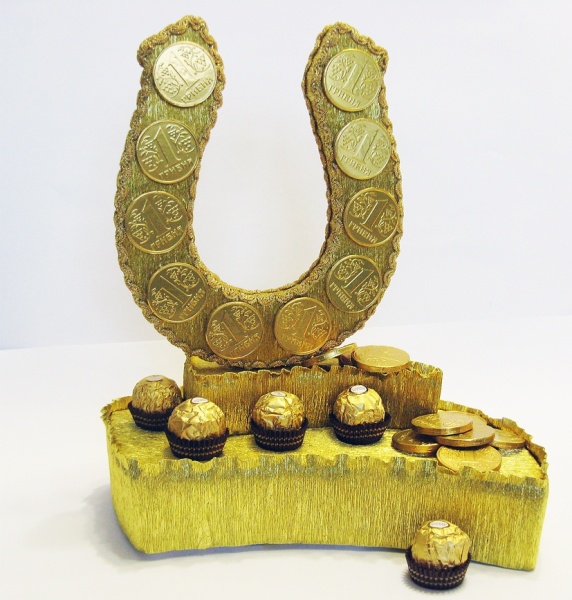
Candies can not be used to decorate the horseshoe itself, but placed at the base as an additional decoration.

And by tradition, at the end of each article we invite you to watch a video master class. This time it will be a New Year's bouquet of sweets:
Read our articles on New Year's themes, find something new for yourself and try to create!
Post Views: 206