Interesting home experiments. A selection of the most interesting experiments with water for children
Did you know that May 29 is Chemist's Day? Who among us in childhood did not dream of creating unique magic, amazing chemical experiments? It's time to make your dreams come true! Read on quickly and we will tell you how to have fun on Chemist Day 2017, as well as what chemical experiments for children can be easily done at home.

Home volcano
If you are not already attracted, then... Do you want to see a volcanic eruption? Try it at home! To set up a chemical experiment “volcano” you will need soda, vinegar, food coloring, a plastic glass, a glass of warm water.
Pour 2-3 tablespoons of baking soda into a plastic cup, add ¼ cup of warm water and a little food coloring, preferably red. Then add ¼ vinegar and watch the volcano “erupt”.
Rose and ammonia
A very interesting and original chemical experiment with plants can be seen in the video from YouTube:
Self-inflating balloon
Do you want to conduct safe chemical experiments for children? Then you will definitely like the balloon experiment. Prepare in advance: a plastic bottle, baking soda, a balloon and vinegar.
Pour 1 teaspoon of baking soda inside the ball. Pour ½ cup of vinegar into the bottle, then put a ball on the neck of the bottle and make sure that the soda gets into the vinegar. As a result of a violent chemical reaction, which is accompanied by the active release of carbon dioxide, the balloon will begin to inflate.
Pharaoh snake
For the experiment you will need: calcium gluconate tablets, dry fuel, matches or a gas burner. Watch the algorithm of actions on YouTube video:
Colorful magic
Do you want to surprise your child? Hurry up and conduct chemical experiments with color! You will need the following available ingredients: starch, iodine, transparent container.
Mix snow-white starch and brown iodine in a container. The result is an amazing mixture of blue.
Raising a snake
The most interesting home chemical experiments can be carried out using available ingredients. To create a snake you will need: a plate, river sand, powdered sugar, ethyl alcohol, a lighter or burner, baking soda.
Place a pile of sand on a plate and soak it in alcohol. Make a depression in the top of the slide, where you carefully add powdered sugar and soda. Now we set fire to the sand slide and watch. After a couple of minutes, a dark wriggling ribbon that resembles a snake will begin to grow from the top of the slide.
How to conduct chemical experiments with an explosion, see the following video from Youtube:
Entertaining chemical experiments will prepare children for studying chemistry at school. Most of the experiments carried out at home are not dangerous, educational, and effective. Some experiments are provided with a written description, which will help explain to the child the essence of the processes taking place and awaken interest in chemical science.
When conducting chemical experiments at home, the following safety rules must be observed:
Simple experiments for little ones
Chemical experiments for young children, carried out at home, do not require any special substances.
Colored bubbles
For one such experiment you will need:
- fruit juice;
- sunflower oil;
- 2 effervescent tablets;
- decorative transparent container.
Stages of experience:

You can create bubbles with a stronger shell yourself by mixing water and dishwashing detergent in a 2:1 combination + a little granulated sugar. If you add glycerin instead of sugar, the bubbles will reach very large sizes. Adding food coloring to the soap solution will create colored glowing bubbles.
Night light
You can make a night light at home using simple substances. To do this you will need:
- tomato;
- syringe;
- sulfur heads from matches;
- hydrogen peroxide;
- bleach.
Sequencing:
- Place sulfur in a bowl, add bleach, and leave for a while.
- Draw the mixture into a syringe and prick the tomato from all sides.
- To start the chemical reaction, hydrogen peroxide must be introduced. This is also done with a syringe in the place where the petiole was located.
- When in a dark room, the tomato will emit soft light.
Carefully! You can no longer eat this tomato.
Sizzling balls
You can make your own sizzling balls for children's bathing.
During work, hands must be protected with gloves.
Sequencing:

Floating worms
For the next experiment you will need:
- 3 jelly worm candies without sugar sprinkles;
- soda;
- acetic acid;
- water;
- glass glasses.
Stages of work:
- The first glass is half filled with acetic acid.
- Pour warm water into the second glass and dilute 60 g of soda.
- Place the candies in the solution and leave for 15 minutes.
- Remove the candies from the soda solution and place them in a glass with the essence.
- The surface of the candy will immediately become covered with bubbles; they will continuously rise to the surface and fall to the bottom of the glass. This happens because the soda first fills the pores of the candy, then, reacting with vinegar, it releases carbon dioxide, which raises the candy to the top.
- When they come into contact with air, the bubbles burst, the candy sinks to the bottom and again becomes covered with bubbles and rises.
Experiments for older children
Chemical experiments for children at home can be more complex and interesting.
Volcano
So, any schoolchild can simulate a volcanic eruption at home:

Colored foam
To experience creating colored foam you will need:

Sequencing:
- The glasses are placed on a tray, half filled with soda, and dyes are added.
- Mix vinegar with detergent and pour into glasses.
- Colored foam will come out of each glass. You can pour the vinegar mixture into glasses several times until all the soda is released.
Malachite egg
The experiment of dyeing a chicken egg the color of malachite is lengthy, but interesting:
- To do this, remove the contents from the egg: make 2 holes and blow it out.
- For weight, a little plasticine is placed into an empty egg.
- Dissolve a spoonful of copper sulfate in 0.5 liters of water (it can be purchased at a hardware store).
- Dip the egg into the solution; the shell should be completely immersed in the solution.
- After a few days, gas bubbles will appear.
- After a week, the shell will acquire a light blue-green color.
- After a month, the color of the shell will become rich malachite.
Fireworks
Making fireworks with your own hands:

- Magnesium shavings are very finely ground.
- Sulfur match heads are separated from the wood. You will need 2-3 boxes of matches. Crushed magnesium is mixed with sulfur powder.
- Take a metal tube and seal one of the holes tightly with plaster.
- Pour a mixture of magnesium and sulfur into the tube. The mixture should not occupy more than half of the tube.
- The tube is wrapped several times with foil. A wick is inserted into the free hole.
- Such fireworks can only be exploded in deserted places.
Coloring water blue
To color a colorless liquid blue you need:
- alcohol solution of iodine;
- hydrogen peroxide;
- vitamin C tablet;
- starch;
- glass glasses.
Performing the experiment step by step:
- A vitamin C tablet is ground into powder and dissolved in 55 ml of warm water.
- Pour 5 ml of the resulting solution into a glass, add 5 ml of iodine and 55 ml of heated water. The iodine should be discolored.
- Separately mix 18 ml of hydrogen peroxide, 5 g of starch, 55 ml of water.
- The iodine solution is poured back and forth into the starch solution several times.
- The colorless liquid will turn dark blue. Iodine loses color when it reacts with vitamin C. Starch turns blue when mixed with iodine.
Simple experiments on the properties of metals
Chemical experiments for children at home can be carried out with metals.
For simple experiments you will need:
- fire;
- pieces of various metals;
- foil;
- copper sulfate;
- ammonia;
- acid.
To experiment with copper wire, a small piece of metal is twisted into a spiral and heated strongly over a fire. Then immediately lower it into a container with ammonia. The reaction will occur instantly: the metal will begin to hiss, and the black coating formed when exposed to fire will disappear. The copper wire will shine again. It is better to do the experiment several times, then the color of the ammonia will turn blue.


For the next experiment you will need solid iodine, crushed aluminum, and warm water. Iodine is mixed with aluminum in equal parts. Water is added to the mixture. The powder begins to burn, releasing purple smoke.
Another experiment will involve:
- chrome-plated paper clip;
- galvanized steel nail;
- pure steel screw;
- acetic acid;
- 3 test tubes.
Stages of experience:
- Metal objects are placed in test tubes, filled with acid, and left for observation. In the first days, hydrogen evolution is observed.
- On the 4th day, the acid in test tubes with coated metal objects begins to turn red. In a test tube with a steel screw, the acid turns orange and a precipitate appears.
- After 2 weeks in a test tube with a paper clip, the acid turns red, but only in the upper layers. Where the paperclip is located, the acid is colorless. After removing the paper clip, you can see that its appearance has not changed.
- The acid in a test tube with a nail is colored with a smooth transition from red to pale yellow. The nail hasn't changed.
- In the 3rd test tube, layered coloration of the liquid and sediment are also observed. The screw turned black, the upper microlayers of the metal collapsed.
Conclusion: unprotected iron is susceptible to corrosion.
For the next experiment, you need to prepare a blue solution of copper sulfate (dissolve several crystals in water, stir). Place non-rusty nails in a test tube and fill with solution. After some time, the solution will turn green and the nails will turn copper-colored. This happened because iron displaced copper from the liquid, and the displaced copper settled on metal objects.
To conduct the “Hydrogen Glove” experiment you will need:

Sequencing:
- The saline solution and copper sulfate solution are simultaneously poured into the flask. When mixed, a sea-green liquid is obtained.
- Make a lump of foil and place it in the hole of the flask. Immediately, hydrogen begins to rapidly evolve.
- Put a rubber glove on the neck, it will instantly fill with gas.
- When the glove comes into contact with fire, it ruptures and the gas ignites. The liquid in the vessel gradually acquires a dirty gray tint.
The most spectacular chemical experiments for children
Chemical experiments for children at home are very diverse, and some are very impressive.
Colored foam
To make a large amount of colored foam you need:

Bleached green
For the experiment on bleaching greenery you will need:
- brilliant green solution;
- glasses;
- bleach;
- ammonia;
- vinegar;
- hydrogen peroxide;
- activated carbon tablets.
Sequencing:
- Water is poured into 6 glasses, a drop of greenery is added to each.
- The 1st glass is set aside for comparison, bleach is added to 2, ammonia to 3, peroxide to 4.
- Ammonia instantly discolors the liquid.
- Small bubbles appeared in the glass with bleach, and the solution became colorless.
- Hydrogen peroxide will discolor the liquid gradually, over about 15 minutes.
- Adding vinegar to the solution will make the liquid brighter.
- After 30 min. the liquid becomes lighter.
- Activated carbon brightens the solution.
Pharaoh snake
Conducting an experiment called “Pharaoh’s Snake” will require:

Stages of experience:
- The sand is soaked in alcohol and formed into a cone.
- A recess is made at the top.
- Mix soda with sugar and pour into the well.
- The soaked sand is set on fire.
- The mixture will turn into black balls, soda and sugar will begin to decompose.
- After burning the alcohol, a snake will appear, consisting of the products of burning sugar.
Pharaoh's snake made from sugar and soda:
Fire without a spark
To create a fire without a spark, you need potassium permanganate, glycerin and paper.
Sequencing:
- Place approximately 1.5 g of potassium permanganate powder in the center of a sheet of paper, cover with the free edge of the sheet.
- Apply 3 drops of glycerin to the paper in the place where the powder is located.
- After 30 seconds, potassium permanganate will begin to hiss, smoke and produce black foam. The exothermic reaction will heat the paper and it will catch fire.
Fireworks
To make small fireworks at home, you need to choose a small fireproof dish with a long handle.


Sequencing:
- On a paper sheet you need to pour a crushed tablet of activated carbon, the same amount of potassium permanganate and the same amount of iron filings.
- Fold a piece of paper in half to combine the powders (powders should not be mixed with spoons or spatulas; they may ignite).
- Carefully pour into a fireproof container and heat over the burner. After a few seconds. the heated mixture will begin to emit sparks.
Chemistry sets for children
Chemical experiments for children at home will help you carry out special sets of substances and tools.
Experiment kit “Vulcan”
Designed for children over 14 years old, it allows you to independently reproduce the eruption of a small volcano.
Equipment:

To conduct the experiment, you first need to make the volcano itself; sand or gypsum is suitable as a material. When the mountain has frozen, a special powder is poured into the depression and set on fire. The substance begins to burn spectacularly, throwing out sparks, and ash appears.
The advantages of such an experiment include a visual representation of flammable substances. Disadvantages: presence of harmful substances, can only be used once.
Price: 440 rub.
Chemistry set
The kit provides for growing crystals at home.

The set includes:
- ammonium crystal;
- dye;
- polypropylene container;
- gloves;
- colored glass base;
- stirring tool;
- instructions.
Stages of work:
- Pour crystalline powder into a container and mix with 150 ml of boiling water.
- Stir until completely dissolved.
- The base of the crystal is immersed in the liquid.
- Cover with a lid for 60 minutes.
- Add a substance to form a crystal into the cooled water and close the lid.
- After a day, remove the lid.
- Wait until the top of the crystal appears above the water.
- The water is drained, the crystal is removed and dried.

The experiment is very interesting for children and is practically safe, but it will take at least 4 days to complete.
Cost of the set: 350 rub.
Set for chemical experiments “Traffic light”
Set includes:
- sodium hydroxide;
- glucose;
- indigo carmine;
- 2 measuring cups;
- gloves.
Sequence of experience:
- Glucose (4 tablets) is dissolved in 1 glass using a small amount of boiling water. Add 10 mg sodium hydroxide solution.
- A little indigo carmine is dissolved in the 2nd glass.
- A solution of glucose and alkali is poured into the resulting blue liquid.
- When mixing the solutions, the liquid will turn green (oxygen in the air oxidizes indigo carmine).
- Gradually the solution will turn red, then yellow. If the vessel with the yellow solution is shaken, the liquid will turn green again, then red and yellow.

The experiment is spectacular, interesting and safe. The disadvantages include insufficiently detailed instructions.
Set price: 350 rub.
Advantages and disadvantages of home experiments
| Experience name | Advantages | Flaws |
| Pharaoh snake | Availability of materials, entertainment | Not safe |
| Growing Crystals | Complete security, visibility | The experiment is quite long |
| Volcano | Clearly demonstrates the interaction of substances | Long preparations for the experiment |
| Experiment on the interaction of metals with various liquids | Effectiveness, safety | Requires a lot of time to carry out |
| Home fireworks | Entertainment and availability of substances used | Not safe |
Most chemical home experiments, when carried out correctly, do not harm the child’s health, but it is better to carry them out under adult supervision. All the necessary substances can be found in any kitchen.
Experiments will reveal to children the secrets of the interaction of substances and arouse interest in understanding the world.
Article format: Svetlana Ovsyanikova
Video on the topic: chemical experiments for children
Home miracle laboratory: chemical experiments for children:
Summary: Chemical experiment - invisible ink. Experiments with citric acid and soda. Experiments with surface tension on water. Mighty shell. Teach an egg to swim. Animation. Experiments with optical illusions.
Does your baby love everything mysterious, enigmatic and unusual? Then be sure to carry out the simple but very interesting experiments described in this article with him. Most of them will surprise and even puzzle the child, giving him the opportunity to see for himself in practice the unusual properties of ordinary objects, phenomena, their interaction with each other, understand the reason for what is happening and thereby gain practical experience.
Your son or daughter will certainly earn the respect of their peers by showing them experiments like magic tricks. For example, they can make cold water “boil” or use a lemon to launch a homemade rocket. Such entertainment can be included in the birthday program for children of preschool and primary school age.
Invisible ink
|


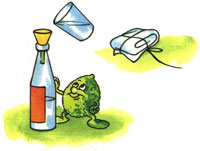
Lemon inflates a balloon
|


Lemon launches a rocket into space
|

Running toothpicks
|


Mighty Shell
|


Teach an egg to swim
|


"Bait" for ice
|


Can cold water “boil”?
|


Pipette straw
|


Straw-flute
|


Rapier straw
|


Bird in a cage
|


How does a square turn into a circle?
|


Strong newspaper
|


Mighty Breath
|


Record weight
|


And learn with them peace and wonders of physical phenomena? Then we invite you to our “experimental laboratory”, in which we will tell you how to create simple, but very interesting experiments for children.
Experiments with eggs
Egg with salt
The egg will sink to the bottom if you place it in a glass of plain water, but what happens if you add salt? The result is very interesting and can clearly show interesting facts about density.
You will need:
- Salt
- Tumbler.
Instructions:
1. Fill half the glass with water.
2. Add a lot of salt to the glass (about 6 tablespoons).
3. We interfere.
4. Carefully lower the egg into the water and watch what happens.
Explanation
Salt water has a higher density than regular tap water. It is the salt that brings the egg to the surface. And if you add fresh water to the existing salt water, the egg will gradually sink to the bottom.
Egg in a bottle

Did you know that a boiled whole egg can easily be placed in a bottle?
You will need:
- A bottle with a neck diameter smaller than the diameter of an egg
- Hard boiled egg
- Matches
- Some paper
- Vegetable oil.
Instructions:
1. Lubricate the neck of the bottle with vegetable oil.
2. Now set fire to the paper (you can just use a few matches) and immediately throw it into the bottle.
3. Place an egg on the neck.
When the fire goes out, the egg will be inside the bottle.
Explanation
The fire provokes heating of the air in the bottle, which comes out. After the fire goes out, the air in the bottle will begin to cool and compress. Therefore, a low pressure is created in the bottle, and the external pressure forces the egg into the bottle.
Ball experiment

This experiment shows how rubber and orange peel interact with each other.
You will need:
- Balloon
- Orange.
Instructions:
1. Inflate the balloon.
2. Peel the orange, but do not throw away the orange peel (zest).
3. Squeeze the orange zest over the ball until it pops.
Explanation.
Orange zest contains the substance limonene. It is capable of dissolving rubber, which is what happens to the ball.
Candle experiment

An interesting experiment showing ignition of a candle from a distance.
You will need:
- Regular candle
- Matches or lighter.
Instructions:
1. Light a candle.
2. After a few seconds, put it out.
3. Now bring the burning flame close to the smoke coming from the candle. The candle will start burning again.
Explanation
The smoke rising from an extinguished candle contains paraffin, which quickly ignites. The burning paraffin vapor reaches the wick, and the candle begins to burn again.
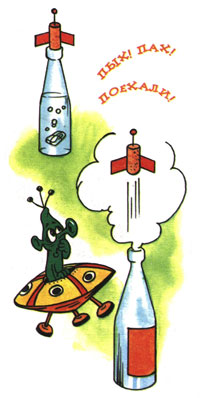
Soda with vinegar

A balloon that inflates itself is a very interesting sight.
You will need:
- Bottle
- Glass of vinegar
- 4 teaspoons soda
- Balloon.
Instructions:
1. Pour a glass of vinegar into the bottle.
2. Pour baking soda into the ball.
3. We put the ball on the neck of the bottle.
4. Slowly place the ball vertically while pouring the baking soda into the bottle with vinegar.
5. We watch the balloon inflate.
Explanation
If you add baking soda to vinegar, a process called soda slaking occurs. During this process, carbon dioxide is released, which inflates our balloon.
Invisible ink

Play secret agent with your child and create your own invisible ink.
You will need:
- Half a lemon
- Spoon
- A bowl
- Cotton swab
- White paper
- Lamp.
Instructions:
1. Squeeze some lemon juice into a bowl and add the same amount of water.
2. Dip a cotton swab into the mixture and write something on white paper.
3. Wait until the juice dries and becomes completely invisible.
4. When you are ready to read the secret message or show it to someone else, heat the paper by holding it close to a light bulb or fire.
Explanation
Lemon juice is an organic substance that oxidizes and turns brown when heated. Diluted lemon juice in water makes it hard to see on paper, and no one will know there is lemon juice until it warms up.
Other substances which work on the same principle:
- Orange juice
- Milk
- Onion juice
- Vinegar
- Wine.
How to make lava

You will need:
- Sunflower oil
- Juice or food coloring
- Transparent vessel (can be a glass)
- Any effervescent tablets.
Instructions:
1. First, pour the juice into a glass so that it fills approximately 70% of the container’s volume.
2. Fill the rest of the glass with sunflower oil.
3. Now wait until the juice separates from the sunflower oil.
4. We throw a tablet into a glass and observe an effect similar to lava. When the tablet dissolves, you can throw another one.
Explanation
Oil separates from water because it has a lower density. Dissolving in the juice, the tablet releases carbon dioxide, which captures parts of the juice and lifts it to the top. The gas leaves the glass completely when it reaches the top, causing the juice particles to fall back down.
The tablet fizzes due to the fact that it contains citric acid and soda (sodium bicarbonate). Both of these ingredients react with water to form sodium citrate and carbon dioxide gas.
Ice experiment

At first glance, you might think that the ice cube on top will eventually melt, which should cause the water to spill, but is this really so?
You will need:
- Cup
- Ice cubes.
Instructions:
1. Fill the glass with warm water to the very top.
2. Carefully lower the ice cubes.
3. Watch the water level carefully.
As the ice melts, the water level does not change at all.
Explanation
When water freezes to ice, it expands, increasing its volume (which is why even heating pipes can burst in winter). The water from melted ice takes up less space than the ice itself. Therefore, when the ice cube melts, the water level remains approximately the same.
How to make a parachute

find out about air resistance, making a small parachute.
You will need:
- Plastic bag or other lightweight material
- Scissors
- A small load (possibly some kind of figurine).
Instructions:
1. Cut a large square from a plastic bag.
2. Now we cut the edges so that we get an octagon (eight identical sides).
3. Now we tie 8 pieces of thread to each corner.
4. Don't forget to make a small hole in the middle of the parachute.
5. Tie the other ends of the threads to a small weight.
6. We use a chair or find a high point to launch the parachute and check how it flies. Remember that the parachute should fly as slowly as possible.
Explanation
When the parachute is released, the weight pulls it down, but with the help of the lines, the parachute takes up a large area that resists the air, causing the weight to slowly descend. The larger the surface area of the parachute, the more that surface resists falling, and the slower the parachute will descend.
A small hole in the middle of the parachute allows air to flow through it slowly, rather than having the parachute tumble to one side.
How to make a tornado

Find out, how to make a tornado in a bottle with this fun science experiment for kids. The items used in the experiment are easy to find in everyday life. Made home mini tornado much safer than the tornadoes shown on television in the American steppes.
And scientific holidays are becoming increasingly popular. For children and teenagers, entertaining experiences are something very exciting, magical and interesting. Becoming a wizard and showing some interesting experiments is simple for children, but for them it is a real holiday.
Experiments for children at home
Any, even the most amazing, can be explained from a scientific point of view. But the children will still have great admiration and delight. We have selected for you the most interesting and exciting experiences that will delight both children and adults.
Experiment No. 1 - Tornado in a jar
In this experience we will be able to see with our own eyes a real tornado up close. They say that some who tried to see him went missing. Our whirlwind will be safe, but no less spectacular.

Would need:
- Transparent glass jar with a lid (preferably oblong)
- Dishwashing liquid
- Food coloring
- Sequins
Conducting the experiment:
- Fill the jar 3/4 full with water.
- Add a few drops of dishwashing liquid.
- After some time, add dye and glitter. This will help you see the tornado better.
- Close the jar with a lid and shake well.
- Spin the liquid in the jar clockwise.

Explanation: When you swirl the can in a circular motion, it creates a vortex of water that looks like a mini tornado. Inside the speed is slower, along the edge it is faster. The water rotates rapidly around the center of the vortex due to centrifugal force. Centrifugal force is the force within a guiding object or fluid, such as water, relative to the center of its circular path.
Experiment #2 - Invisible ink
Invisible ink is an interesting experience that will surprise and delight any child. Children will then be able to write their own secret messages to their friends.

Would need:
- Lemon
- Cotton swab
- Bottle
- Any decorations at your discretion (hearts, sparkles, beads, sequins)

Conducting the experiment:
- Squeeze some lemon juice into a glass.
- Dip a cotton swab into it and write your secret message. Put it in a bottle and decorate it a little.
- In order for the inscription to appear, you need to heat the paper with the inscription (iron it with an iron, hold it over the fire or in the oven). Be careful not to let children do this themselves.

Explanation: Lemon juice is an organic substance that can oxidize (react with oxygen). When heated, it turns brown and “burns” faster than paper. Orange juice, milk, vinegar, wine, honey and onion juice also have the same effect.
Experiment No. 3 - Soap bubbles in the cold
What could be more fun for children than blowing soap bubbles? Children will be amazed to see how they freeze in the fresh air.

Would need:
- Bubble
- Frosty weather
Conducting the experiment:
- We go outside with a jar of soapy water in the bitter cold.
- Blowing bubbles. Immediately, small crystals appear at different points on the surface, which quickly grow and finally merge. If the weather is not very frosty and the bubbles do not freeze, you will need a snowflake: as soon as you have blown a soap bubble, drop a snowflake on it, and you will see how it will immediately slide down and the bubble will freeze.
Explanation: When there is frost and contact with frosty air or a snowflake, the crystallization process immediately begins, so the soap bubble freezes.
Experiment No. 4 - DIY helium balloons

Would need:
- Air balloons
- Empty bottle (1 or 1.5 l.)
- Tea spoon
- Funnel
- Table vinegar
- Baking soda
Conducting the experiment:
- Fill the bottle with vinegar about a third full.
- Through a funnel, pour 2-3 tsp into the ball. soda We put the ball on the neck of the bottle.
- Pour the contents of the ball into the bottle.

Explanation: As a result of the interaction of soda and vinegar, carbon dioxide is released, which fills the ball. But such a ball will not fly on its own; in order to make it attach to the ceiling, it should be rubbed and thereby electrified, and then it will be able to stay under the ceiling for 5 hours!
Experiment No. 5 - Simple motor

Would need:
- Battery
- Copper wire
- Neodymium magnet
Conducting the experiment:
- We bend the copper wire, the ends of the wire should not connect.
- Using pliers, make a small dent on the positive terminal of the battery.
- We place the battery minus on the magnet, put the wire on top of the battery. The free ends of the wire should lightly touch the magnet.

Explanation: We put a battery on the magnet and then place a wire heart on it. The system begins to rotate. This happens because an electric charge arises in the wire. And this is nothing more than the ordered movement of charged particles. Each of them is subject to a magnetic field, which deflects the direction of their movement. This deflection is called the Lorentz force. Charged particles move in a circle, creating rotation of the structure. The battery will run out after some time and the movement will stop. But the impression will remain.
Experiment No. 6 - Paper bottom

Would need:
- Cup
- Paper
Conducting the experiment:
- Pour water into a glass.
- Cut out a square of paper and place it on a glass.
- Carefully turn over. The paper stuck to the glass as if magnetized, and the water did not spill out. Miracles!
Explanation: When we cover a glass of water with a piece of paper and turn it over, water presses on the sheet on one side, and air on the other side (from the very bottom). The air pressure is greater than the water pressure in the glass, which is why the leaf does not fall.
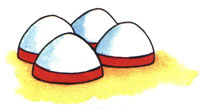
Experience #7 - Walking on Eggs

Would need:
- two trays of fresh chicken eggs
- who wants to walk through them and is in a good mood.
Conducting the experiment:
- Place a garbage bag or oilcloth on the floor (for hygienic purposes).
- Place 2 trays of eggs on top.
- By evenly distributing your weight and placing your feet correctly, you will be able to literally walk on raw and fragile eggs with your bare feet.

Explanation: It's no secret that breaking an egg doesn't cost anything. However, the architecture of the egg is so unique that with uniform pressure, the stress is distributed harmoniously throughout the shell and prevents the fragile egg from cracking. Try it today, it's very exciting!
Experiment No. 8 - Clean hands
This project by an inspired teacher is a fun and visual way to teach children the importance of personal hygiene. Using only 3 slices of bread, the woman was able to clearly tell first-graders why it is really important to wash your hands before eating.

Would need:
- 3 slices of bread
- 3 zip bags
- clean and dirty hands
Carrying out: The bread in the first bag is a control sample. Place a piece of bread into the second bag with washed hands. Well, the third is a piece of bread, which you let all the kids touch with unwashed hands after a walk. After just a week, children will be able to see from their own experience that hygiene is very important!
Experience No. 8 - Flower magic
In this experiment we will be able to paint flowers with our own hands in any color. There will be no limit to the surprise of children when, before their eyes, the flowers change their color over a period of time.

Would need:
- White carnation, chrysanthemum or chamomile.
- Food coloring in any color, but we'll choose blue.
- A jar or vase, a knife and a camera to later capture the results of your home experience and leave a photo of a flower of unearthly beauty as a souvenir.
Conducting the experiment:
- Take a small jar or glass vase, pour water at room temperature, dilute blue food coloring.
- Cut off the tip of the stem evenly with a sharp knife. Place the flower in colored water.
- After about 3 hours, the carnation petals begin to turn bluish at the edges. The veins of the flower are also colored.
- After a day, the flower will already noticeably turn blue. Sometimes the edges of the petals are brighter, sometimes the middle. But after two days the flower will definitely turn blue.

Explanation: The flower used to grow in the ground, it had a root system. Through special vessels - capillaries - water from the soil flowed to all parts of the plant. If its root is cut off, it does not lose the ability to “drink” water using capillaries. Through them, like through tubes, the water rises. In our case, it was painted. Therefore, the flower, penetrated by capillaries, also changed color.
Experiment No. 9 - Sprouting peas
Experiments with sprouting for children vary; you can use almost any unprocessed cereals and beans. In our germination experiment we use peas. This experience will help children better understand where plants come from and how they grow.

Would need:
- Peas
- Saucer
- Cotton swab
- Flowerpot
- Earth
Conducting the experiment:
- You need to take three peas from a regular package purchased at the store. But our goal is not to use them in cooking, but to prove their viability.
- Place a piece of soft cloth such as gauze or bandage on a saucer (alternatively, a large cotton swab). Pour some water there. Place peas on top. Cover with the same cloth. Place the saucer in a warm place away from a draft or next to a radiator.
- Around the second day, sprouts will appear from the peas - first a root, and then a leaf. Plant the sprouts in a pot of soil (not too deep). In the evenings, we water the peas and wait for the sprouts to sprout.
- In two days, green shoots will appear. When they grow up, you need to stick long sticks into the ground and tie the peas to them with a thread. It will grow up along them. Then the peas will get stronger, pods will appear, and in them there will be real peas.

 Explanation: Our peas sprouted because favorable conditions were created for this process. The peas needed warmth and moisture. If it were humid, but cold and dark - for example, in the refrigerator, the peas would not germinate. Or, for example, where it would be warm, but there would be no moisture (say, in a dry cloth), the peas would not “come to life” either. For rapid germination, access to light and oxygen is also needed, and the peas had them.
Experiment #10 - Lava lamp
In the next experiment we will reproduce the legendary lava lamp. This is a very beautiful and spectacular experience that children will especially enjoy.

Would need:
- The oil can be refined sunflower oil or baby oil for skin (it is more transparent)
- Food coloring dissolved in water
- Soluble effervescent tablet (you can use aspirin or any other)
- Glass vase
- Funnel
Conducting the experiment:
- First of all, fill the vase with water about a quarter full.
- Then pour oil through a funnel along the edge of the vase; the oil should lie on top of the water.
- Then we take the dissolved food coloring through disposable pipettes and drip it into the vase around the perimeter. We observe how the drops fall first onto the surface of the water, and then mix with the water in snakes.
- When the bottom layer of water becomes colored, the experiment can be continued. - We throw a piece of an effervescent tablet into a vase; when it comes into contact with water, the tablet begins to dissolve and colored bubbles rise into the layer of oil. We observe the beautiful effect as colored droplets of water rise and descend again to the lower layer.
Explanation: Oil does not dissolve in water due to a stronger molecular structure than water, that is, oil molecules are connected more tightly to each other.
Experiment No. 11 - Surface tension or water slide
A slide can be built from almost anything - sand, salt, sugar, and even clothes. Is it possible to make a slide out of water?
Would need:
- Glass tumbler
- A handful of coins (or, for example, nuts, washers, or other small metal objects)
- Water (preferably cold)
- Vegetable oil
Conducting the experiment:
- Take a well-washed dry glass,
- Lightly grease the edges with vegetable oil and fill with water to capacity.
- Now very carefully drop one coin into it.

Result. As the coins are lowered into the glass, the water will not pour out of it, but will begin to rise little by little, forming a slide. This is clearly visible if you look at the glass from the side.
As the number of coins in the glass increases, the slide will become higher and higher - the surface of the water will inflate like a balloon. However, on some coin this ball will burst, and water will flow in streams along the walls of the glass.
Explanation: In this experiment, a slide on the surface of the water is formed mainly due to the physical property of water called surface tension. Its essence is that a thin film of its particles (molecules) is formed on the surface of any liquid. This film is stronger than the liquid inside the volume. To break it, you need to apply force. It is thanks to the film that the slide is formed. However, if the water pressure under the film turns out to be very high (the slide rises too high), it will burst.
The second reason for the formation of a slide is that water does not wet the surface of the glass well (cold water is worse than hot water). What does it mean? When interacting with a solid surface, water does not stick well to it and does not spread well. That is why it does not immediately flow over the edge of the glass when a slide is formed. In addition, to reduce wetting, the edges of the glass in the experiment were lubricated with vegetable oil. If, for example, gasoline, which wets glass very well, was used instead of water, no slide would have worked.
Experiment No. 12 - Egg in a bottle
Is it possible to put an egg in a bottle without breaking either the bottle or the egg? Yes, if it is quail. But we will do this with a regular egg.
Would need:
- A bottle whose neck diameter is smaller than an egg
- Thin strip of paper
- A little vegetable oil
Conducting the experiment:
- Boil the egg and peel it.
- Lubricate the neck of the bottle with vegetable oil.
- Light the paper and drop it into the bottom of the bottle.
- Then immediately place the egg on the neck. When the paper goes dark, the egg will be sucked inside.

Explanation: The fire burns the oxygen in the bottle and rarefied air is formed in it. The reduced pressure from inside and normal atmospheric pressure from outside work together to force the egg into the bottle. Due to its elasticity, it slips through a narrow neck.
We told and explained the most interesting . We hope that our article was interesting and useful for you. Good luck with your experimentation, but be vigilant and attentive!