We mold people from salt dough. Necessary tools for sculpting
Technology for making salt dough products
More and more attention has recently been paid to the revival and promotion of various types of folk applied art in Russia.
It is no secret that since ancient times in Rus' they treated bread with great respect. How many holidays and rituals are dedicated to him. And the most important holiday among the peasants was dedicated to the harvest. For this occasion, festive loaves, pies, braids, rolls and many other delicious masterpieces of culinary art were baked. Masterpieces, because they were not only incredibly tasty, but also beautifully decorated with various patterns and figures. And the remaining flour, or, as it was called, flour, was not thrown away (this was considered a great sin). Salt and water were added to it, and various figures, amulets, and totems were sculpted from this (inedible) dough. And this type of creativity in the old days was called mukosol.
Over time, other ingredients were added to the salt dough recipe, but the main ingredients - salt, flour and water - remained unchanged.
Here, for example, are some recipes for making salt dough:
1. Flour and salt are taken in equal proportions 1:1 and ½ part water. For example, 1 glass of flour, 1 glass of coarse table salt and half a glass of warm water. All this is thoroughly kneaded for 10 - 15 minutes so that the dough becomes soft, like plasticine and at the same time does not stick to your hands. Then the finished mass is placed in a cool place for 3–4 hours to “settle.”
2. Take flour and salt in equal proportions (1 glass of flour, 1 glass of fine salt), 1 tbsp. a spoonful of vegetable oil and half a glass of warm water with the addition of 2-3 drops of iodine. The mass is well kneaded and placed in the refrigerator for 2 - 3 hours.
3. The following method: 2 cups of flour, 1 cup of coarse salt and 1 cup of glue mass (100-150 ml of water and 2 tablespoons of wallpaper glue). Mix everything thoroughly.
4. Instead of wallpaper glue, you can use PVA glue: 1 cup of flour, 1 cup of salt and ½ cup of water with PVA glue (50 g of PVA glue for ½ cup of water). Everything is also thoroughly mixed until smooth. Products made from salt dough can be left to dry completely naturally (in a warm place near a stove or radiator, or in the sun), but this way the product will not be ready for further processing soon.
In another case, the finished salt dough elements can be dried in the oven over low heat and at a temperature not exceeding 125 °C.
As for coloring the finished product, there are several ways:
1. Food coloring is added to the dough during the process of kneading the dough (disadvantage - the colors are not too saturated).
2. Oil paints look very impressive and colorful (the disadvantage is that the paint takes a long time to dry on the product).
3. Gouache paints create a dense, rich layer (the disadvantage is that the paint can wear off if not covered with a clear varnish).
By doing modeling, a teenager develops fine motor skills (and this also contributes to the development of speech). Modeling develops spatial thinking and imagination. Thanks to modeling classes, a child or teenager directly experiences reality. In addition, when modeling from salt dough, the teenager works with environmentally friendly material.
When making products from salt dough, they use the same techniques and methods of working as with plasticine:
1. At the beginning of work, you need to take care of your work area (the surface of the table should be covered with oilcloth or a piece of plexiglass), you need to have several napkins (paper and cotton).
2. To work with the dough, you will also need a variety of tools: stacks (wooden, metal, wire), various molds, templates, etc.
3. Basic sculpting techniques: rolling, rolling, flattening, pinching, pinching, pressing, bending edges, etc.
You can create an entire composition from individually sculpted parts. Composition is a creative process, combining individual details into an expressive picture.
When making paintings from salt dough, you can also use additional materials: scraps of fabric, beads, beads, buttons, feathers, etc.
Working with salt dough gives the children great satisfaction; they work with great interest with this “unusual” material, creating extraordinary, fabulous paintings.
|
Making New Year's Christmas tree toys with children of the preparatory group. Master class with step-by-step photos. Christmas tree toy “Mitten” made of salt dough. Step-by-step instructions with photos This toy is a beautiful decoration for the New Year tree. The Christmas tree toy “Rukavichka” is completed in one academic hour of work, but how much joy and delight it brought to its author, and it is difficult for the teacher-mentor to convey it simply in words. We invite everyone to the master class! |
|
Autumn crafts from salt dough for preschoolers step by step with photos Master class “Bright colors of autumn” (autumn trees from salt dough) The autumn forest, playing with colors, Weaves wreaths from the crowns of trees, Pampering warm days with its sunny caresses. This is immeasurable pleasure - Walking along the festive path Along the rainbow maples, probably, With a bouquet of deciduous trees in your hand. Author of the master class: Denisenko Dina Vladimirovna, teacher of additional education at a municipal government institution of additional education... |
|
Master class “Fairy Meadow Kolobok”. Modeling from salt dough and plasticine. Step-by-step instructions with photos for childrenAuthor: Olga Kopylova, 8 years old, studying at GKURS (I) Republican orphanage boarding school for mentally retarded children. Teacher: Pargisheva Raisa Nikolaevna State Public Institution of the Republic of Sakha (Yakutia) Republican orphanage boarding school for mentally retarded children. The master class is intended for additional education teachers, technology teachers, parents, as well as everyone who wants to master the technique of modeling from... |
|
Master class with step-by-step photos "New Year's toys" using the technique of modeling from salt dough. The master class will be useful for educators and teachers of additional education. Goal: to make a craft using the technique of modeling from salt dough. Objectives: - teach children to work with salt dough - develop fine motor skills - instill in children a desire to make crafts with their own hands For work you need: flour, salt, water, modeling board, paints, varnish, modeling molds, stencils, stacks, knife, skewer, bowl, rolling pin,... |
|
Master class with step-by-step photos “Magic toys” using the salt dough modeling technique. Author: Darina Prokudina, student of kindergarten No. 83 “Igrushka”, Vorkuta, village. Vorgashor Teacher: Mamedova Guzel Rasul kyzy, teacher of kindergarten No. 83 “Igrushka”, Vorkuta, village. Vorgashor. This master class with step-by-step photos is useful for additional education teachers, parents, and primary school teachers. Purpose: interior decoration for the New Year. Goal: creating interior decoration using stucco technique... |
|
Fairy tale "Teremok" made from salt dough - master class on making dollsAuthor: Maria Trofimovna Murygina, teacher at MBDOU "Kindergarten No. 34", Ivanovo. Description: this master class will attract the attention, first of all, of educators and parents of preschoolers. Salt dough dolls are easy to make; all materials are easily available. Dolls can be made together with older preschoolers. Purpose: Dolls for the fairy tale "Teremok" can be used in independent games for children, teachers... |
|
Master class on modeling from salt dough on the topic "Insects" for older preschoolers. Author: Valentina Aleksandrovna Belkina, teacher, ANO DO "Childhood Planet "Lada" d/s No. 203 "Alice", Togliatti, Samara region Description of work: The master class is designed to work with children 5-7 years old. Can be used by kindergarten teachers, tutors, parents. Objectives: to cultivate a caring attitude towards nature through an understanding of the interconnection of all life on earth. Practice rolling out straight dough... |
|
Master Class. Do-it-yourself matryoshka made from salt dough. Description: the master class will help parents and older children make a bright craft with their own hands. Goal: to arouse interest in dough sculpting. Objectives: to develop dough modeling skills, which contributes to the development of fine motor skills of the hands, to develop children's creative abilities, imagination, imagination. For work you will need: 1 glass each: flour, water, salt. Acrylic paints or gouache. 1. Knead the dough: combine flour, salt and gradually... |
|
Master class on testoplasty for children 5-7 years old “Fish from salt dough”. Author: Elena Pavlovna Kolmakova, teacher of the Child Development Center, Kindergarten No. 73, Voronezh Description: the master class will help parents make a bright craft with their child with your own hands. Purpose: for interior decoration, as a gift. Goal: to develop skills in modeling from salt dough, to arouse interest in modeling, which contributes to the development of fine motor skills. Objectives: to develop the child’s creativity, imagination... |
|
We make a lizard from salt dough (a character from P.P. Bazhov’s fairy tale “The Mistress of the Copper Mountain”). Master class with step-by-step photos. Nomination: Best handicraft master class. The work is designed for children 5 years old, teachers, educators, parents. Objectives of the master class: - teach techniques for modeling from salt dough, - develop fine motor skills in a child, - develop individual creative abilities, - cultivate hard work, accuracy, and the desire to create crafts with your own hands. The purpose of the master class: - Make... |
|
How to make Winnie the Pooh from salt dough Let's make Winnie the Pooh from salt dough. Master class with step-by-step photos. The work is designed for children 4-6 years old, teachers, educators, parents. Objectives of the master class: - teach techniques for modeling from salt dough, - develop fine motor skills in a child, - develop individual creative abilities, - cultivate hard work, accuracy, and the desire to create crafts with your own hands. The purpose of the master class: - To make your favorite fairy-tale character Winnie the Pooh. For this... |
|
“Autumn tree” (testoplasty) Master class with step-by-step photos. Author: Artem Belyaev, a pupil of the MBDOU kindergarten “Topolek” in Volgodonsk, Rostov region. Head: Natalya Nikolaevna Filinkova, teacher at the MBDOU kindergarten “Topolek” in Volgodonsk, Rostov region. Purpose: The craft can participate in creative exhibitions and serve as interior decoration. Autumn embraced nature, taking brushes and canvas into her hands, to paint the braided branches of stately maples and birches. With painterly strokes of paint... |
|
House for a gnome made of salt dough. Master class with step-by-step photos Far away in the forest land Once upon a time there lived an old, old gnome. The gnome had an old house: He lived in it for three hundred years. And it happened, if the gnome was not at home for a long time, the old house missed him: The shutters sadly knocked. Mikhail Libin The poem by Mikhail Libin, which became a famous cartoon, tells about the magical living house of a gnome. This house was bored without its owner and went looking for him. Let's try to make the characters of the poem from salted t... |
|
Magic house made of salt dough. Master class with step-by-step photos. Master class for teachers, children over 5 years old (with the help of adults), and any creative people. Goal: learn to make a decorative house from a bottle from salt dough Objectives: Develop creative and constructive abilities Learn to work with salt dough Purpose: interior decoration, DIY gift Equipment: stack, glass bottle, salt dough, gouache paint, brushes, acrylic varnish. Dough recipe: 1 tbsp... |
|
Master class on creating amulets from salt dough. Author: Marina Petrovna Antonova, teacher of the Iskorka Medical Educational Institution No. 21, Berdsk The master class is intended for educators, additional education teachers, parents and children of senior preschool age. Purpose: Making amulets for use in GCD on the topic “Family customs in Rus'”, “Ancient customs in Rus'”, etc. Objectives: Learn to use an unconventional drawing technique (pen painting), performing elements: wavy lines, l... |
On our website you can see many different crafts created based on salt dough.
Here one of the recipes for the manufacture of salt dough:
1Mix a glass of flour and 1 glass of salt.
Then pour in 125 ml of water(the volume is approximate, because the amount of water may depend on the type of flour you used for the dough). Stir this mass again with a spoon, and then knead with your hands until a homogeneous consistency. Some people use a mixer for this purpose.
By the way, water can be replaced with jelly made from potato starch (dissolve 1 tablespoon of starch in 1/2 cup of cold water. Then pour another 1 glass of boiled water into this liquid, stirring. When the jelly thickens and becomes transparent, remove from heat. received the paste). The dough will only benefit from such a replacement - it becomes more plastic.
Just don't overdo it! If the dough is too soft, knead it with a little extra flour and salt mixture. Salty dough there must be dense.
Now you can sculpt! It is better to sculpt on a sheet or board - this is a good place for drying. The drying itself is carried out at a temperature of +80C in the oven for an hour, or on a radiator (in winter). The drying time depends on the thickness of the figurine.
If you need color salty dough , then it can be colored either at the kneading stage, using food coloring or gouache, which is convenient when working with small children; or paint the finished product after complete drying.
And our craftswomen have their own subtleties and secrets for working with salt dough. That's why , go to the blog , Whose work did you like and ask! I’m sure the craftswomen will be happy to share with you!
P.S. Reminder on how to make the required color:
cyan = blue + white
pink = white + red
purple = blue + pink
green = blue + yellow
orange = yellow + red
brown = green + red
emerald = green + blue
flesh = light pink + a little yellow
gold and silver will be obtained if you add the corresponding color of gouache or acrylic, in the same way you can get glitter dough(gel for gouache)
When working with salt dough many come up with amazingly beautiful names - testoplasty , bioceramics and even, flour ! But whatever you call it, the result sometimes exceeds all our expectations! The birth of a salt dough masterpiece is always an event! Happy creativity and peace to everyone!
How to prepare salted dough for modeling.
We take: 1 cup of premium flour, 1/2 cup of fine salt (not iodized!), ¼ cup of very cold water. Mix flour and salt in a bowl. Pour water in small portions, kneading the dough well each time. The amount of water may vary, depending on the properties of the flour, so water should be poured in small portions. Knead until the dough crumbles and sticks to your hands. It will turn out very similar to plasticine. Store the dough in a closed container or bag to prevent it from drying out in the refrigerator. Shelf life is three days. To keep the dough longer, you can add 2 tablespoons of citric acid when kneading. (UPD - It seems that citric acid somehow interacts with varnish for children's creativity, the first time I made it without it and the varnish was transparent, but now it’s kind of whitish.)
How to color the dough.
You need to take a small piece of dough, make a flat cake and put a little gouache in it. Knead this piece until the dough is evenly colored. You can first mix the color on the palette and then color the dough. But it is much more convenient to color the dough with the main colors, and then mix the already colored pieces until the desired new colors are obtained. When sculpting food, it is very important to replicate as accurately as possible the color of what we are sculpting.
For example – sausage color = pink + a little brown
pink = a lot of white + a little red
To sculpt food you will need the following colors - white (a lot), pink, sand, brown, yellow, orange, green, red. And be sure to leave part of the dough uncolored.

We sculpt almost as if from plasticine. Take the dough out of the container in small pieces so that it does not dry out. If the dough is still a little dry, add a few drops of water. If it's a little wet, add a little flour. You can also flour your hands. To glue individual pieces of dough, moisten the joint with water using a brush. We use available materials for modeling - a garlic press, a strainer, toothpicks and more.
How to blind:

Broccoli
Let's see what broccoli looks like. Mix three green shades. From a piece of the lightest shade we make a sausage, divide it into small pieces - these are broccoli legs.
We press our dough through a kitchen metal strainer, we get an interesting texture. We moisten the leg with water and “glue” onto it what we pressed through the strainer.


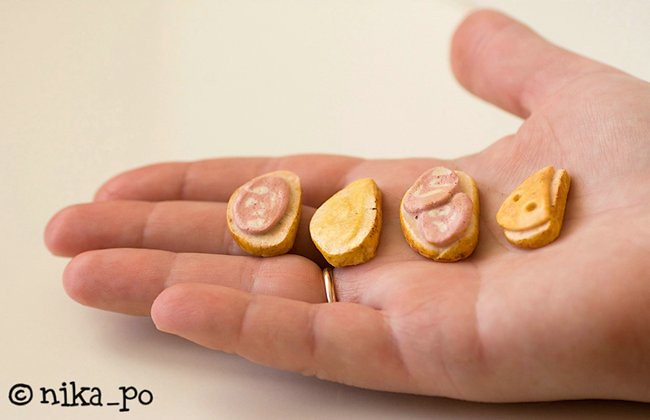
Sausage
We make a thin sausage-colored flatbread. Place thin strips of white dough on it. We roll up the cake, roll it a little in our hands and put it in the refrigerator for a while. When it has cooled, cut the sausage into slices. We saw, rather than press, the dough.

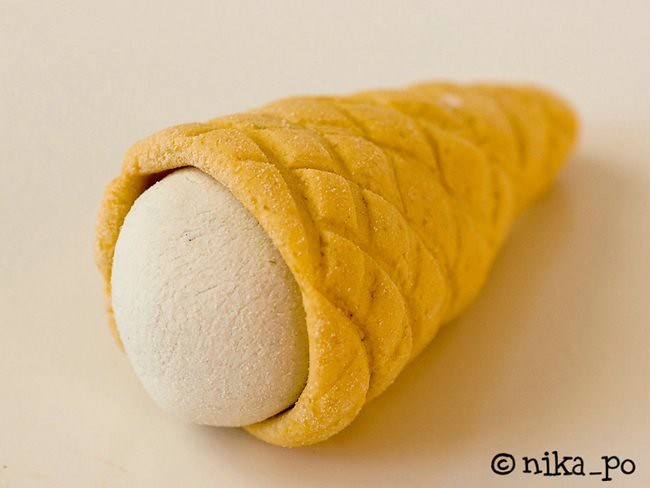

Ice cream
We make a sand-colored cake, a ball and a cone from white. Using the back of a knife, press out the cells on the flatbread, like a waffle. Let it sit for a while and dry slightly - a piece that is too soft will not be able to be wrapped like a wafer. We make ice cream from the white parts and wrap it in a wafer.

Cheese
Cheese color = yellow + a little orange.
Make a flatbread, cut off the excess to make a triangular slice of cheese. We make holes with the rod from the handle, large holes with the back, small holes with the nose of the rod.

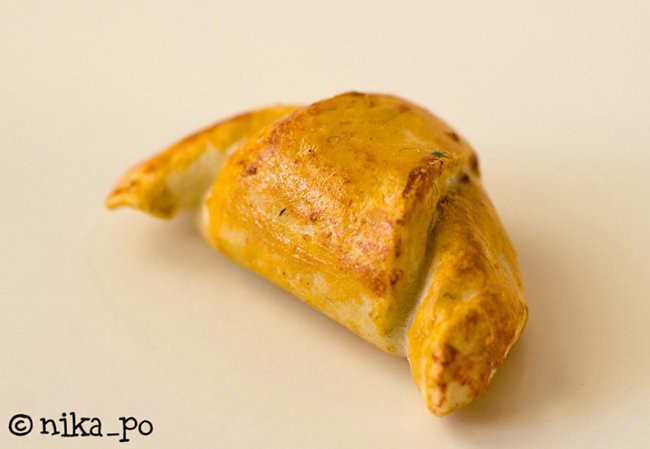
Bread and other dough products
We make pieces of bread from uncolored dough, pies can be made from uncolored dough or from sand-colored dough. We tint the already completely dry products with oil pastel crayons for children's creativity - we create a golden brown crust.


It is better to dry finished products simply in air, on a smooth surface - for example, on a plastic file or oilcloth. When the top is dry, turn it over to dry the bottom.
When dry, the products turn a little pale; they must be coated with any varnish. It is better for children to use a special water-based varnish for children's creativity - it is odorless.

More
You can make a completely liquid dough (add water) and spread it. This way you can depict butter on a sandwich or chocolate icing.

In order not to get confused with the sizes, it is good to try on the plate from which the toys will then be eaten while sculpting.


We got to dessert.


Bon appetit:)
An article for those who like to be creative with their children. It contains recipes for salted play dough and many ideas for crafts.
Modeling is a fun and useful activity at the same time. By making figurines, paintings, and compositions from plastic material, the child develops imagination, logical thinking, fine motor skills, and learns perseverance.
Of course, mom can just buy plasticine or some branded modeling compound for the baby. But how high quality and environmentally friendly are these materials? As an alternative, you can use salt dough made with your own hands from inexpensive natural products.
How to make dough for crafts?
Environmental friendliness is not the only advantage of salt dough over plasticine or play-doh.
- The recipe according to which the plastic mass is prepared does not cause any difficulties for absolutely anyone. If a child asks to sculpt while at the dacha, for example, and there is no plasticine at hand, his wish can be fulfilled in half an hour
- Materials for modeling in the store are quite expensive. Ingredients for salt dough will cost much less
- Salted dough, even the one to which paint has been added, does not stain your hands or stick to your fingers. It's soft and pliable
- Crafts made from dough can be dried using a special technology. Then they will be stored for a long time and serve as a souvenir, Christmas tree decoration, or children's toy.
IMPORTANT: Even in ancient times, people mastered modeling from dough with salt. A whole art arose, which was called testoplasty. Women and children made very elegant crafts, painted them by hand and used them as decorations for their homes. Figurines symbolizing various benefits were considered expensive gifts, given only to close people. Our ancestors didn’t bother with the salt dough recipe, making the material only from water, flour and salt
Today, salt dough modeling, which has suddenly returned to popularity, is called bioceramics. The recipes for the dough itself are being improved. Unfortunately, some of them involve the use of wallpaper glue, synthetic paints, etc. The concept of absolute naturalness is lost.

Salt play dough has three main components. This:
Additionally widely used:
- gelatin
- starch
- vegetable oil
- natural dyes (beet juice, green beans, etc.)
- food colorings
- gouache or watercolor paints
- PVA glue
- wallpaper glue
Glue or starch makes ready-made dried dough figures more durable, but it is not advisable to add them to material intended for children under 5 years of age. But dough with butter can be greasy and stain your clothes.
IMPORTANT: You can color both the dough itself while it is being prepared and the finished figurine, then creativity will be doubly more interesting and useful

RECIPE No. 1. Simple dough
You need: wheat flour – 1 cup, extra salt – 1 cup, cold water – 0.5 cups
First of all, the dry ingredients, flour and salt will be combined. If the dough is colored with food coloring or paint, dissolve it in water. Gradually adding colored water to flour and salt, knead a fairly stiff dough, but such that it does not stick to your hands and does not crumble into crumbs.
IMPORTANT: To check whether the mass is suitable for modeling, roll out a smooth ball and press a hole in the middle of it with your finger. The dough should neither spread nor immediately return to shape. The edges of the recess should remain smooth
RECIPE No. 2. Dough with starch
You need: wheat flour - 0.5 cups, starch - 0.5 cups, extra salt - 1 cup, water - 0.5 cups.
Just as in the first case, first mix flour, salt and starch. Next, clean or colored cold water is gradually added. Modeling mass that contains starch becomes more elastic.
In addition to the saltiest modeling dough, you need to prepare:
- dostochku
- knives - stacks
- molds (such, for example, come complete with play-doh dough)
- beads, sequins, buttons, other improvised materials for decorating crafts
IMPORTANT: The flour and salt dough can be used several times in a row. To prevent it from drying out, place the material in a plastic bag or wrap it in cling film, then close it in an airtight container and put it in the refrigerator.
How to dry dough crafts?
If the dough crafts are small, they will dry out on their own. To prevent cracks from appearing on their surface, they are removed from direct sunlight.

You can also dry the dough figures in the oven at a minimum temperature and always keep the door ajar. Dry the dough in the oven for 3 – 6 hours, depending on the size of the craft. It goes into the oven three times for 1 - 2 hours, with a short break between each time.
Making salt dough with children
You can offer salt dough to your baby for the first time at the age of 1 year. This is not chemical plasticine or play-doh; mom doesn’t have to worry if the baby tastes the material or swallows it. For such small “homemade products”, the dough is prepared without synthetic dyes.

IMPORTANT: Play dough is very salty. As a rule, it is enough for a child to lick it to understand that it is not edible. But if the baby still ate a piece, you just need to give him plenty of drink, and if the mother is still worried, a bag of Smecta
Full-fledged developmental modeling classes are possible with children from 2 years old. From rolling out circles and balls from salt dough, they will smoothly move into real creativity, in which kids will be able to make flowers, animals, favorite fairy-tale and cartoon characters, etc.

The finished result of dough modeling is as important for kids as the process itself. The finished craft evokes strong positive emotions in them.
Crafts from dough for children in kindergarten
There is no need to think that salt dough is a “handicraft” material exclusively for home use. Kindergarten teachers have long taken note of recipes for plastic materials and are happy to replace plasticine with them in developmental classes with students.

So, in nurseries they often make casts of baby hands, circles, mushrooms, “sausages”, snails, etc. In older groups, children are already working on themed crafts, for example, for the holidays.
Crafts from dough for kids. Step-by-step dough crafts
When making dough with kids, you don’t need to come up with ideas for crafts: usually, they are born by themselves the moment your fingers touch the plastic material. Children love to sculpt:
- geometric figures
- flowers and trees
- fruits and vegetables
- animals
- dinosaurs
- little men
- fairy-tale creatures
- cartoon characters

Adults, mastering testoplasty, can get ideas on the Internet; there are many step-by-step master classes.
IMPORTANT: Good guides for both children and beginning adults are the books “Salt Dough Step by Step” by V. Khomenko and “Miracles from Salt Dough” by A. Firsova
Templates for crafts made from dough. Children's crafts made from salt dough
Crafts made from salt dough can be very beautiful. Children's crafts have their own touching charm. Adults are like pottery.
To get inspired for creativity, you can view a selection of thematic photos with crafts made from salt dough.
Panels and pictures made from salt dough
Such works of bioceramic art can be hung on the wall or placed in a prominent place. Photo frames made from salt dough are also very beautiful.


New Year's crafts made from salt dough
For the New Year, you can make not only Christmas tree decorations from dough, but also gifts - souvenirs for friends in the form of the symbol of the year. In 2016 this is a funny monkey.


Crafts from dough for February 14th for Valentine's Day. Crafts made from salt dough heart
The heart is a symbol of Valentine's Day. Made with your own hands from flour, salt, water and, of course, love, it will turn into a very valuable gift.
A cute angel made from salt dough also looks very cute.


Video: Angel on February 14
Crafts from dough for February 23. Aircraft craft made from salt dough
On February 23, instead of a banal postcard, you can give men cute crafts made from dough: the number 23, any symbols of courage, for example, weapons, cars, military equipment.


Crafts from dough for March 8th. We make flowers from salt dough. Craft roses from dough
Any mother will be touched by a craft given to her by her beloved child for the holiday of March 8th. Most often these are flowers, bouquets, floral arrangements. Roses made from dough will never wither.


Magnificent basket with flowers.
Video master class on making roses from salt dough
Crafts from dough for Maslenitsa. Easter crafts made from salt dough


Stand - chicken for Easter eggs.

Easter crafts made from salt dough will add a special flavor to the bright holiday
Animal crafts made from salt dough
Together with your baby, you can fashion a whole zoo out of salt dough!


Figurines - cats.

Video: how to make a cat - a refrigerator magnet?
Crafts made from salted poultry dough. Making fish from salt dough
It’s difficult to make birds and fish in testoplasty, but they don’t turn out beautiful.
Such products are delicate work.
Which salt dough crafts to choose for a 5 year old child?
It is simply impossible to force a five-year-old child to sculpt something that an adult wants. He needs to be interested. The child should be offered several ideas, let him choose the one he likes best.
Video: salt dough - recipe for crafts
Modeling dough is a mass reminiscent of plasticine, but softer, does not stick, does not stain, does not have a strong odor and does not cause allergies. How to make salted play dough at home? The best homemade dough is made from salt, flour and cold water.
Working with plastic mass is incredibly exciting and useful in terms of developing fine motor skills. This helps to activate brain points responsible for coordination of movements, objective actions and speech. And this is not all the advantages of modeling dough, it:
- Increases perseverance.
- Develops logic and creative thinking.
- Improves concentration and perception.
- Develops the ability to work with small objects and helps in mastering the subtleties of manipulation.
Every mother can make a healthy mass, because the technique is not much different from preparing dough for dumplings. In this article I will look at the most popular recipes. I'll start with the classics and later switch to more complex options.
Classic recipe for salted play dough
I offer a classic recipe for salted modeling dough, which involves the use of the simplest ingredients found in every kitchen. It is incredibly popular among experienced craftsmen, people with little experience and beginners.
Ingredients:
- Flour – 300 g.
- Salt – 300 g.
- Water – 200 ml.
Preparation:
- Pour salt into a deep container and add some water. I advise you not to use all the liquid at once, since in each individual case the moisture content of the flour is different.
- After the salt has dissolved, add the sifted flour. First, mix in a bowl. After forming a lump, transfer the mixture to a work surface and complete the process. To increase plasticity, gradually add water.
- Place the finished dough in a plastic bag and put it in the refrigerator. After two to three hours, the salted mass is ready for use.
Video recipe
From the indicated proportions you get quite a lot of salt dough. If large crafts are not planned, reduce the amount of ingredients by half or quadruple. If there is any remaining mass, store it in film in the refrigerator, just as you store slime mass. In this form, it retains its original qualities for a month.
How to make dough in 5 minutes

If crafts from salt dough have turned into a family hobby, I recommend arming yourself with a recipe that will allow you to make another portion of elastic mass at home in 5 minutes.
Ingredients:
- Flour – 1 cup.
- Water – 1 cup.
- Soda – 2 teaspoons.
- Salt – 0.3 cups.
- Vegetable oil – 1 teaspoon.
- Food coloring.
Preparation:
- Pour a mixture of salt, soda and flour into a small saucepan, pour in water along with vegetable oil. Place the container over low heat and heat for a few minutes, stirring regularly. Add coloring and stir.
- Watch the thickness of the dough. If it sticks to the spoon, it's ready. Place the mixture on a plate to cool. After this, knead thoroughly with your hands.
- Store the salt dough in a bag or food container, otherwise it will dry out. If the mixture has dried out, don't worry. Add a little water and knead.
Video cooking
Quick salt dough has another advantage - a long shelf life. If all rules are followed, the dough retains its properties for several months. You won't be bored with this material.
Recipe without starch with glycerin

Some craftsmen coat the surface with a layer of varnish to add shine to their crafts. But this result can be achieved without the help of paints and varnishes, because there is glycerin, sold in all pharmacies.
Ingredients:
- Boiling water – 2 cups.
- Flour – 400 g.
- Glycerin – 0.5 teaspoon.
- Sunflower oil – 2 tablespoons.
- Cream of tartar - 2 tablespoons.
- Fine salt – 100 g.
- Dye.
Preparation:
- Make the base. In a small container, combine cream of tartar, vegetable oil, salt and flour.
- Bring water to a boil in a small saucepan. Add flour base, coloring and glycerin. Cook until the mass has a homogeneous consistency.
- Cool the resulting mixture and knead thoroughly. Add flour if necessary.
Having made a figure from dough without starch, you will see that it has a pleasant shine. This craft will be a wonderful gift for your mother on March 8th or a friend’s birthday.
How to make play dough without flour

The highlight of this plastic mass is the absence of flour in the composition. The technology for preparing salted dough for modeling is suitable for craftsmen who do not like working with white, quick-flowing ingredients.
Ingredients:
- Starch - 1 cup.
- Baking soda - 2 cups.
- Water – 0.5 cups.
- Natural food coloring.
Preparation:
- In a deep bowl, mix starch and soda. While stirring the mixture, pour in water in a stream.
- Place the container with the ingredients on low heat and cook until a ball forms.
- Place the cooled mass on a floured surface and knead. The dough is ready.
There is no flour in this dough, but it is perfect for modeling. Use this easy-to-make plastic material to create a variety of shapes that will demonstrate your talent to others.
What can be made from salt dough - examples of crafts

We looked at the technology for preparing salted dough for modeling. It's time to put the salty material to work. If you are a beginner, I recommend starting with the simplest figures. Over time, having gained valuable experience, switch to more complex crafts.
Experienced craftsmen make various figures and compositions from salt dough. The result depends only on your imagination. In this part of the article I will give some good examples with step-by-step manufacturing instructions. They will help even children learn the basics.
Mushroom
- To create a hat, roll a small ball and press lightly on one side.
- Make a sausage. When rolling one side, press down slightly. You will get a leg.
- All that remains is to assemble the figure. To increase reliability, use a toothpick.
- After the dough has dried, decorate the mushroom as desired.
Beads
- Roll several dozen equal-sized and even balls from the dough. Place the balls on toothpicks.
- Leave the balls in the fresh air for several days to dry. I recommend turning the beads over several times a day.
- Carefully remove the toothpicks from the dried balls. String beads onto a ribbon or cord. For a more beautiful product, color the beads with markers.
Christmas decorations
- Roll out the salt dough into a layer. Using a cardboard stencil or cookie cutter, press out the shapes.
- Use a cocktail straw to make holes in the figures. Dry the dough.
- All that remains is to decorate the Christmas tree decorations and thread a beautiful ribbon through the hole.
Rose
- Make a cone using a small amount of dough.
- Roll into a small ball and roll into a flat cake. Attach the fragment to the cone.
- Attach a similar element on the opposite side. You will get a bud.
- Roll some balls and make petals. Attach to the flower in a circle.
- Bend the upper edges of the petals slightly back and press the sides.
- After the dough has dried, paint the figure scarlet.
Puzzles
- Make a large stencil of a shape out of cardboard, such as a cat. Roll out the dough into a layer. Using a stencil, cut out a large shape. Leave the dough until the morning to dry.
- Using a sharp knife, cut the cat figurine into fragments. Wait until completely dry.
- Use markers or gouache to color the craft. Once dry, coat each piece with a layer of clear varnish.
Video examples of figures
As you can see, salt dough is ideal for creating simple and complex shapes and compositions. And these are just a few ideas. With the help of your imagination you can create a variety of toys, decorations, souvenirs and other crafts.
In conclusion, I will share the secrets of experienced craftsmen who will make working with materials more productive and the result more impressive.