Mirror and colored glaze for drips on the cake. How to make beautiful chocolate streaks on a cake
Colored chocolate icing is often used to coat mousse cakes and pastries. Today, the “competitor” of the glaze, perhaps, can only be “Chocolate Velor” :)))
The glaze, covering the confectionery products with a thin chocolate veil, evenly colors them in all possible colors and shades, emphasizing the shape of the products, and giving them a beautiful gloss. And the glaze is also called mirror glaze, because when you look at a cake or pastry covered with glaze you can see your reflection in it :))
This is a variant of one of the most affordable glaze recipes in terms of ingredients, which is prepared quickly and relatively simply. This glaze has not only advantages, but also some disadvantages that are better to keep in mind. I mentioned the advantages above, but the disadvantages include the fact that the glaze is quite sweet, although I won’t say that it’s cloying. Because The icing is quite viscous, it can drag on the knife when cutting the cake. And also the glaze introduces some additional milky taste into the product - it is not pronounced and, in principle, usually goes well with other tastes and textures in the product, but this just needs to be kept in mind;) Also, pay attention to the fact that the glaze needs prepare in advance 12-24 hours before use, because she needs time to stabilize.
I have also tried some other types of colored glazes to cover mousse cakes. And if anyone is interested, I will keep this in mind and over time I will add other options so that everyone can choose what they like best and what suits a particular product.
Ingredients
| sugar | 100 g |
|---|---|
| glucose syrup (can be replaced with invert syrup) | 100 g |
| water | 50 g |
| condensed milk | 70 g |
| gelatin | 8 g |
| white chocolate (can be milk or dark, not higher than 56% cocoa) | 100 g |
| food coloring | |
| Necessary (special) equipment and tools for work: | |
| - ladle or small saucepan (about 1 liter capacity) | |
| - tall plastic measuring cup or bowl | |
| - cooking thermometer | |
| - immersion blender | |
| - cling film (for storing finished glaze) | |
Step-by-step recipe with photos
Prepare the ingredients.
Soak leaf gelatin (8 g) in a bowl with plenty of very cold water for 5-10 minutes.
Advice. If you are using powdered rather than sheet gelatin, then 8 g of powdered gelatin should be poured into 48 g of water and left to swell for 40-60 minutes.
Place chopped white chocolate (100 g) and condensed milk (70 g) into a bowl or tall plastic measuring cup. Set aside.

Pour sugar (100 g) into a small ladle or pan, put glucose syrup (100 g) and pour water (50 g).

Bring water with sugar and glucose to a boil and cook to 103°C (if you don’t have a thermometer, let the syrup boil for about 2 minutes).
Pour the hot syrup over the chocolate with condensed milk and leave for 2 minutes.

Add squeezed sheet (or swollen powder) gelatin to the chocolate.

Add food coloring.
Advice. You can use powdered or gel food coloring to make the glaze. If the coloring is gel or powder (fat-soluble), then add it to the icing before punching it with a blender (as shown in my photo - I use fat-soluble powder coloring). Powdered fat-soluble dyes color the glaze in brighter colors (compared to other dyes).
If the glaze is water-soluble, add it to the syrup. Also, the color and saturation of the finished glaze will depend on the quality of the dyes.
To obtain a white glaze, add white dye (titanium dioxide), because glaze without adding dye will have a yellowish milky tint and will not turn out pure white.

Using an immersion blender, beat the glaze, being careful not to form bubbles in the glaze.
Advice. We punch the glaze with a blender, turning the chocolate with the rest of the ingredients into a homogeneous emulsion, which makes the glaze smoother and shiny. But there are subtleties that need to be taken into account.
Fresh, just-prepared glazes tend to form. large quantity bubbles that form when the blender is not positioned correctly. Therefore, carefully immerse the blender in the glaze at an angle of 45°C. The blender should be completely immersed in the glaze, but not at the bottom of the measuring cup, but close to the surface. You need to try to find such a position of the blender when, during the process of punching, a pattern in the form of a triangle is formed on the surface of the glaze, which can be called differently - a kind of small funnel that sucks in the incoming air and the rare air bubbles that form. Also, listen to the sound that the blender makes - over time, you will learn to navigate by the sound whether the blender is correctly immersed in the glaze. Punch through the glaze at the slowest speed of the blender - this is also an indispensable condition for bubble-free glaze.
Hi all. Today we will discuss the most pressing topic - how to make beautiful streaks on a chocolate cake. This is the most popular request in my direct message, everyone who was waiting - catch the article.
Chocolate smudges... This is perhaps the most common mistake made by beginners (unfortunately, not only beginners suffer from this; very often I see the work of more experienced colleagues with ugly smudges). How to find that line so that the smudges do not flow down in puddles on the substrate and at the same time do not lie in thick waves on the top? Today I will reveal the secret of my chocolate drips.
I will describe not so much the recipe as the technology itself. Here it is important to understand the very essence of the process in which the drip will flow sexually on the cake, reaching its middle.
There are many recipes on the Internet on how to make chocolate drips for decorating a cake. And you will be surprised, but almost all of them are working!
At one time I tried ganache for drips both with butter and with cream with the addition of butter. And today I will tell you the most basic recipe for chocolate drips with cream, but not with 33% fat, but with the usual 10%. Yes Yes! Even with such cream, smudges can be made beautiful. There are a lot of myths that chocolate will curdle in such cream. No no and one more time no! The fat content of the cream has nothing to do with it; drips can be made with 4% baked milk. This is a matter of practice.
Today I will be making drips for a dark chocolate cake, but, as you understand, black, milk, and even white chocolate can be used. The proportions will accordingly be slightly different. Each chocolate will have its own gram! I never weigh, I measure everything by eye.
In this article, I will teach you to understand what needs to be done in different situations. And then you will experiment yourself and everyone will find the most comfortable proportion for themselves.
So, how to prepare drips for a sponge cake from chocolate and cream 10% at home, recipe with photos step by step.
Ingredients:
- dark chocolate - 50 grams
- cream 10% - 40 grams
Preparation:
First, I’ll write about preparation. The cake should be as cold as possible, which means that it should stand leveled in the refrigerator for at least 1-2 hours, or better yet 4. If you have recently covered it with a finishing layer of cream, you can put the cake in the freezer for 30 minutes. to speed up the process. It is because of the difference in temperature that a cold cake is a warm chocolate ganache, and good drips are obtained.
What kind of cream can be used to make chocolate drips? Yes, almost any! For us, the main condition is a smooth and cool coating. I make smudges on creams such as -, ganache, Swiss butter meringue (all creams are available via links). Smudges on these creams fall without problems. You can even make streaks on a mousse cake, as in my version with
Before you start preparing the ganache, take a clean glass glass and put it in the refrigerator to cool, then you will understand why we need it.

Let's start preparing the chocolate coating for the cake.
Break the chocolate into pieces and pour in cream (I have the cream from the refrigerator, the temperature is not important here).

Let's put our bowl in the microwave for 30 seconds. We don't have to wait for all the chocolate to melt! This way it can overheat. The chocolate should slowly melt from the warmth of the cream.
So, we heated it for 30 seconds. Take it out and mix it. At first, our mass will clump, so confidently stir it.

Slowly the chocolate will disperse into the cream.
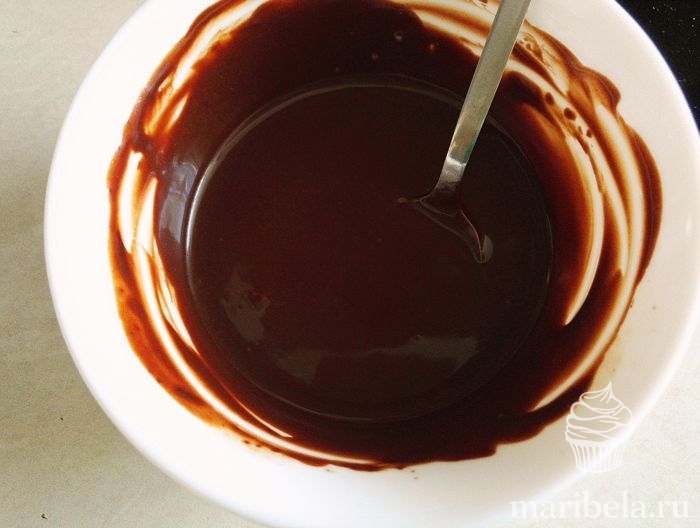
If there are pieces of unmelted chocolate left, then put the bowl in the microwave for 10 seconds, no more! You can only heat it for a long time the first time, then heat it only in pulses for 10-15 seconds, otherwise the chocolate will curdle.
So, we warmed it up. Take it out and mix thoroughly again. You should get an emulsion without lumps or bubbles! The ganache should flow from the spoon like a ribbon; if it barely drips from the spoon, then the mass is too thick, you need to add more cream, literally half a teaspoon, do not add a lot at once. Mix everything and wait until the ganache drips from the spoon.
Is it dripping? Great. We take the glass out of the refrigerator and check our drips on it.

If the drip reaches the bottom of the glass, it means the mass is liquid, you need to add more chocolate. Literally a slice, added and mixed. If necessary, warm it up in the microwave for 10 seconds.
Let's try again. Did the leak stop halfway through the glass? Great.

Let's get the cake. We choose the ugliest side (of course, you should try to make the cakes perfectly even, but anything can happen). This cake has a ganache top coating. I experimented with a new recipe, and as you can see, the experiment was not successful yet. Let's let the first drip, for this I choose a small spoon, you can let drips from a disposable bag. But it’s more convenient for me this way. With a bag it is more difficult to control the length of the drip, but with a spoon you can add drops exactly where you want.
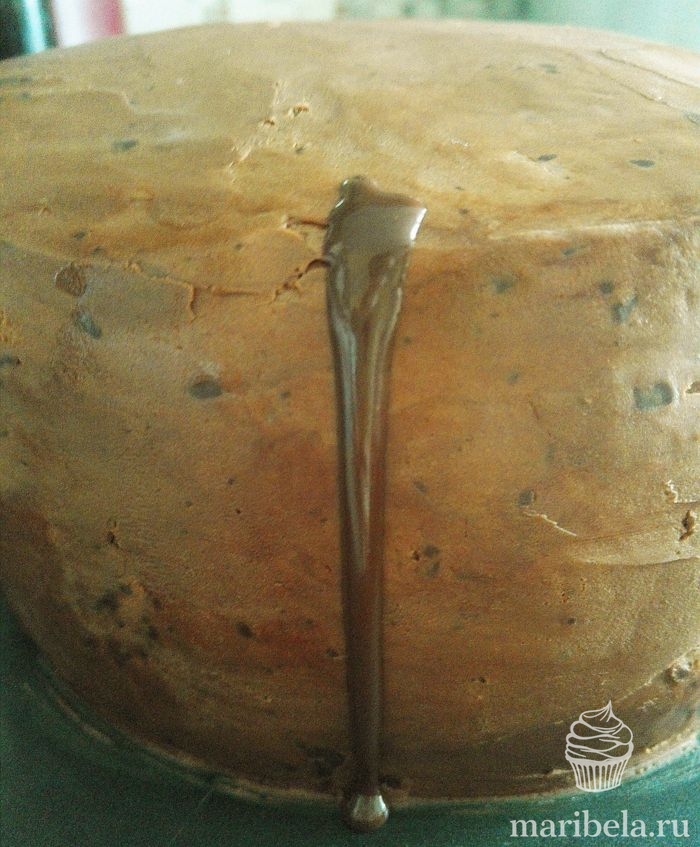
Let's let our smudge run and take a look. So, if the smudge has reached the substrate, it means either the temperature of the ganache itself is high (we try, it should not be hot in your hand), the working temperature is 27-30 degrees, or the ganache is liquid, which means we add a little chocolate again. Melted and stirred.

Let's try again.

Has the drip frozen almost at the top? This means the glaze is thick - add cream drop by drop and knead.

Let's let it flow again. Reached the middle? Great! Feel free to pour over the entire cake. In the picture I specifically showed an example of 3 smudges. The first one is too long - the ganache is liquid, the second one is too “greasy”, a leak from the thick ganache, and the third one is normal.
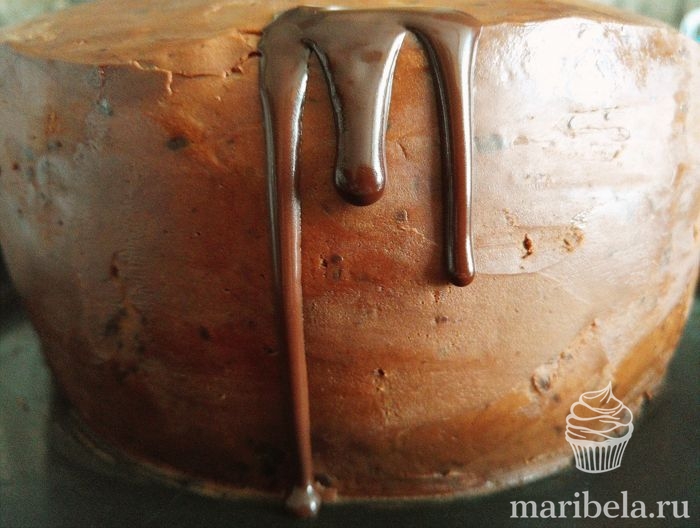
I first make a drip, run a spoon around the entire edge of the cake, and then fill the top if it calls for it.

If the glaze thickens as it drips, put the bowl in the microwave to warm up for literally 5-10 seconds and continue.
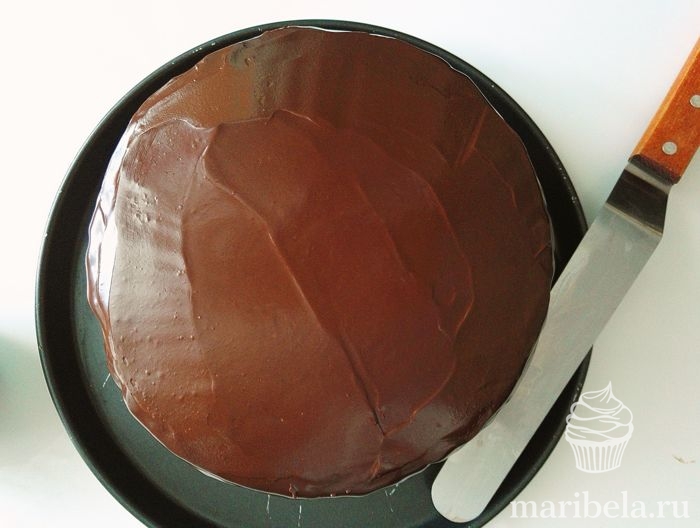
How to evenly pour chocolate glaze over the top of a cake? Very simple. Pour the glaze into the center, take the spatula, heat it under hot water, wipe off the water and level the surface, while turning the turntable (at the moment, I’m working in the field and don’t have a table at hand, which is why my cake is not level covered with cream)

That's all! The surface of the cake is completely ready for decoration.
You can decorate the top of the cake with whatever you want. From banal sweets to figures made of mastic, because as you know, mastic does not flow on chocolate.

Perfect chocolate drips on the cake are ready.

I hope you now have a clear understanding of the process. Drips are not difficult at all! With experience, you will measure everything by eye. Literally one trial lesson and you'll be covered with chocolate stains.
What I want to add is that there is no need to make a picket fence out of drips; it looks beautiful when the drips are of different lengths: one is a little shorter, the other is a little longer. Their length can be adjusted with a spoon, adding a little more chocolate in some places and less in others. Well, in my opinion, one or two smudges of chocolate flowing down to the base are still acceptable, but when half of them flow down in puddles, it doesn’t look very aesthetically pleasing.
I will publish the recipe for the cake itself one of these days - don’t miss it.
Bon appetit.
The fashion for roses made of rich cream has passed. Now the love of confectioners is colored icing for cakes. It can be transparent or opaque, of all possible colors and tastes different, depending on the additives. It opens up huge spaces for creativity. Do you want to surprise your guests with baked goods, the surface of which is covered with green glaze in marble patterns? Or mirror glaze, like on a cake in an expensive restaurant?

Unlike mastic, which is already boring for many, which, of course, gives a lot of scope for creativity, but few people like to eat it, glaze pleases not only the eye, but also the taste buds. Most often it is used on mousse cakes to emphasize their ideal shape with a glossy shine. It is usually based on chocolate, sugar or powdered sugar, which increases the calorie content of the dish, but sometimes you can risk your figure for a tempting piece, right?
How to make colored icing
Decorating cakes with colored drip icing is very popular. “Flowing” drops fascinate us from photographs on Instagram and blogs of culinary experts, and we really want to repeat this beauty!
Making colored icing for drips on a cake at home is not at all as difficult as it seems at first glance. It can be of different colors. They are achieved by using food coloring or natural dyes to make the glaze bright. The glaze acquires color depending on the type and concentration of the additive. To make the icing pink, it is made with a drop of red coloring or cherry juice. Cakes with pink icing are often baked for wedding celebrations and decorated with white elements and figures of the bride and groom on top. If you increase the amount of cherry juice, the color will be burgundy. Beets will produce a purple color. Purple baking frosting will look very unique when paired with a cake or cookie.
Red glaze will still require dye or, if you agree to a softer tone, then cranberry will come in handy. But cakes with red icing will certainly attract all the sweet tooth in the room. The green icing for the cake will come out after adding an unexpected ingredient for confectionery - spinach juice. The orange glaze is made, as you might have guessed, by adding carrot juice. But to get yellow, blue to blue, or other multi-colored glaze, you still have to use “chemistry,” even if it’s safe. It is even prepared as mother-of-pearl.

Multi-colored icing for cakes is prepared according to many recipes, although most often people are interested in how to make sweet sugar or chocolate icing. Chocolate glaze (prepared on the basis of chocolate) can be both expectedly brown and colored. Colored mirror glaze for cakes is very popular - the product coated with it shines as if polished.
A cake with colored glaze with drips always looks very elegant and interesting and will be the highlight of the holiday table. But you can also choose bright candies, fruits, and sprinkles to decorate the cake.
Ingredients
Colored icing for drips on the cake is prepared according to different recipes. In most cases, the ingredients include chocolate, milk or white, or cocoa. An almost indispensable element is sugar; without sugar syrup you will not get a mirror glaze. And dye. Often frosting is made from just syrup and coloring.
The glaze may also contain butter, condensed or regular milk, cream, coffee, egg whites, lemon juice and white wine. Of course, not all at the same time, but the variety of recipes gives wide scope for creativity - the color, taste, density, and calorie content vary.
Cooking methods
There are many ways to make colored cake frosting. They can be roughly divided into two types: those requiring heat treatment and those that do not. The latter are usually cooked with egg whites, and for the former, syrup is boiled.

Consider, for example, making a lemon mousse cake with orange frosting. This dish is very sunny and is prepared without baking. The cakes are shortbread cookies (400-450 grams), mixed with 120 grams of softened butter. Knead the “dough” to a more or less plastic mass, cover with cling film and put it in the refrigerator for a while to cool. Then we place it on the bottom of the springform pan, evenly distributing it along the bottom and forming low sides. Place the base back in the refrigerator to let the butter harden.
For the mousse, take the juice of one lemon (70 ml) and two oranges (170 ml) and their finely grated zest (1 tablespoon), 200 grams of sugar and the yolks of six eggs, as well as 30 ml of orange liqueur, 2 teaspoons of gelatin and 360 ml high fat cream. Mix the juice, zest, sugar and yolks in a saucepan and place over medium heat, stirring constantly until the contents thicken. Remove the mixture from the heat and strain through a sieve, then add liqueur and vanilla extract (1 teaspoon).
Soak the gelatin in 60 ml of warm water. At the same time, whip the cream and combine it with the yolk and citrus cream. At this point it's time to add the gelatin. Pour the mousse into the mold on top of the cake and put it in the refrigerator to set for several hours.
Once the cake has hardened, you can start making the glaze. It will require the juice of one orange and about a glass of powdered sugar. Mix them and the glaze is ready. You can add orange dye for a brighter color. Distribute it over the surface of the dessert, let it cool and serve the cake.
Video of making colored glaze
When cooking the glaze, you should never allow it to burn. Therefore, you cannot be distracted for a second and stir it intensively all the time. Otherwise, it may have a bitter taste and you will have to start the work all over again.
You don't have to buy chocolate for the glaze - you can use cocoa instead. 100 grams of ready-made chocolate in the recipe will replace 50 grams of cocoa and 50 grams of butter or cream.
If the icing with butter does not seem white enough, drop just a little blue dye into it - it will set off the yellowness and you will get a snow-white decor.
Once you've frosted the cake, be sure to refrigerate it for at least three hours to set. And when you cut it, do not forget to heat the knife, otherwise the coating may crack.
What dyes can be used
As we wrote above, you can prepare glaze both with “chemical” food colors and with natural ones, from the juice of berries and vegetables. With food coloring, the color will be more “clean,” but using natural coloring can calm you down, and you will fearlessly put a piece of cake on your child’s plate, even if the dessert is covered with green icing.
By the way, orange glaze can be made from orange juice, not just adding food coloring or carrot juice. To prepare the chocolate coating, mix cocoa with butter, sour cream and sugar.

You can make icing of almost any color using one or another dye.
Basic recipe with glucose syrup
The recipe for colored glaze for drips on the cake is based on chocolate and glucose syrup.
- 150 g chocolate (dark for brown glaze, white if you plan to use dyes);
- 150 ml glucose syrup;
- 150 g granulated sugar;
- 100 ml condensed milk;
- 12 g gelatin;
- 135 ml of water (reserve 60 ml of water for soaking gelatin).
Soak the gelatin in advance. Bring the glucose syrup and sugar to a boil and simmer together for a while. Cool.
Pour gelatin, condensed milk, dye into the syrup and combine everything with crumbled chocolate. Beat the mixture with a blender and make sure no bubbles form. To do this, hold the blender only in one direction and slightly inclined, or use a special attachment.
Cool the whipped mass for several hours, then heat it in the microwave to 35 degrees and carefully pour it onto the surface of the cake, previously lined with cream on top and sides (light cream cheese works great). The cake icing should spread on its own; there is no need to level it with anything. If you want to get drips and not completely “glaze” the cake, then just pour a little slower and less to control the situation.

If you took white chocolate and did not use dye, you will get a white glossy glaze. And with dyes you can even make a rainbow cake by dividing the syrup into several parts and painting it in different colors, and then carefully covering the baked goods with “enamel”.
What to do if there is no glucose syrup?
You can make your own glucose syrup. Take two-thirds (by weight) glucose tablets or powder and one-third water and boil together until the glucose dissolves. Then add glycerin, pour into a glass jar and store in the refrigerator for up to several months. From 64 grams of glucose, 36 grams of water and 1 teaspoon of glycerin, 100 grams of glucose syrup is obtained.
Milk chocolate recipe
The easiest way, perhaps, is to make icing from milk chocolate (or any other chocolate). You will only need a bar (100 grams) of chocolate without additives (it is better to take a quality product - a cheap one can curdle) and five spoons of milk. Place the broken chocolate in a dry bowl, add milk and melt in a water bath, stirring regularly. All! You can use the glaze for its intended purpose.
Butter icing
Creamy icing does not harden to a solid state, so it is used for cakes, Easter cakes and even simple buns. Its original color is milky white, so it is very easy to paint.

To prepare it, pour 2/3 cup of heavy cream into a saucepan, add 2 tablespoons of butter and heat over medium heat until the butter has dissolved. Pour 3 cups of powdered sugar and a little vanillin into the cream, mix, remove from the burner and immediately beat with a mixer at high speed.
Wait for the glaze to cool to a warm state and apply it to the cake.
Frosting recipe with cocoa and cream
Cocoa and cream make a thick glaze with a rich flavor.
Melt 30 grams of butter in 130 ml of cream. Add 90 grams of cocoa powder to the warm liquid. When it dissolves, gradually stir in two cups of powdered sugar. Let the glaze cool slightly before using.
The chocolate glaze can be additionally decorated with colored crafts - sprinkles, confectionery figures or flowers.
The ideal coating for a mousse cake is a mirror glaze with invert syrup.
To obtain invert syrup, heat 130 ml of water and 300 grams of sugar in a thick-bottomed saucepan, bringing it to complete dissolution and the liquid to a boil over low heat. Then add 1/3 teaspoon of citric acid. Cooking time – another 25-35 minutes until thickened to the consistency of liquid honey, cool and store in the refrigerator in a glass jar.

For the glaze, we will take 150 ml of introvert syrup (can be replaced with glucose), 150 grams of sugar and 60 ml of water and bring the mixture to a boil. Mix 150 grams of white grated chocolate with 100 ml of condensed milk and pour syrup over them. Add soaked gelatin and the necessary dye. Now you need to carefully beat everything with a blender so that no bubbles form - with them the glaze will look less aesthetically pleasing.
Before application, the glaze must be heated to 33-25 degrees. Pour it in a circular motion from the center of the cake, without touching it with foreign objects, so as not to disturb the perfect gloss. Once it begins to harden, you can add additional decorations to the surface of the cake.
Honey Glaze Recipe
Original recipe for glaze with honey and coconut milk. For it, we will take half a bar of dark chocolate, grate it and put it in a water bath, after mixing with 10-15 grams of cocoa, 35 ml of coconut milk and 30 ml of honey, until everything is dissolved. Place 40 grams of butter into a hot but not boiling mass and stir until the mass is homogeneous.
This glaze is thick, apply it to the cake, leveling it with a knife or pastry spatula.
Caramel glaze
Soak 5 grams of gelatin, and dilute 10 grams of starch in 30 ml of water. In a saucepan with a thick bottom, standing over low heat, pour 100 grams of sugar and add 10 grams of lemon juice, prepare caramel.

As soon as the pan is removed from the stove, pour in 70 ml of water and 130 ml of heavy cream, stirring continuously. Put it back on the fire, add a whisper of salt and starch, and let it boil. When the mass has cooled to 50 degrees, stir in the gelatin and cool at room temperature.
Vanilla frosting
A very simple vanilla frosting recipe. Melt 1 teaspoon of butter, add a glass of powdered sugar, 2 teaspoons of milk, a pinch of salt and a quarter teaspoon of vanilla extract. Whisk everything together.
Lemon glaze
For 100 grams of powdered sugar, take 3-4 teaspoons of lemon juice. Mix. Add more juice if necessary. Sweet and sour glaze is ready.
Orange glaze
The orange glaze is prepared in the same way. You can also add orange zest to it.
Coating of cakes and pastries
To get a beautiful and evenly poured cake, you need a special grid on which it is placed when it is removed from the mold, and only after that they begin to pour the icing.
To make smudges, you will need two colors of glaze. For example, first green icing is applied to the surface of the dessert, it is given time to “set”, and then a small amount of pink icing is poured onto the “top” of the cake so that it flows over the edges. It is advisable to cool it a little in advance so that it becomes more viscous and flows more slowly - there the smudges will be more pronounced and picturesque.
When there is no way to prepare complex decorations for cakes and other homemade baked goods, icing will come to the rescue. The confectionery component can turn baked goods into a real work of art. It comes in different types: chocolate, mirror, ganache, sugar. The list is quite large, because the glaze can be made from various ingredients. Her choice will depend on tastes, ingredients, time and complexity of preparation.
Mirror glaze
Such decoration requires great skill and many years of practice. Mirror glaze is rightfully considered an art and a standard of beauty; its ideal form and beauty will not leave anyone indifferent. But, like any other work of art, decorating baked goods will require a lot of time and effort. This glaze got its name because of the surface, which, if the requirements are met, really looks like a mirror. But when transporting and cutting the finished confectionery product, you need to be careful. Thick film can easily crack.
You can make mirror glaze from white and dark chocolate. White is in most cases used in conjunction with food coloring to obtain a colored mass.
Preparation of mirror glaze
Ingredients:
- Gelatin - 15 g.
- Condensed milk - 125 ml.
- Syrup - 200 ml.
- Chocolate - 2 bars (180 g).
- Drinking water - 100 ml + 75 ml for gelatin.
- Granulated sugar - 200 g.

Cooking sequence:
- Soak the gelatin in warm water until it swells.
- Heat the syrup and mix it with sugar. Place this mixture in a water bath.
- Stirring constantly, until the sugar in the syrup is completely dissolved.
- Remove syrup from heat and cool.
- Add the swollen gelatin and condensed milk to the cooled syrup and mix thoroughly.
- If food coloring is required to prepare the glaze, at this stage they are added to the mixture and mixed until the color is uniform.
- Melt the crushed chocolate in a water bath, mix with syrup and beat with a blender.
- The finished mixture should be placed in the refrigerator for 10 hours.
- It is recommended to perform the same step with baked goods. When it freezes, the surface becomes smooth, and the finished composition will be covered more evenly.
- After refrigeration, heat the mirror glaze to 30 degrees, beat again and quickly pour this mass onto the baked goods, without smoothing it further.
- To harden the glaze, you need to put it in the refrigerator for a few more hours.
Smudges - as a decoration for desserts
If you don’t have the opportunity or experience to work with mirror composition, but the desire is there, you can make the process easier and decorate the homemade smudges on the cake. The cooking process will, of course, be easier, but the beauty of the decoration will not fade from this. The ingredients for this method are identical to the components of mirror glaze. The difference lies in the application technique.

If attentiveness and dexterity are required when working with mirror glaze, then even a novice cook can cope with smudges. You just need to turn on your imagination. Using cutlery, it is easy to create streaks of colored icing on the cake. When the process is completed, the baked goods must also be placed in the refrigerator to harden.
Original recipe
For the following recipe for colored glaze for drips on a cake, which, by the way, has a low cost, you will need only three ingredients:
- refined deodorized sunflower oil - 40 ml;
- white or dark chocolate - 130 g;
- food coloring.

The process of preparing colored glaze for drips on the cake:
- First you need to melt the chocolate in a water bath. It is important to stir it constantly.
- Then you need to pour it in and mix until it becomes a liquid mass.
- Add food coloring and blend with a blender.
- Place the resulting glaze into a piping bag.
- Place the cooled cake on a wire rack with a stand.
- It is necessary to apply the composition to the dessert along the edge in the form of smudges.
- The remaining mass can be distributed over the baking surface.
Thus, the process of preparing colored icing for cakes at home is not complicated at all. If desired, any confectioner can obtain the desired composition; you just need to carefully follow the cooking technology, take into account the amount of ingredients, and everything will work out!
Modern confectioners are a real discovery for me! Scrolling through the pages of websites and Instagram, you can come across mesmerizing works that are difficult to look away from. And after closing the photo, it pops up in your thoughts for a long time. I am delighted with the current trends in the confectionery world. Cakes of the 21st century are, without exaggeration, masterpieces! But, as you know, fashion is a fickle lady, it changes very quickly, and what is in trend today may deserve the stigma of “last century” tomorrow. Let's still discuss how, today, you can add a zest to the cake and bring your work closer to a masterpiece?
The answer is quite simple - make streaks on the cake. This is not a difficult technique that every pastry chef, even a beginner, can master. The main thing is to concentrate and maintain proportions. A sense of proportion plays a fairly large role. A cake with drips looks neat and attractive only if the icing flows down in thin streams of different lengths. Cake drips are one of the most versatile designs. Goes great with fresh berries, candy, and floral decorations. Depending on the theme, they can be chocolate or colored.
Secrets of the “correct” glaze
Chocolate icing is great for creating smudges. There are many recipes. However, obtaining an excellent result depends not so much on the ingredients as on the cooking technology.
- Can only be applied to a cooled product.
- It is very important that the icing is the right consistency. If it’s too thick, you’ll get pot-bellied worms, and if it’s too thin, the streaks will flow onto the substrate, forming chocolate puddles.
- Before applying, be sure to check the temperature by applying to the skin of your hands. It shouldn't burn. Glaze that is too hot will ruin your creation.
- Volumetric smudges on a chocolate cake look more impressive. This point again depends on the density.
So, let's look at the recipe for making this miracle glaze.
Chocolate stains

The recipe for a cake with chocolate overflows involves the use of the following ingredients:
- Dark chocolate from 50% - 90 g;
- Cream 33% fat - 70 ml;
- Butter – 40 g.
Cooking process
For such pastry experiments, it is highly advisable to use scales. But, in principle, you can do without them by adjusting the density using the test method on chilled dishes described above.
- Heat the cream to a temperature of approximately 70 degrees (do not bring to a boil!). Remove from heat.
- Finely chop the chocolate and add to the heated cream. Don't be alarmed, at first the mass will seem stratified. Continue stirring until the cream becomes smooth.
- Add butter, cut into pieces. Some confectioners do not use it, but this ingredient gives a chic glossy sheen to the ganache.
- The glaze is ready. Next is a matter of technique, so to speak! Use our recommendations regarding its application.
While making drips, the ganache changes consistency and hardens. Control this moment! Either work quickly or reheat the glaze as you go.
As practice shows, it is better to perform such manipulations with a small spoon, but you can also use a pastry bag. Whichever is convenient for you. Once the drips are done, fill in the center portion of the top of your masterpiece.
Colored glaze

Colorful desserts attract the attention of both adults and children. If you are preparing for a children's party, use colored smudges for the cake as a design. “The head of the holiday,” in this case, will not be left without compliments.
Ingredients:
- White chocolate - 65 g;
- Vegetable oil - 20 g;
- Food coloring.
Cooking process
- Melt the chocolate in the microwave, stirring every 15 seconds, or in a double boiler. Make sure the bowl is dry. Getting even one drop of water is very undesirable.
- Add vegetable oil (refined, odorless) to the melted chocolate.
- The next step is adding dye. Mix everything thoroughly until the color is uniform.
- Remove the pre-chilled dessert and pour the frosting, starting from the edges. Then fill the center, leveling everything with a spatula.
We tried to explain the essence of this simple process in as much detail as possible! Share in the comments how well your expectations and reality coincided?)) We hope this article will contribute to the development of someone’s confectionery talent.