Classification of salads according to preparation method. Master Chef - Culinary School


Basic ornamental
The material for making our carnations will be paper. Not just
regular, but rice, crushed or tracing paper. Carnations from
regular table napkins. It is with them that we will work in our
master class. For all other types of paper, the technology for making carnations
will be the same.
In addition to paper for us
You will need: glue (PVA or other
office glue), medium wire
thickness, preferably copper, green colored paper, scissors, pencils,
a special ruler with a circle and a marker.
Let's get started
Master class on making a carnation flower from paper.
First, fold one paper napkin in half, and then
Draw the outline of a circle on it. For this purpose you can use either
a ruler with a circle, or an object with a round base.
You don’t even need to outline the latter, but
just press it hard into the napkin and use the remaining dents to cut out the ones we need
circles. For example, I use a hairspray cap. It fits perfectly in size.
After the semi-finished products are carefully cut, they
you need to cut it into equal halves, and then divide everything into three identical ones
parts.


Now the part can be unfolded, but only with each rotation along the bend it is necessary to make cuts up to the middle of our part. (see photo)


Taking one of the parts,
divide it into two parts, as shown in the photo.

Let's start creating a carnation flower.
First we create the center of the flower. To do this we need wire and a small strip of paper (5:0.5cm). Stepping back from the edge of the wire a couple of centimeters, we tightly wrap it with a paper strip, well coated with glue. After this, the wire needs to be bent and its ends twisted, as it was done in the photographs below.


So, the central part of the flower is ready, we can continue
work on creating our flower. The first petals of the carnation cap will be from
the smallest details. They need to be greased with glue and glued around the central
parts (see photo).


Now, having rotated the center 180 degrees, at the junction of the first
The next part is glued onto the petals. And so one by one, constantly turning the center, everyone sticks together
small parts.


Larger parts
- semicircles, glued in a similar way, with
the only difference is that the color center is rotated only 30-45 degrees.
The flower is finished.
However, what is a clove without a stem?
From a strip of green
paper, cut out the petals and, creating a peduncle, glue them to the base
flower, as shown in the photo below.


Now you can work on the stem. We wrap the wire base with a paper strip (1.5x30 cm), as in the photo. To prevent the coils from unwinding, the paper should be glued every 2-3 cm.


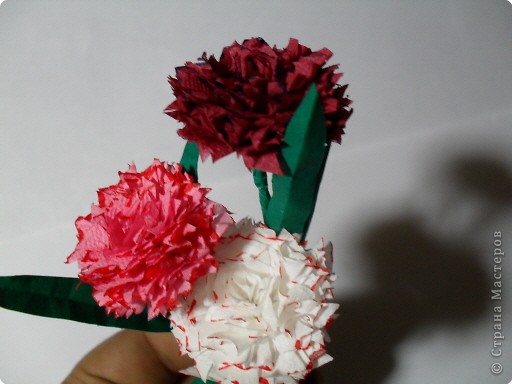
This amazing bouquet is made from ordinary napkins! If you are looking for an original idea for creating paper flowers as a gift for March 8th, then you have definitely found it! Try making such a bouquet with older children: your mother, grandmother, sister, friend or teacher will be very pleased. And I thank the Folding Trees blog for providing the master class.
Materials:
napkins
2 paper clips
chenille (flexible, shaggy) wire
colored marker or felt-tip pen
optional (to decorate the stem): thick wire and adhesive tape
In principle, flowers can be any size, but the creator of this bouquet suggests making them 7.5 cm in diameter to make them look realistic.
Manufacturing:
1.Fold the napkin in half again and again until it reaches a size slightly larger than the diameter of the flower. (The author used a napkin measuring 50 x 60 cm, and after folding it, she got 48 circles, which is enough for 4-5 flowers.)  2. Trace a circle with a pencil on a folded napkin.
3. Holding all layers of napkin together, cut out circles. if the napkin is too thick and scissors won’t cut it, divide it into 2 parts, draw a circle on both parts and cut one by one. If you can’t cut it very evenly, that’s okay too, there’s no need for it. Use a paper clip to keep the napkin layers from falling apart or moving.  4.As you continue cutting, add a second clip on the opposite side of the circle to keep the napkins from unraveling.
  5.And now - a technique that will give napkin flowers a believable appearance. If you need to finish the job quickly or are making flowers with children, you can skip this step - the flowers will still turn out beautiful. It will only take you a few minutes to complete this technique. Choose a felt-tip pen or marker that contrasts with the napkin. A bright color will look more impressive. Holding the stack of napkins in one hand, carefully draw a marker along the edges of the circles. Take your time - if you press too hard, the napkins will separate. Draw the marker slowly (several times) along the edges to create a bright line.
  6.Remove the clamps and take from the stack of napkins as many circles as needed for one flower. The author used 12 layers, but 8-10 may also be enough. Hold the napkins in your hand and make 2 holes in the center of the circles. Thread the chenille wire through one hole, bend the end and thread it through the other hole.
  7.Pull the ends all the way through and curl them onto the underside of the napkins to keep the circles from falling apart.
  8. Now we are making the petals. Separate the top layer and crumple it, pointing upward. Crinkle the napkins as you wish, the main thing is to crumple them at the base of the petal (the center of the circle). Do not touch the painted edges.
  9.Repeat the same with each circle in turn. Separately crumple each layer and try to ensure that the folds are not in the same place all the time. Wrinkle (this is clearly visible in the photo) the napkin at the base of the circle, and there should be no folds at the edges!
10.When you crumple all the layers, you should get a flower like this 
11.In principle, the flower is ready. But if you wish, you can also decorate the stem in such a way that it looks more like a real one. Here is one idea how to do this. Take wire and adhesive tape that florists use. 
12.Attach the wire to the stem and wrap it tightly with tape. Start at a distance of about 2.5 cm from the flower (as in the photo), first wrap part of the stem up to the flower (i.e. wind up), and then down the entire stem - from beginning to end. 
Make several of these flowers to make a bouquet. 
A carnation made from a napkin is a simple but effective decoration that is suitable for festive table setting, decorating recreation areas and kindergarten crafts. In addition, the craft will require a minimum of material and time. You can choose any color and size of the product, showing imagination and skill.
Nuances when choosing material
A napkin carnation should look natural and remain intact for a long time. To achieve this effect, you need to use high-quality material. Since the base of the flower is a napkin, when purchasing raw materials you should pay attention to several nuances:
- It is advisable to choose two-layer napkins.
- Pay attention to the surface relief - it should be minimal.
- The color should match the natural tone of the flower.
- The larger the size of the napkin, the easier it is to work with the shape of the product.
Other features when choosing a material are important if there are certain conditions for making a flower.
Preparation of tools and material
To start making cloves, you should prepare your work area. The ideal option would be a desk that is well lit. Making one product at first takes approximately 15-30 minutes. To create a full-fledged bouquet, it will take from 1 to 2 hours.
In addition to standard conditions, it is worth preparing the necessary tools and materials. Making carnations from napkins with your own hands is very simple and cheap, since the set for work consists of the simplest items:
- A pack of napkins.
- Stapler with small staples.
- Stationery glue.
- Paper scissors.
- A circle stencil with a certain diameter.
- Sheets of newspaper.
- White chalk or toilet soap.
You can use other materials or tools that are easiest for the creator to work with.

Additional flower decoration
After making a carnation from napkins, it’s worth thinking about additional decoration. Depending on the result, special materials are selected:
- A flower for a gift should look bright, so you should choose stained glass glue with glitter.
- To give the flower romance and freshness, you should use silicone glue, which is applied to the petals.
- You can use napkins of two colors - this will create the illusion of naturalness and originality.
- If the material used is initially light, then the edges of the petals can be outlined with a contrasting felt-tip pen, creating an edging.
By showing your imagination, you can use non-standard methods of decorating a flower, which will appear during the process of its creation or at the final stage of work.
Making a flower with a step-by-step description
To create a beautiful bouquet, you need to know how to make carnations from DIY napkins. The algorithm for creating a flower is quite simple and understandable even for beginners:
- First you need to separate the layers of napkins so that they do not move relative to each other.
- Lay the canvases divided into layers on the table, straightening out the folds and edges well.
- A glass can be a stencil for creating circles. Rub the edges with chalk or soap, make 4 prints on one canvas.
- The layers of each circle are fixed using a stapler. Make a fastening with a bracket in the center of the workpiece.
- Cut the workpiece using scissors or a stationery knife. Sometimes the circle is not cut out, but separated by hand, making jerks.
- We fasten several circles together to achieve splendor when forming a flower.
- The edges need to be frayed a little to achieve the natural shape of carnation petals.
- Separating layer by layer, it is worth lifting the elements up. In this way, a bud is created, and then the flower itself.
The technique is very simple and uncomplicated. Even children can make carnations of this kind, since there is no contact with dangerous tools, and the technique is clear.

Creating the rest of the flower
The next part of the flower is the stem, which in this case is not so difficult to make. The simplicity lies in the minimalism of the stem of the carnation - the leaves are very small in size. If the stem is made with high quality, then the carnation from a napkin will not only be perfect, but also look like a natural one.
Option for making a stem for cloves:
- It is worth preparing tools and materials. The base can be a barbecue skewer or stiff wire. For further processing you will need a green napkin, tape or corrugated paper.
- Moisten the base in PVA glue, but the main thing is not to overdo it. You can coat the paper itself. For tape, you should choose a higher quality glue.
- Cut the paper material into strips. It is advisable to use narrow elements that will look more harmonious on a thin base.
- Wrap the glue-moistened material onto a rigid base.
- Secure several leaves at a distance of several centimeters along the entire stem.
- Leaves are prepared separately. It is enough to cut thin strips of paper, soak them in glue, and wait for them to dry completely. The working principle with tape is the same as with cellulose base.
There are other techniques for creating clove stems. The main thing is to choose those options that are as close as possible in appearance to the natural type of flower.

Connecting all the elements
There are many options that guarantee a high-quality and durable connection of all elements of the flower. It is especially difficult to attach a ready-made flower to the stem so that a sharp transition between parts is not visible.
For a do-it-yourself clove made from napkins, it is worth considering step by step how to form each element and connection. The most popular options are:

Another technique for creating a flower
There are other ways to create a flower, which are even simpler in their algorithm. Similar techniques are popular when working with young children, but at the same time the flower looks impressive. Thanks to this, many needlewomen resort to this type of work.
A step-by-step explanation will help you create a carnation from napkins with your own hands:
- You will need 1 napkin, which consists of at least 3 layers. The color may be very different. To fix it, you can take thread, wire, fabric, or use a stapler.
- Fold the napkin like an accordion. The smaller the accordion, the more neat the flower will look, and the shape will be lush and natural. You can first separate the layers without shifting the planes of the canvases.
- Tie a thread or wire in the middle of the fabric folded into an accordion. It is worth tightening the lock a little so that you get two equal fans on both sides.
- Straighten the layers on both sides of the fixing material, lifting them up. The attachment point will act as the center of the bud.
- The edges need to be slightly wrinkled or even slightly torn.
The next step in creating a flower is the formation of the stem. Complex techniques are not needed when creating a carnation bud. It is worth using the option that is optimal for further use.

Methods for arranging carnation arrangements
Carnations from a napkin can become the basis for a huge number of compositions. Most often, paper carnations are used to decorate halls for celebrations and parties.
Options for creating compositions from paper flowers:
- Flowers can be attached to a foam sphere. You will get original hanging decorations that can be used at weddings, birthdays, and parties.
- The buds are attached to a wire frame. The result is an airy composition that can be installed or hung.
- Most often they create bouquets. You can put paper carnations in an interesting glass vase or ceramic flowerpot.
- You can place buds in rows in a flowerpot, forming a sphere or pyramid. This decoration will be an ideal option for decorating for the holidays and for everyday use.
- The buds can be placed in an empty glass or glass. This option is used in extraordinary table settings and to decorate shelves.
Due to the pliability of the material from which the flower is made, the elements can be used to create any composition. If you show your imagination, you will get original options for decorating the room.
Even children can do it, since making carnations from napkins is not difficult at all.
For work, in addition to napkins, you will also need paper glue (PVA, stationery), medium-thick wire (it is best to use copper wire), green colored paper, scissors, a pencil, a marker, a ruler with a round hole or a round shape of the required diameter, for example , cup, hairspray cap, etc.
Carnations made from paper napkins
1. Without unfolding, fold one napkin in half and draw a circle on it.

2. Holding the napkin with your fingers or using paper clips, cut out round parts along the intended contour.
3. Cut the paper circles into equal halves and distribute into three equal groups.

4. Fold each semicircular piece symmetrically three times to obtain a narrow sector of the circle.


Make a triangular cut in the contour of a narrow sector with scissors. Color the outline of the part with a red marker or felt-tip pen. The petals will have a more natural shape if you make cuts with curly scissors.


5. Unfold the part, making cuts along each fold line to the middle of the part.

7. Divide one of the resulting fragments into two parts.

Formation of a carnation flower
8. Grease a strip of green paper 5 x 0.5 cm with glue and tightly wrap it around the wire at a distance of 2 cm from the end of the wire.


9. Bend the wire, secure the end of the wire around the main rod. Finish wrapping with a paper strip.


10. Grease the smallest fragments of the napkin with glue and secure them to a green strip of paper, forming the central petals of a clove bud. Each next segment is glued at the junction of the petals of the previous row, that is, the center of the flower must be rotated 180 degrees each time until all the small segments are used.


11. In the same way, secure the semicircular blanks, turning the center of the flower by 30 - 45 degrees each time, until the formation of the carnation head is completed.


Clove stem
12. To form a peduncle, use scissors to make teeth on a strip of green paper. Glue the part at the base of the carnation bud.


13. Wrap the wire base with a strip of green paper (1.5 x 30 cm), gluing the paper every 2 - 3 cm to prevent the paper strip from unwinding.

