Dried garlic. How to dry garlic at home
Dried garlic is an aromatic seasoning that goes great with meat, poultry, seafood and all kinds of soups. During the cooking process, dried garlic in the oven loses its bitterness, while retaining all its beneficial properties and aroma. That is why dried garlic is ideal for many first and second courses, and it is also recommended to add it to preserves so that preparations for the winter do not explode and are guaranteed to last for 2-3 years.
At home, you can dry garlic in the oven in just 3-4 hours. Depending on the type of dish, you can use granulated garlic or flakes, which are perfectly stored all winter on the shelf along with other spices.
Ingredients
- garlic 0.5 kg.
Preparation
 1. To prepare, you only need one ingredient - garlic of any variety, mature, with well-formed cloves.
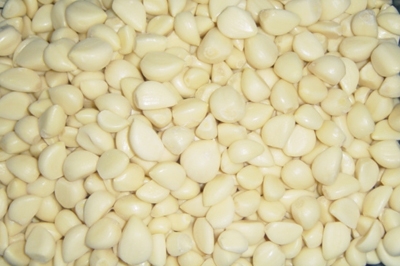
 2. Peel the husks from the cloves using a knife. If there are any contaminants, they should be carefully cut off or cleaned with a damp sponge - do not wash, as excess moisture will take a long time to evaporate and the drying time will increase.
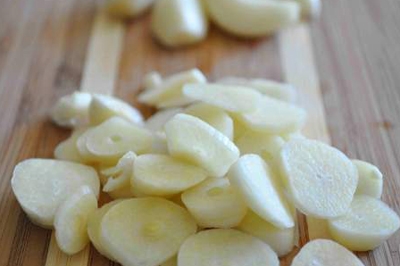
 3. Using a sharp knife, cut into thin slices - the thinner the slice, the faster the garlic will dry.
 4. Cover a baking sheet with parchment and place the resulting garlic chips on it in one layer. There is no need to grease the parchment with anything.
 5. Place the baking sheet in the oven and dry the garlic for 3-4 hours at a minimum temperature of 60-80 degrees - the oven door must be slightly open so that air circulates well. If the flakes were cut a little thicker, the drying time should be increased.
 6. Well-dried garlic flakes are dense and crispy and break easily when pressed with your fingers.
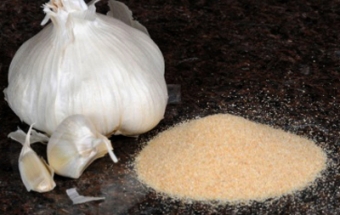
 7. In order to turn dried garlic flakes into granules, you need to grind it in a blender or mortar.
 8. After 1-2 minutes of grinding in a blender, the granulated garlic will be completely ready. The granules should be well dried; if they are slightly damp to the touch, then the garlic should be returned to the oven and dried for another 15-20 minutes.
Garlic, produced in large quantities, always pleases gardeners. But harvesting is only half the battle, because all this goodness also needs to be preserved for the long winter months. Today we propose to talk about how to properly dry this vegetable immediately after harvesting, so that it can be stored in whole heads all winter, and we will also talk about how to make garlic seasonings at home, in the form of chips and powder, from peeled garlic cloves .
Before harvesting this vegetable, you should avoid watering it for several days so that the soil remains dry and crumbly. If it rained heavily the day before, then you should also wait a while with cleaning.
Having pulled the heads out of the ground, they are laid out in one layer on the ridge and allowed to dry for 3 to 4 hours. After this, the crop is harvested under a well-ventilated canopy and dried there for 5 to 10 days.
After the green part of the plant dries, it is partially cut off, leaving a small stump of 5–6 centimeters. The garlic heads are placed in mesh boxes in a small layer and stored in a cool, dry place.
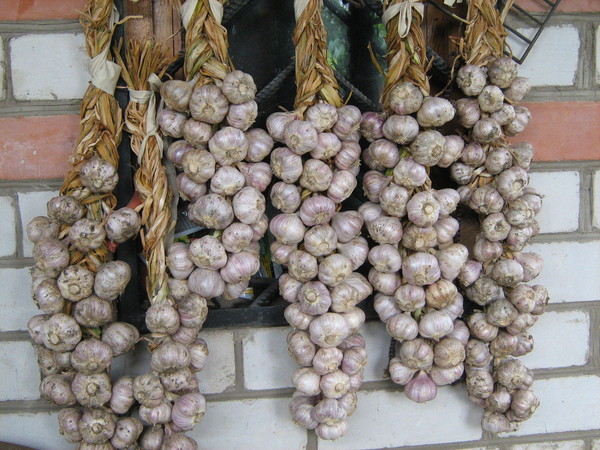
If you plan to store garlic in bundles or braids, then the tops are not cut off, but used for fastening. Bunches of garlic are hung at some distance from the ground in a dry room.
Watch the video from the “Useful Tips” channel - How to dry garlic
How to dry garlic cloves
Before you start drying, you need to prepare the main product. The head of garlic is disassembled into individual cloves, each of which is then peeled. If the slices are darkened or damaged, they should be cut off with a knife.
There are several ways to chop garlic:
- Grind the garlic through a coarse grater. This method is not desirable, since when chopping, too much juice is released, which interferes with high-quality drying. In addition, the aromatic substances from such a product will disappear much faster.
- Grind with a food processor. The disadvantages of this method are the same as in the previous recipe.
- Cut the garlic cloves into thin slices. This is the optimal grinding option for drying in ovens and electric dryers.
- Cut the cloves in half lengthwise. This method is ideal for drying garlic in the fresh air.
Natural way of drying
Garlic cloves cut in half are laid out on a flat surface, cut side up. The pallet is placed in a dry and very well ventilated area. An important rule: drying should not be exposed to sunlight. Drying in the shade will help preserve the maximum amount of nutrients.
From time to time, garlic cloves should be checked for readiness. On average, the entire process takes from 10 to 14 days, subject to dry, warm weather. If the garlic cloves were initially large, and the weather was not good during drying, then you will have to wait much longer for the product to be ready.
Dry in the oven
Chopped into plates, the garlic is placed on a baking sheet. To keep the dishes clean, the bottom of the container is first covered with baking paper. The oven is heated to a temperature of 50 - 60 degrees and the garlic is sent there. To avoid excessive overheating and to provide access to fresh air, keep the oven door ajar.

40 minutes after the start of drying, the baking sheet is removed and the slices are turned over. After the garlic has cooled completely, it is sent back to dry.
The total oven drying time is approximately 3 – 6 hours. This mainly depends on the thickness of the original product.
How to dry garlic in a vegetable and fruit dryer
Garlic petals are laid out on drying racks in one layer. The heating temperature is set on the unit to 55 - 60 degrees. You can’t go higher, as excessive heat will destroy all the aromatic and beneficial substances of the vegetable.

The average drying time is 4 – 6 hours. This largely depends on the size of the cut and the humidity of the room in which dehydration is carried out.
The Ezidri Master channel in its video will talk about how to properly dry garlic
How to make garlic powder
Well-dried garlic can be used to make an excellent seasoning in powder form. To do this, garlic chips are placed in a blender or coffee grinder and beaten for 1 - 2 minutes. The crushed mass is sifted through a sieve in order to achieve a uniform consistency. If you grind the product for less time, you will get a coarse granular powder. It will be more noticeable in the finished dish.
How to store dried garlic
Fragile, crumbly garlic cloves are stored in jars, preferably made of dark glass, under a tightly screwed lid. This preparation is stored in a dry, dark place for a year, until the new harvest.

Kira Stoletova
Garlic is one of the popular food additives that can retain its healing properties for a long time. There are several ways to prepare this seasoning, but before drying the garlic, you need to follow the cleaning rules and prepare the storage area.

Otherwise, the taste of the teeth will be lost as a result of rotting. To avoid this, you must adhere to a certain algorithm of actions.
Rules for harvesting bulbs
Digging up the crop is an integral part of preparing plants for storage. Improper harvesting of fruits can affect the integrity of the heads, which will cause rapid spoilage of the bulbs.
- The main indicator of crop ripening is the foliage of the plant. As soon as most of it has turned yellow, the garlic can be dug up.
- Also, to determine the ripening of the bulbs, one arrow is left on the bed. The appearance of seeds indicates the readiness of the variety.
- Species that are planted for the winter are usually dug up closer to August. Spring varieties can ripen until mid-autumn.
Plants should be dug up as carefully as possible. First, the bulb is dug up, after which the garlic is pulled out of the ground by the base of the stem. After harvesting the garlic, the soil should be dug up and planted with green manure. If this is not done, the soil will lose many useful substances.
How to prepare crops for drying
Before drying garlic after harvesting, it should be subjected to primary processing. The heads should be cleaned from the soil by hand and dried for a week. Afterwards, the shoots and roots are removed with a knife or pruning shears, leaving a stem 2 cm long.
There are also several rules that must be followed during primary processing. These include:
- Preserving foliage after digging. This will allow the bulb to gain maximum nutrients after drying.
- Accuracy in relation to the harvest. It is not recommended to knock the heads together to shake off the soil. Any mechanical damage to the husk affects the shelf life of the bulbs.
- Lack of moisture. After digging, you cannot wash the garlic - this will lead to rotting of the bulbs.
These recommendations will help you properly prepare the harvest. When cleaning the heads, you can remove the top layer of husk. There are several ways to dry garlic. Their choice depends on the means at hand and the amount of harvest.
Drying outside
This type of heat treatment is the most popular because it does not require additional materials. After initial processing, the crop should be dried outside, weather permitting. The drying process can only be carried out during the day; it is better to hide the garlic at night, since the amount of precipitation increases at night.
Drying garlic lasts from three to five days. This method is also welcomed by farmers due to the increased resistance of fruits to various diseases. However, you need to monitor the sun's rays - under direct ultraviolet light, the heads can get burned.
Experts also advise not to remove excess foliage from the stem. This will keep the cloves from drying out and will increase the beneficial properties of the onion.
Drying indoors
This method of drying crops for the winter is used if the weather does not allow leaving the bulbs outside. Rooms with good air circulation are suitable for drying.
It is also desirable that the room is darkened and the air is moderately humid. For these purposes, you can use a balcony or attic.
Oven drying

In the modern world, an oven is used to dry crops in an apartment. Before drying garlic, it should be completely cleaned of excess leaves and roots, and then rinsed thoroughly under running water.
The cloves are cut into plates a couple of millimeters thick. The slices are laid out on a baking sheet, having previously covered it with parchment or foil. The plates are stacked in one row. The oven temperature should not exceed 50 degrees, otherwise the slices may burn and acquire an unpleasant brown tint. Once dried, the garlic can be ground into granules and stored as a powder. A similar method is used in industrial production, since storing the onion in powder form is convenient and practical.
Drying in an electric dryer
This method of drying garlic at home is considered the simplest, since its use minimizes the risk of spoiling the harvest. To dry garlic in an electric dryer, you should thoroughly peel it and wash it under running water for a while. After this, each clove is cut into two or three parts and placed in special containers in an electric dryer.
The slices should be laid out with the cuts facing up. This will allow the bulbs to dry out faster. Using this method, you can dry the crop in ten hours. This method takes the least time and allows you to dry a large amount of crop. Once dried, the slices can be ground and stored as a powder.
Storage at home
Before drying homemade garlic, you should prepare a place for storage during the winter. It will determine how long the harvest will last. Dried garlic can be stored for several months in an apartment or special storage areas. However, to make the cloves stronger, various additional materials should be used. The most effective are considered:
- kitchen salt;
- paraffin;
- onion peel;
- a mixture of oil and iodine.
Salt
Table salt is placed at the bottom of the jar, after which the container is filled with garlic. Add another layer of salt on top and pull a nylon cloth over the neck of the jar. In this form, the bulbs are stored for several months. You can also add a handful of wheat flour. These components remove excess moisture and help prevent the process of rotting. In addition, they protect the cloves from pests and diseases.
You can say about garlic the same way as about onions - it is “from seven ailments.” But garlic not only helps to avoid many diseases and cure existing ones, but is also a vegetable that improves the taste of a dish and increases appetite.
Garlic can be stored well at home. But if there is a lot of it, for example, you have your own garden with a garlic bed, but there is nowhere to store it (although there may be other reasons), then the garlic can be dried. After all, this is not such a labor-intensive process as it seems at first glance. Dry garlic also takes up little space and is very convenient to use.
How to prepare garlic for drying
The following varieties of garlic are suitable for drying: Kirovogradsky, Starobelsky White, Southern Violet, Bronitsky, Ukrainian White, Kalininsky, Rostovsky, Creole and others.
If you are harvesting your own garlic, do not water it for several days before digging it up, since the soil must be completely dry. For the same reason, they do not dig immediately after rain.
The garlic must be ripe. This is evidenced by the leaves themselves, which turn yellow and fall to the ground.
If you dig up garlic that is not yet fully ripe, its bulbs will be loose and loose. They will be poorly stored and dry.
But overripe garlic is also not very good, since when it is dug up, the scales are easily separated from the heads, as are the cloves themselves. This makes further processing difficult. After all, the cloves can become stained with soil, and it is not recommended to wash garlic that is going to be dried. Such garlic will take a very long time to dry and may simply become moldy and spoiled.
Only healthy, clean, undamaged and fully formed garlic is suitable for drying.
Garlic is dried by taking it into pieces, cutting it into slices or making powder out of it.
How to dry garlic in a bunch
Immediately after digging, the garlic needs to be dried. Primary drying is carried out directly in the field. To do this, it is pulled out of the ground and left to lie there for several days. During this time, the tops and roots will dry out and the garlic will ripen. The scales will also dry out and press tightly against the bulb. In rainy or cold weather, drying is carried out in a warm room at a temperature of about 30°C for six to eight days.
When the tops dry, they are cut off, leaving a small stump. But most often, garlic and tops are braided into braids and hung by them in a dry, cool room.
How to dry garlic without destroying the bulbs
Garlic is peeled from the upper hard scales without destroying the bulb itself.
Then the garlic is cut into pieces 5 mm thick.
Place on sieves or baking sheets lined with parchment and dry in an oven or oven at a temperature of about 50°C. To avoid steaming or uneven drying, the garlic should be stirred periodically.
Garlic can also be dried in the sun, spread out in a thin layer. But this method is inconvenient because you need to make sure that moisture from rain or dew does not get on the garlic.
Garlic is considered dried when the slices no longer bend and break easily.
The crushed garlic is well cooled by placing it on a cloth or on the same sieves.
The garlic is then winnowed by hand to separate the slices from the flakes.
Ready garlic is packaged in boxes, paper bags, hermetically sealed glass jars and stored in a dry, dark, cool room for about a year.
How to dry already peeled garlic
Garlic heads are disassembled into cloves and completely peeled. The root collar of the cloves is cut off. Check that the cloves are free of damage and brown spots.
Some people advise grating the garlic, but this method releases a lot of juice, which makes drying the garlic almost impossible. You can chop the garlic using a food processor, but the slices should not be very wet. Therefore, the best cutting method is still manual. That is, armed with a sharp knife, the cloves are cut into thin slices and immediately laid out on a baking sheet covered with parchment.
This garlic is dried in an oven or electric dryer at a temperature of 50-60°C.
The chopped garlic is periodically stirred with a spatula and ventilated, occasionally opening the door. This must be done so that the raw materials do not steam and dry evenly. Drying continues for several hours.
Method 2. Garlic is disassembled into cloves, peeled and the root collar is cut off. The cloves are cut in half. They are laid out in one layer on a baking sheet lined with parchment, cut side up. Dry in an oven or oven in the same way as in the previous case.
The drying time depends on the quality of the garlic, the degree of grinding, the drying temperature and the choice of drying unit.
Ready dried garlic breaks easily.
It is cooled in air and packaged in paper bags or hermetically sealed glass jars.
How to Make Garlic Powder from Dried Garlic
Well-dried and cooled garlic slices are ground in a coffee grinder or blender until powdered. Then sift through a sieve so that the resulting powder is homogeneous. You can chop the garlic to coarse crumbs, then the prepared topping will taste good in the dish.
If the garlic cloves do not chop well, it means they are not dried enough. You need to additionally dry them in the oven, cool again and grind.
Store garlic powder in glass, well-closed jars. Shelf life is about a year.
The product is also high in vitamins B2, C, B1 and PP.
How to collect garlic for drying?
Important! Do not wash the garlic after you dig it. You just have to separate the top dirty layers of the plant, and the problem will solve itself. If you wash the product, it may rot and it will be very difficult to dry it.
Garlic must be dried in a dry and cool room. It is best not to tear off the root, stem and leaves. You will still have time to chop the cloves into small pieces.
Methods for drying garlic
Drying the heads of garlic
How to dry garlic? Dig up the plant when it is ripe. Find a well-ventilated, cool room where the temperature is no higher than 10 degrees.
You can also store garlic in stockings. However, they should be placed in a dry, shaded place. Then you can chop the garlic. To do this, cut the cloves into 2 mm pieces.
Cutting will be easier if you use vegetable cutters with vertical and horizontal blades.
Pay attention to the condition of the knives, and also do not forget to constantly moisten them with water. This removes cell sap from the device, which prevents the product from darkening. It is recommended to store chopped garlic in an airtight container.
Drying peeled garlic
Take a mature and pure product. Carefully sort it and peel it from the hard shell.
 Next, cut the garlic into pieces 6 millimeters thick and place it on a sieve and dry in the oven at 50 degrees.
Cool the dried garlic in sieves, place in jars and screw the lids on tightly.
If you wish, you can make powder from dried garlic. Pass the product through a coffee mill. The resulting powder can be stored for 1 year.
Drying chopped garlic
Choose the best garlic. Weed out damaged heads immediately. Peel the product. What to do next? You can dry the plant in various ways.
 Place the garlic in a food processor and chop it.
If you prefer the product sliced, use a knife to cut it.
Then you can dry the product in an oven at a temperature of 93 degrees.
Dry the garlic for 2 days at 35 degrees in a dehumidifier.
If you set the temperature to 45 degrees, you can dry the product faster. To do this, it is recommended to take large slices, but provided that the desiccant has large holes.
That's all! The garlic is ready. How to store the resulting product?
There are several storage methods:
- Garlic pieces can be stored in an airtight container for several months. In this case, it is necessary to ensure that the product is not exposed to direct sunlight and high temperatures.
- After the garlic has dried, chop it. In order for the quality of the powder to be excellent, it is recommended to pass the pieces through a sieve. The resulting mixture can be stored for 2 months.
- Freeze the garlic pieces in a covered container. This way it will be stored for 12 months. Before using the product for food, grind it in a coffee grinder.
The drying speed is affected by the quality of the garlic, as well as the size of the pieces, the air temperature during drying and the presence of scales on the surface of the plant.
Is it possible to dry garlic in the sun?
The answer to the question posed is ambiguous. If you are engaged in industrial cultivation of garlic, then you can! This way the product dries out faster, which is important, since manufacturers strive to sell garlic during the season.
For those who consume the product on their own, the presented method is not suitable.
The thing is that after drying in the sun, the shelf life of garlic is significantly reduced.
It is best to dry in the shade. In the sun, the outer covers of the product crack, which means the quality of the bulbs deteriorates. Because of this, if you are interested in using garlic for culinary purposes, dry it in the shade!
And plants intended for planting before winter can be dried in the sun for 3 days.
Good advice
If you opted for sun drying. The product pre-production process will be as follows:
- take a baking sheet and cover it with foil;
- cut the cloves into 2 halves;
- place garlic on a baking sheet, core side up;
- wait 3-5 days;
- If the garlic is crunchy, it is ready.
During cooking, regardless of the chosen method, the garlic must be stirred periodically using a wooden spatula. In order for the final product to be aromatic, it is better to give preference to spicy types of garlic.
Only ripe garlic is suitable for drying. In view of this, before starting the process, carefully examine each clove. If there are damaged areas, you need to cut them off.
So, any type of garlic is suitable for drying. However, the best option is considered to be creole and silver-white garlic.
The product can be dried in an oven, dehumidifier or in the sun. However, the latter option is suitable only for industrial purposes. Don't forget to pre-prepare the product before drying.
Use only mature and healthy heads, otherwise the garlic may rot or become moldy. The dried cloves can be crushed and used as an additive for culinary purposes.