Andy Chef's honey cake. Honey cake from Andychef is an amazing classic for everyone! What are the benefits of Andy Chef honey cake?
Everyone loves simple recipes, but when the result turns out to be more than expected, it’s always great. This is what happened with my honey cake. I started making it more out of curiosity, what would happen, there was already 220 grams of honey.
Trust me, as soon as you try the first piece, your doubts about this cake will disappear. Still, Jamie Oliver knows how to find signature combinations. 
Beat the softened butter (room temperature) well with a mixer, saturating it with oxygen. The mass should turn slightly white and increase in volume. 
Add honey to the whipped mixture. I used linden as the most neutral in taste. Now I can say, if you are a fan of buckwheat or floral, easily add them. 
Mix everything well again and add the eggs one at a time. After each egg, mix the dough well until smooth. This is actually why we introduce the eggs in steps - otherwise it will be difficult to obtain a homogeneous mass.


Grind the nuts in a blender. You choose the size of the crumbs and the type of nuts yourself – it’s a matter of imagination.


Add dry ingredients to the finished dough - baking powder, flour and the nuts themselves. Mix well.


If you have a springform pan, here’s the secret to easily removing the cakes. Fold the parchment several times diagonally (remember when we were kids we cut out snowflakes) and measure the distance from the center to the edge of the bottom.


Assemble the mold and pour out the dough. It is quite thick, so smooth the surface. Bake at 160 degrees for 30-40 minutes. I give this run-up, because it all depends on the oven and the height of the dough in the mold. The cake should spring back and a toothpick should come out clean.


Allow the finished cake to cool in the pan and then remove. I decorated it with chocolate glaze and berries, but there is room for your imagination. The glaze is prepared very simply: pour cream into a cup, add butter and well-broken chocolate. Then either heat it all up in a water bath, or in a microwave oven in 20-second pulses (heat it up, take it out and mix it, heat it up again). Until all ingredients are completely dissolved.

The cake turns out very tender and, by the way, if you wait overnight, it will be even tastier in the morning. The cake turns out very tender and moderately crumbly. At the same time, it is juicy, it does not need any impregnation, cream or berries inside, this is another advantage of such simple but effective recipes. The taste of honey does not play any solo role here, so don’t be afraid that you are making ONLY honey cake. 
- Honey - 90 g
- Sugar - 220 g
- Butter 82.5% - 30 g
- Soda - 10 g
- Yolk - 8 pcs
- Flour - 500-560 g
- Spices
I know that many were waiting for the honey cake recipe on the blog. To be honest, an attentive reader might have noticed that the recipe for honey cakes has been on the blog for more than a year and a half, we prepared it in a cake ““, and those who read the recipe have long used it to make honey cakes. I’ll tell you a secret, I have a lot of these “Easter bunnies” on my blog. But, now it’s time to give you a separate recipe with cream and different cooking options.
Of course, everyone has their own associations in their heads when they hear the word “Honey cake,” and debates about what it should be are pointless. If you look, most of the recipes are similar to each other - there is syrup from sugar and honey, there are eggs and flour. Only the proportions and some aspects of preparation change. However, there are hundreds of honey cakes and each one is somewhat different from the neighbor in the display case. Therefore, I decided to make a honey cake that I like. And along the way, I’ll tell you which honey to choose or what to replace it with, how to slightly change the taste of the honey cake or completely change the texture of the entire cake.
This is what it is, the honey cake of my dreams - it’s always quite thick cakes, I like to feel their porosity and airiness, after all, the right honey cake should have different textures, and not look like a pancake mess. They are bright and juicy in color, thanks to the yolks and good aromatic honey, preferably buckwheat or chestnut. I added a little maple syrup to the second one, mmm, how delicious it is. There is a pinch of nutmeg inside, after all, honey cake is a winter dessert and a subtle warm note suits it. We coat all this with the simplest cream - sour cream with a drop of cream. They calm the sweetness of the cakes a little, and if you add a little lemon juice, the result will be completely harmonious. In ten hours, the cream soaks the cakes well, leaving the thinnest center in each cake dry. You will have a masterpiece on your plate. It holds its shape perfectly, is aromatic and dense, but not at all heavy, so you can eat it piece by piece, thinking about when it’s worth repeating.
Good news. My store is open again. Now this is a separate site to make it more convenient for you to use it - dvemorkovki.ru. I plan that it will become the most convenient store for those who love to cook. Up-to-date showcase, many delivery (worldwide) and payment methods, products that I select myself and ingredients that I use myself. Come in!
So, the preparation is similar to, and consists of several parts. The first is honey syrup. Below I will tell you different variations with flavors, but now we’ll just discuss all the steps. Take the best honey and preferably a strong one (buckwheat or chestnut, I have the second one).
Collect honey (90 g), sugar (220 g) and butter (30 g) in a large saucepan. The pan should be at least 2.5 liters, because at some point the mass will increase significantly in volume. Place the pan over medium heat. As with caramel, try not to stir the mixture with a spatula. It’s better to rock the pan itself if necessary. You need to wait until the sugar melts.

At this time, prepare flour (560 g). We don’t yet know for sure how much it will take. On my own, I added half a teaspoon of nutmeg.


Without removing from the stove, add soda (10 g) to the pan and immediately stir vigorously with a whisk.
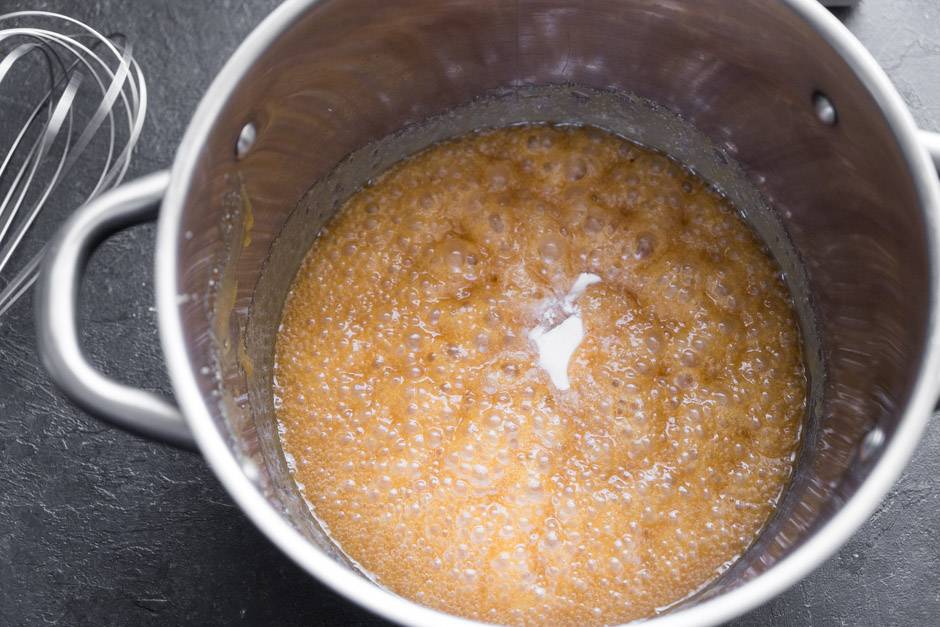
The mass will foam beautifully and increase in volume by 3-4 times. If this does not happen, continue stirring the mixture over the heat.
It will darken slightly, don't be alarmed, this is normal!
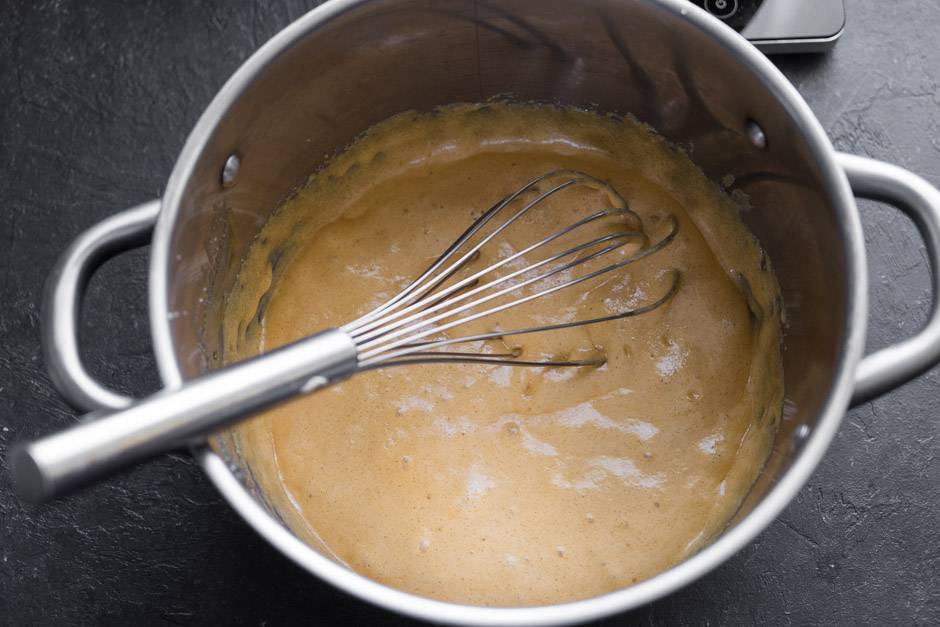
When you realize that the mass is no longer growing (which means the soda has reacted), remove the pan from the stove and add the yolks (8 pcs). Sometimes they use eggs in recipes (there would be 4 of them), but I like them better with yolks.

Stir the mixture well with a whisk to prevent the yolks from curdling. Let this mixture stand on the counter for 4-5 minutes to cool slightly. This will make it possible not to add too much flour.

Now it's a matter of flour. Add it a little at a time, it will be easier to mix it in, plus we don’t know exactly how much flour will be used.

After each new portion of flour, knead the dough until smooth. I use the hook attachment on my mixer, but you can also do this by hand. The dough is ready when it does not stick to your hands and is elastic.

Weigh the finished dough and divide into 10-11 equal parts.

Roll the pieces into balls and cover with a towel or film to prevent them from drying out.

Now let's start rolling out the dough. I used planks 2 mm thick (you can take wooden Soviet rulers or a rolling pin with adjustable ring). Roll out the workpiece into a round shape so that you can cut out a 16 cm circle. I used a silicone mat. Can be rolled out into pieces good parchment(and then put it in the oven).
Watch, the cakes will double in size in the oven. Therefore, if you like pancake-type honey cake, roll out the cakes to 1 mm (then initially divide the dough into 20-25 pieces).

Traditionally, I use a roll of film. The dough rolls out perfectly without additional dusting with flour. If yours is sticky, you probably didn't add enough flour. Then dust the table and the dough itself.


Prick the crust with a fork.

You can put it on a baking sheet and bake. I turned the dough over perforated mat, they help the cakes bake even better and remain even.
I baked each cake at 170 degrees for exactly 6 minutes. Wait until the cakes are golden brown. The time will depend on the oven, the thickness of the cakes and even the amount of flour in them. While the cake is baking, roll out the next one and do the same with all the pieces of dough.
Immediately remove the finished cakes from the parchment or mat and let cool on a flat surface. After that, just collect them in a pile.

When all the cakes are ready, collect the scraps and dry in the oven for another 2-3 minutes.

Let them cool completely and puree into crumbs in a blender bowl.


- Fat sour cream 20% - 500 g
- Powdered sugar - 50 g
- Cream 33% – 50 g
When the cakes are ready, it's time to assemble the honey cake. Here is one of the simplest and most classic creams - sour cream. Take full-fat sour cream, in which the spoon rests firmly, this is important for the future of the cake.

You see, I took a piece of sour cream with a spoon and a crater formed.

Place sour cream (500 g) and powdered sugar (50 g) in a mixer bowl. Stir with a whisk or mixer. The mass will instantly become liquid. Don't be alarmed. Pour cream (50 g) into it and start whipping at maximum mixer speed. Watch the consistency. The mass will begin to thicken. We need the consistency of full-fat yogurt, when the mass holds its shape, but very weakly.
If you overbeat the mixture, the cream will come out too dense and will not soak the honey cake well; if you stop too early, the honey cake will be unstable.

Here is the approximate consistency, traces of the whisk are visible, but they quickly disappear.

Place the cakes on the scale and add 50-55 grams of cream for each.

Spread the cream with a spoon and place the next layer on top. Press it lightly and repeat the operation again.

Don't forget to coat the sides and top of the honey cake.

Let the cream stabilize a little in the refrigerator (5-10 minutes), during which time sift the crumbs through a coarse sieve to get rid of too large pieces.

Build a cake stand with a plate underneath.

Place the honey cake with the base on top and sprinkle it with crumbs, helping with your hand (press a handful of crumbs) or with a silicone brush.

Decorate with fondant flowers.

Serve 10-12 hours after spreading the cream on it.

Basics
Often you may have questions about ingredients, some cooking techniques, or perhaps you are looking for basic recipes for dough, creams and sauces. In order to simplify the learning process, I have a ““ section on my blog, which contains a lot of useful information. I recommend that you read it before asking questions in the comments to the recipe; there is a high probability that you will find the answers to your questions yourself.
Note to the hostess
Let's look at some points.
Honey and replacements.
Let's start with the main thing. Don’t skimp on honey, both the quality and taste of honey are important here. I wrote above that the kings of flavors are chestnut and buckwheat honey. Of course, from a jar, such honey may seem too sugary or too bright in taste, but in the end we are eating the finished product, not honey. Be that as it may, choose what you like best.
I'll tell you a secret, I took chestnut honey (70 g) and maple syrup (20 g), it turned out very tasty. You can even skip the honey altogether in favor of molasses, corn syrup, or maple syrup (maybe you can come up with other thick, viscous syrups as a substitute, I don't mind).
Storing the dough.
Once prepared, the dough can be wrapped in plastic and stored in the refrigerator for 3-4 days before rolling it out. Ready-made cakes can also be sealed in film and stored in a dry place for a couple of days. The cakes after the oven will look like cookies, so don’t be alarmed, this is normal, they only become soft after soaking.
Thickness of the cakes.
Honey cake is a dessert for which everyone has their own special requirements and memories. Therefore, you decide for yourself what kind of honey cake you want. Remember that the dough will rise to approximately double in size in the oven. This means the thickness of the raw dough is 1-3 mm. Look at the comments and photos, some made cakes almost 1 cm thick (ready-made), this is bad, because such a cake will be dry, the moisture of the cream will not cope with impregnation of such a thick layer. Therefore, roll out no thicker than 3.5 millimeters.
Sweetness.
Several factors will influence the sweetness of the finished cake. Honey itself, and linden honey, will be the least sweet here. The degree of caramelization (burnt caramel) of the initial mass of syrup. The taste of the cream - here you can add a little lemon juice at the very end, its sourness will balance the taste of the honey cake. And sour cream itself also varies in taste.
Impregnation.
It takes 10-12 hours for cakes 4 mm thick to soak if the cream is of the right consistency (not too thick). Therefore, do not rush to eat the honey cake immediately after coating it. Store it in the refrigerator for up to 3 days, it’s better not to risk it further, there is a lot of dairy product in the honey cake, and such desserts pick up the aroma of the refrigerator very quickly.
Flowers for decoration.
This is a simple homemade fondant, which I cut out with special cutters and dripped a little yellow chocolate into the center (you can make yellow fondant balls). I gave the recipe (the most elementary) and method for preparing mastic in the cake ““.
Very often, honey cakes are slightly flavored. There are also lavender honey cakes and honey cakes with pieces of dried apricots and so on. Here, use your imagination and your own pastry skills. Here are a couple of ideas:
— cold flavoring of cream for cream
— adding fruit/berry syrups to the base (for example, replace 10 grams of honey with syrup)
- spices


Probably everyone has their favorite culinary blogs, which are a source of inspiration and new information at the same time. For me, this is the blog of Andrey Rudkov (better known under the pseudonym Andy Chef).
It was according to his recipes that I made this cake.
Andy Chef's Cream Cheese Cake
Ingredients (for a mold 18 cm in diameter)
for biscuit:
8 eggs
220 grams of sugar
240 grams flour
80 grams butter
for buttercream:
300 grams of cream cheese
90 grams of powdered sugar
105 grams butter
Banana, cranberry for layering (if frozen, then defrost first)
For decoration:
orange, cranberry, kiwi
sugar
rosemary
I baked the sponge cake the day before layering it with cream.
This is done to make the cakes more rich.
In order for the cakes to be the same, you must first weigh the bowl in which you will make the dough and write down its value somewhere.
Well, let's get started.
Break 8 eggs into a bowl or mixer bowl and add sugar.
Beat at medium speed until the mixture triples in size. At the same time, it will become almost white.
Sift the flour into a separate mixture and mix it with a whisk. Gently fold the flour into the egg mixture. Mix the mixture thoroughly until smooth.
Melt the butter and then beat it a little with a fork until it cools, and then add it to the dough. Stir.
Now weigh the bowl with the dough, subtract the weight of the bowl itself and divide the resulting value by 3. These are 3 of our future cake layers.
Line the pan in which you will bake with baking paper, grease the edges with butter and sprinkle with a little flour.
Place the mold on the scale, reset the value to zero and pour in as much dough as was calculated when dividing by 3.
Place our dough in an oven preheated to 180 degrees for 20-25 minutes.
Do this with each cake.
If you bake the sponge the day before, as I did, when the sponge is ready, cool it on a wire rack, then wrap it in cling film and put it in the refrigerator.
Let's start with the cream. There is an important rule: the butter should be warm (it is best to leave it overnight at room temperature), and the cheese should be cold.
Beat the butter and powdered sugar at maximum speed for about 10-15 minutes.
Then add the cheese and beat again.
Let's take our cakes. If a hill has formed somewhere, then carefully cut it off: all the cakes should be even.
Layer the cake layers with the resulting mixture, adding banana and cranberries between them and coat the sides of the cake.
Decorate the cake with rosemary, kiwi, orange. It's just a matter of your imagination.
You can, like me, carefully mix the cranberries with sugar and decorate the cake this way too.
*If there is more cream than necessary, and it’s a pity to throw away the crumbs, then you can make a dessert. Which? I can tell you this in the next post. :)
Bon appetit!
I'll be glad to see you at my place
This is what it is, the honey cake of my dreams - it’s always quite thick cakes, I like to feel their porosity and airiness, after all, the right honey cake should have different textures, and not look like a pancake mess. They are bright and juicy in color, thanks to the yolks and good aromatic honey, preferably buckwheat or chestnut. I added a little maple syrup to the second one, mmm, how delicious it is. There is a pinch of nutmeg inside, after all, honey cake is a winter dessert and a subtle warm note suits it. We coat all this with the simplest cream - sour cream with a drop of cream. They calm the sweetness of the cakes a little, and if you add a little lemon juice, the result will be completely harmonious. In ten hours, the cream soaks the cakes well, leaving the thinnest center in each cake dry. You will have a masterpiece on your plate. It holds its shape perfectly, is aromatic and dense, but not at all heavy, so you can eat it piece by piece, thinking about when it’s worth repeating.
">
I know that many were waiting for the honey cake recipe on the blog. To be honest, an attentive reader might have noticed that the recipe for honey cakes has been on the blog for more than a year and a half; we prepared it in the “Eurasia” cake, and those who read the recipe have long used it to make honey cakes. I’ll tell you a secret, I have a lot of these “Easter bunnies” on my blog. But, now it’s time to give you a separate recipe with cream and different cooking options.
Of course, everyone has their own associations in their heads when they hear the word “Honey cake,” and debates about what it should be are pointless. If you look, most of the recipes are similar to each other - there is syrup from sugar and honey, there are eggs and flour. Only the proportions and some aspects of preparation change. However, there are hundreds of honey cakes and each one is somewhat different from the neighbor in the display case. Therefore, I decided to make a honey cake that I like. And along the way, I’ll tell you which honey to choose or what to replace it with, how to slightly change the taste of the honey cake or completely change the texture of the entire cake.
Ingredients:
Cakes:
Honey - 90 g
Sugar - 220 g
Butter 82.5% - 30 g
Soda - 10 g
Yolk - 8 pcs
Flour - 500-560 g
Spices 
Cream:
Fat sour cream 20% - 500 g
Powdered sugar - 50 g
Cream 33% - 50 g
Preparation:
So, the preparation is similar to New Year's gingerbread cookies, and consists of several parts. The first is honey syrup. Below I will tell you different variations with flavors, but now we’ll just discuss all the steps. Take the best honey and preferably a strong one (buckwheat or chestnut, I have the second one).
Collect honey (90 g), sugar (220 g) and butter (30 g) in a large saucepan. The pan should be at least 2.5 liters, because at some point the mass will increase significantly in volume. Place the pan over medium heat. As with caramel, try not to stir the mixture with a spatula. It’s better to rock the pan itself if necessary. You need to wait until the sugar melts. 
At this time, prepare flour (560 g). We don’t yet know for sure how much it will take. On my own, I added half a teaspoon of nutmeg. 
The sugar has melted and the mixture begins to boil. Here you can act immediately or let the honey caramelize a little - it’s a matter of taste. 
Without removing from the stove, add soda (10 g) to the pan and immediately stir vigorously with a whisk. 
The mass will foam beautifully and increase in volume by 3-4 times. If this does not happen, continue stirring the mixture over the heat.
It will darken slightly, don't be alarmed, this is normal! 
When you realize that the mass is no longer growing (which means the soda has reacted), remove the pan from the stove and add the yolks (8 pcs). Sometimes they use eggs in recipes (there would be 4 of them), but I like them better with yolks. 
Stir the mixture well with a whisk to prevent the yolks from curdling. Let this mixture stand on the counter for 4-5 minutes to cool slightly. This will make it possible not to add too much flour. 
Now it's a matter of flour. Add it a little at a time, it will be easier to mix it in, plus we don’t know exactly how much flour will be used. 
After each new portion of flour, knead the dough until smooth. I use the hook attachment on my mixer, but you can also do this by hand. The dough is ready when it does not stick to your hands and is elastic. 
Weigh the finished dough and divide into 10-11 equal parts. 
Roll the pieces into balls and cover with a towel or film to prevent them from drying out. 
Now let's start rolling out the dough. I used 2 mm thick planks (you can take wooden Soviet rulers or a rolling pin with an adjustable ring). Roll out the workpiece into a round shape so that you can cut out a 16 cm circle. I used a silicone mat. You can roll it out on a piece of good parchment (and then put it in the oven).
Watch, the cakes will double in size in the oven. Therefore, if you like pancake-type honey cake, roll out the cakes to 1 mm (then initially divide the dough into 20-25 pieces). 
Traditionally, I use a roll of film. The dough rolls out perfectly without additional dusting with flour. If yours is sticky, you probably didn't add enough flour. Then dust the table and the dough itself. 
Next, we cut out a 16 cm blank with a ring. You can simply place a plate on top and cut it in a circle with a knife. 
Prick the crust with a fork. 
You can put it on a baking sheet and bake. I turned the dough onto a perforated mat, they help the cakes bake even better and stay even.
I baked each cake at 170 degrees for exactly 6 minutes. Wait until the cakes are golden brown. The time will depend on the oven, the thickness of the cakes and even the amount of flour in them. While the cake is baking, roll out the next one and do the same with all the pieces of dough.
Immediately remove the finished cakes from the parchment or mat and let cool on a flat surface. After that, just collect them in a pile. 
When all the cakes are ready, collect the scraps and dry in the oven for another 2-3 minutes. 
Let them cool completely and puree into crumbs in a blender bowl. 
When the cakes are ready, it's time to assemble the honey cake. Here is one of the simplest and most classic creams - sour cream. Take full-fat sour cream, in which the spoon rests firmly, this is important for the future of the cake. 
You see, I took a piece of sour cream with a spoon and a crater formed. 
Place sour cream (500 g) and powdered sugar (50 g) in a mixer bowl. Stir with a whisk or mixer. The mass will instantly become liquid. Don't be alarmed. Pour cream (50 g) into it and start whipping at maximum mixer speed. Watch the consistency. The mass will begin to thicken. We need the consistency of full-fat yogurt, when the mass holds its shape, but very weakly.
If you overbeat the mixture, the cream will come out too dense and will not soak the honey cake well; if you stop too early, the honey cake will be unstable. 
Here is the approximate consistency, traces of the whisk are visible, but they quickly disappear. 
Place the cakes on the scale and add 50-55 grams of cream for each. 
Spread the cream with a spoon and place the next layer on top. Press it lightly and repeat the operation again. 
Don't forget to coat the sides and top of the honey cake. 
Let the cream stabilize a little in the refrigerator (5-10 minutes), during which time sift the crumbs through a coarse sieve to get rid of too large pieces. 
Build a cake stand with a plate underneath. 
Place the honey cake with the base on top and sprinkle it with crumbs, helping with your hand (press a handful of crumbs) or with a silicone brush. 
Decorate with fondant flowers. 
Serve 10-12 hours after spreading the cream on it.
Note to the owner:
Let's look at some points.
Honey and replacements.
Let's start with the main thing. Don’t skimp on honey, both the quality and taste of honey are important here. I wrote above that the kings of flavors are chestnut and buckwheat honey. Of course, from a jar, such honey may seem too sugary or too bright in taste, but in the end we are eating the finished product, not honey. Be that as it may, choose what you like best.
I'll tell you a secret, I took chestnut honey (70 g) and maple syrup (20 g), it turned out very tasty. You can even skip the honey altogether in favor of molasses, corn syrup, or maple syrup (maybe you can come up with other thick, viscous syrups as a substitute, I don't mind).
Storing the dough.
Once prepared, the dough can be wrapped in plastic and stored in the refrigerator for 3-4 days before rolling it out. Ready-made cakes can also be sealed in film and stored in a dry place for a couple of days. The cakes after the oven will look like cookies, so don’t be alarmed, this is normal, they only become soft after soaking.
Thickness of the cakes.
Honey cake is a dessert for which everyone has their own special requirements and memories. Therefore, you decide for yourself what kind of honey cake you want. Remember that the dough will rise to approximately double in size in the oven. This means the thickness of the raw dough is 1-3 mm. Look at the comments and photos, some made cakes almost 1 cm thick (ready-made), this is bad, because such a cake will be dry, the moisture of the cream will not cope with impregnation of such a thick layer. Therefore, roll out no thicker than 3.5 millimeters.
Sweetness.
Several factors will influence the sweetness of the finished cake. Honey itself, and linden honey, will be the least sweet here. The degree of caramelization (burnt caramel) of the initial mass of syrup. The taste of the cream - here you can add a little lemon juice at the very end, its sourness will balance the taste of the honey cake. And sour cream itself also varies in taste.
Impregnation.
It takes 10-12 hours for cakes 4 mm thick to soak if the cream is of the right consistency (not too thick). Therefore, do not rush to eat the honey cake immediately after coating it. Store it in the refrigerator for up to 3 days, it’s better not to risk it further, there is a lot of dairy product in the honey cake, and such desserts pick up the aroma of the refrigerator very quickly.
Flowers for decoration.
This is a simple homemade fondant, which I cut out with special cutters and dripped a little yellow chocolate into the center (you can make yellow fondant balls). I gave the recipe (the most elementary) and method for making mastic in the “Molly” cake.
Very often honey cakes are slightly flavored. There are also lavender honey cakes and honey cakes with pieces of dried apricots and so on. Here, use your imagination and your own pastry skills.
In my life, this is the third honey cake that I have ever made. “Russian classics” don’t attract me very much, because I know what I can get in the end - not only a calorie bomb, but also a wildly sweet dessert. Having already become accustomed to my cakes and pastries that are balanced in sweetness, every time I come across our historical desserts again, such a collision confuses me.
The first time I started making my own, what is not a classic version of this cake, was in Paris (oddly enough). A good friend of mine asked me to teach him how to make this “national Russian honey cake.” After digging through my grandmother’s archives, I, of course, found it. We cooked the dough, boiled condensed milk for four hours, replaced the sour cream with overseas crème fraiche, and rolled out the cakes with a bottle of Absolut vodka. (where she came from in a rented French apartment is a separate story shrouded in darkness), baked the cakes on the only small silicone mat we had and assembled everything in the pan. The cake turned out to be tender, soft (a knife went in like butter), so fragrant that when you opened the refrigerator, the apartment was instantly filled with the smell of “honey cake,” which can no longer be confused with anything else.

But when we tried it... oh my god, how sweet! Honey, condensed milk and sugar. That was practically the only thing we felt. It was then that we came up with our new version, Russian-French, on napkins, which we later brought to life on . “Honey cake” turned out to be the best, honestly! Nicolas and I managed to feel the balance of sweet and honey with tender and vanilla so subtly that it seems we couldn’t have done better. Laconic, with a light honey trail, classic honey Russian custard cakes and high French assembly and decoration technology. The composition was as follows: “Medovik” sponge cake, crispy croquette with almonds and honey, honey cream, light vanilla cream.
But, this is no longer just “Medovik”, it is rather entremets - a complex, multi-component French dessert, where the basis, so to speak, the very “heart” is our Russian version.
Today we will talk about a slightly different cake, which is currently one of my favorites. Perfectly balanced - tender, soft, aromatic, with a subtle honey note and moderately sweet. But, I warn you right away - you will have to tinker with it no less than with another recipe. Behind the apparent simplicity of appearance (that there are, in fact, honey cakes and cream, that’s all), you will need several hours of continuous work.
You can decorate it as you wish, at least make it simple - sprinkled with honey cakes, or use my idea - drops of soft caramel, squares of chocolate with fleur-de-sel and macarons.
It is important to read a few nuances before starting cooking:
1. Sour cream. Simply amazing cream from the chef Nikolai Sarychev . Sour cream is cooked together with sugar for an hour and a half. Doesn't delaminate! It is very important to pre-weigh it in gauze overnight. Plus cook in a water bath, stirring frequently. After an hour and a half, your cream becomes silky, tender, of medium thickness and traces remain on the surface from the whisk.
2. Honey cakes. The dough is also cooked for an hour in a water bath. It’s more difficult with it - sticky, unyielding, stubborn dough. As a “quencher” for soda, I added lemon juice instead of the usual vinegar, which gave another very interesting shade to the cake.
From this amount of dough and cream I got two small cakes 10x18 cm, 5 cakes in height.
Ingredients:
Cream:
680 g sour cream 20%
150 g sugar
125 g butter
Cakes:
3 eggs
50 g flower honey
300 g sugar
400 g flour
2 tsp. soda
4 tsp. vinegar or lemon juice (for extinguishing soda)
50 g melted butter
Preparation:
Cream:
Place the sour cream on cheesecloth, which you either hang over the sink (bowl) overnight, or place in a colander in the gauze, and place a press on top (for 2-3 hours). Periodically, you need to squeeze the sour cream a little through cheesecloth so that as much liquid as possible comes out.
Then transfer the strained sour cream and sugar into a saucepan and place everything in a water bath.
I had a large saucepan, I placed a colander on it so that the water half covered it and placed a saucepan with sour cream on top. Stirring occasionally, cook your cream over low boiling water for about 60-90 minutes. The cream should be soft, homogeneous, slightly change color towards a light caramel shade.

Finally, add soft butter and mix well until melted. Cool the mixture for several hours, or at most overnight in the refrigerator.
Lightly beat the eggs with sugar until they lose their texture. Place in a deep saucepan, add honey, slaked soda, melted butter and all the flour at once. Stir with a wooden spatula.
Place the pan in a water bath and, stirring occasionally, cook for about 40-60 minutes. Be careful and do not leave the dough for a long time, because... it begins to “brew” and lumps will form at the bottom.

Preheat the oven to 220C.
Once the time is up, reduce the heat under your water bath to low and start working with the dough.
It is most convenient to do this with gloves, because... the dough is very hot. Take a small amount of your honey choux pastry and, wetting your hands very often, spread it as thinly as possible onto a baking sheet lined with parchment paper. The layer should be as thin as possible and practically translucent. It will rise 3-4 times in the oven! It’s difficult to do, I’ll tell you right away. First, use your hands as much as possible, then use a tablespoon or a small spatula soaked in water.
Bake each cake individually in a preheated oven for 4-5 minutes. Then, immediately, while still hot, we trim it to the size you need.

Let the cakes cool. Make “crumbs” from the scraps. Layer the honey base with sour cream all the way to the top, forming one or more cakes. Cover the sides or entire surface completely with crumbs. And put it in the refrigerator overnight. The cake should be thoroughly soaked.
Decorate as you wish!

And in the morning you can already enjoy it. The cake is amazingly delicious.

Enjoy your tea!