Pictures made from salt dough in a frame. Salt dough paintings step by step
A fascinating panel made of salt dough will decorate the interior of a living room, nursery or living room. Dough is an ancient symbol of prosperity, comfort and family. In Slavic culture there are many examples of its unusual use, in addition to traditional cooking. The ability to apply dyes, the addition of many decorative elements and durability are only a small part of the advantages of the material.
The artistic composition is selected taking into account the architectural and aesthetic features of the room. In a well-lit room, the salt dough panel should be 1–2 shades darker, otherwise it will fall out of sight. You need to take into account the dominant color in the interior. This includes not only furniture and curtains, but also many small details. The artistic composition must be consistent with the prevailing style. The materials used are selected taking into account the prevailing temperature conditions and the chosen style.
- It is not recommended to hang the molded image in direct sunlight or above a heat source;
- After applying each layer of paint you need to wait 10-15 minutes;
- The colors used are not too bright in order to maintain the harmonious compatibility of the elements;
- The color of the frame is selected to match the image.

The dough has gained particular popularity among designers due to its environmental safety, plasticity and the ability to give it the required shape. When kneading correctly, the salted dough does not stick to your hands.
How to make a panel with your own hands from improvised materials:
Making a salt dough panel for the kitchen
The kitchen is a place associated with eating and a luxurious table. That is why, for decoration, it is better to do something closely related to this. The tradition of using flour for decorative purposes came from Germany. There, such unusual material was and remains the main one for many.
To create the composition you will need to find the following ingredients in advance:
- 1 cup fine salt;
- 2 cups flour with a “heap”;
- 125-160 gr. water;
- 1 tbsp. a spoonful of dry wallpaper glue;
- 1 tbsp. a spoon of any hand cream;
- 1 tbsp. a spoonful of unrefined vegetable oil.
All ingredients are thoroughly mixed in a deep container. In order for the decorative image to be durable, it is necessary to pay special attention to the quality of the flour. A mixture that is too thick or too thin will have an equally bad effect on the quality of work.
To give the composition a pleasant aroma, step-by-step implementation includes several additional elements: cumin, nutmeg, cinnamon, pepper. Once the basis for work is ready, you can move on to creating the necessary forms.

Appropriate baking molds will help you make houses, a tree or a Christmas tree with your own hands. A large, smooth surface is used for modeling, which is then easy to clean. It is convenient from the point of view of the possibility of creating unusual geometric shapes. Fantastic flowers and animals are made from two parts. The base is molded only by hand, the upper parts are made using molds.
Check out some creative wall hanging ideas on this page:
Salt dough panel, master class: secrets of modeling
Difficulties for beginners arise at the stage of sculpting and choosing a base. In the second case, photos of finished work will help. If this did not provide the desired stimulus for the imagination, then there is always the opportunity to attend a master class. Here you not only observe the direct manufacturing process, but you can always ask questions.
Having formed the image of the future painting, you need to start creating its outlines. Masters advise using dough whose consistency resembles plasticine.
- The size of the composition is determined by aesthetic preferences;
- The larger the canvas, the larger the molds are needed;
- For the living room, images of the hearth and family are suitable, while in the kitchen it would be appropriate to hang something gastronomic;
- Representatives of the flora are suitable for a living room or office space, for example, sunflowers or roses, if we are talking about a classic-style interior;
- Cartoon cats or a cheerful monkey, complemented with decorative elements, are suitable for a children's room;
- In the room of an elderly person, daisies are appropriate, bringing a feeling of youth and lightness.
If necessary, you can make a mold of the required shape and size yourself. To do this, you will need to draw an outline on a sheet of thick cardboard with a pencil, and then carefully cut out the area. In order for the three-dimensional image to seem natural, 3-4 layers of the same material are applied on top of the figure cut out of dough.
Making a winter panel from salt dough
Seasonal holidays and upcoming seasons have a certain influence on the choice of themes for the panels. For example, New Year requires something snowy. To work you will need a reed plate, gouache, confetti, dough and a direct sketch. Pictures are selected taking into account aesthetic preferences. A loop is made from ½ of the plate. Gouache must be given the required color depending on the parts of the composition.
The Christmas tree is molded by hand or using a mold. The branches are formed with a toothpick or a needle.
The further procedure looks like this:
- A winter panel requires a stylish frame, which is also decorated with confetti and sparkles;
- You need to make the required number of fir trees;
- A house is formed from brown dough, and a roof is formed from blue dough;
- Recheck the selected dimensions;
- The upper part of the plate is painted purple, and the lower part is painted light blue;
- Fix the house on the plate with glue;
- Confetti will add a New Year's mood to your look.
How to make a decorative panel from natural materials:
Salt dough panel in a photo frame: pictures and instructions
The technique for making dough compositions includes forming the craft in a photo frame. It cannot boast of size, but the effect will be noticeable. Pictures with small flowers, such as lilies or violets, are preferable. For retro-style rooms, a slightly split image is suitable. This will bring the spirit of antiquity.

Before performing the work step by step, attention is drawn to some nuances.
Composition ideas
- Mini fish or cartoon characters are suitable for a child’s room;
- The living room will be decorated with flowers;
- Berries are suitable for the kitchen.
DIY panel “Rowan” made from dough (video)
Compositions made from salt dough are decorations for home and office space. The manufacturing process is simple and quick, making it accessible to beginners. Gouache is used to give the dough the required color. The dough is given the required shape using molds, some of which are easy to make yourself. The theme of the composition is chosen taking into account its future location.
Examples of salt dough panels (photo)


Materials: board, watercolor and gouache paints, brush, salt dough, PVA glue, colorless varnish, knife, stacks, gold stained glass outline.
Step-by-step work process
If you like to sculpt, then you will be interested in this master class. In it I propose a technique for making a stucco painting from a recently popular material - salt dough. It's very easy to make. knead like regular dough and work wonders! Handmade gifts and souvenirs have always been highly valued in the world, because they keep a piece of your hands, they are original and unique.
Funny figures and amulets for houses were made from such salty dough. It was believed that any such craft found in the house is a symbol of wealth, prosperity and prosperity in the family.
Mukosol is an ancient Arkhangelsk craft that is at least four hundred years old. The wives of Pomors gave figurines made of salt dough to their husbands when they went fishing. These funny toys warmed the souls of sailors and saved them more than once from hunger when food ran out.
1. Transfer the drawing you like to the board.
2. Prepare salted dough.

Salt dough recipe: 2 cups of sifted flour, 1 cup of fine salt (not iodized), 1 half glass of water, 1 tablespoon of vegetable oil. Mix all ingredients, put in a cellophane bag and leave in the refrigerator for 1 hour. After this, you can sculpt from the dough.
Helpful advice. If you have some dough left over after modeling, you can store it by putting it in a plastic bag or in a closed plastic container in the refrigerator. If after this the dough becomes damp and wet, knead it thoroughly, add a little flour and knead again.
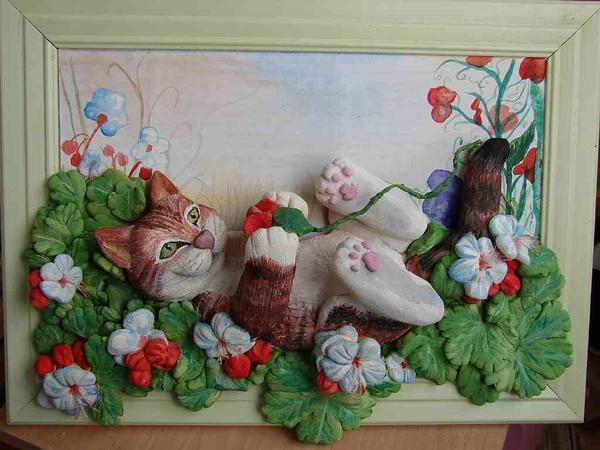
3. We will create a stucco picture. Our nose, ears, eyes, tail, paws, cheeks of the cat and a basket of roses will be voluminous. Let's start with the cat's bangs. Take the dough, knead it in your hands and mold it into the desired shape of a cat’s bangs. In order for the dough to stick well to the board, we wet the area under the dough with PVA glue. After drying, the glue becomes invisible. To add unevenness to the dough, use a knife.

4. In the same way we sculpt all the details of the cat.

5. We begin to sculpt roses. You can make them flat by twisting the flagellum in a spiral.

We will get them like this. You can flatten the dough sausage and roll it up like a rose.

You will get a voluminous flower.

6. Using strips of dough, form a flower basket. Use a knife to make strips to give the shape of the basket weave. Let's make flower petals.

7. The craft dries in room conditions for 2 - 3 days.
8. Let's start coloring. We paint the craft with watercolors and gouache paints. We use gold stained glass to decorate flowers.

9. Cover the craft with varnish. Varnish not only adds shine and finish to the product, it protects it from moisture and crumbling. Transparent varnish is used to varnish products. It is imperative to varnish painted products - under the protective layer of varnish the paints will not crumble, crumble, stain your hands or fade.
Can be compared with the sample on the postcard.
I give you mukosol so that you have bread and salt.

10. Possible work options:


11. Works of students.

Today I want to show you how I create paintings from salt dough.
Let's get started.

Having prepared all the materials, prepare the salt dough: flour, salt, water 1:1:1, a few drops of sunflower oil. At the end, mix in a little flour until a stiff, non-sticky dough forms.

Here's everything you need for sculpting  .
.
We are making a service. Plate.

Place foil under bulky items. To make it smooth, smooth everything out with a brush dipped in water. 


All items are ready. I didn’t get the bowl right away, but I’m not very happy with the end result. So I corrected it later at the very end  .
.
Let's make a frame. Roll out a drop of dough, you can press it with a stack and make veins.  .
.
Place the petals next to each other.  .
.
Insert the center circles and smooth them with a wet brush. 
Let's make raspberries. We cover the triangular center with small balls of dough, smoothing it with a brush. 
Color the base in the desired shades. 
We glue all the parts onto the fiberboard with “Dragon” glue. We add fresh leaves directly to the fiberboard.

Color in primary colors.
Add raspberries and add shades to our dishes. Paint on the grass in the background.  .
.
The work is ready. All you have to do is wait until it dries and apply varnish - glossy or matte.
Craftsman's shop Elena Podlipenskaya
Pictures from salt dough will please you for a long time. Individual execution. The painting is an excellent decoration for the kitchen or living room
Modeling from salt dough: painting “Cat gatherings”
A type of handicraft that our ancestors practiced. Thanks to the availability of materials needed for making beautiful crafts, it’s so easy! If you think that you can only sculpt various figures from salt dough, then you are mistaken. There is nothing stopping you from making a picture out of the dough. It will decorate any interior and create a cheerful mood in your home. And such work can also be presented as a gift - the hero of the occasion will not remain indifferent to your creativity - that’s for sure!

Materials required for modeling salt dough:
- flour - 2 cups,
- water - 1 glass,
- “Extra” salt - 1 glass,
- frame without glass,
- paints: watercolor, gouache,
- knife, rolling pin, cling film, shaped roller for dumplings, garlic press,
- figured buttons, stamps for prints,
- brush, wood varnish
First, knead the dough from flour, salt and water. Add water gradually until you obtain a plastic mass similar to plasticine. If the dough crumbles, add water; if it sticks to your hands, add flour.
Draw a sketch of the future picture on a regular sheet of paper, place it on a hard surface or directly in a frame, wrapping it in cling film.
We make chairs: roll out the sausage into a flat cake under the back; use a knife or other tool to make a checkered pattern; Make the legs for the chair from a thin sausage, narrowing it downwards, and press the design with a stack.
Our table will be voluminous, so immediately under the bottom place foil, rolled into a small flat cake. The base of the table is an oval layer.
For a tablecloth, roll out a thin long layer of dough in the form of a ribbon, cut its edge on one side with a figured roller, and decorate with figured prints.
Place the bottom of the tablecloth in pleats along the edge of the table. Mask the resulting “seam” with a zigzag line from a syringe.
For the cat's dress, roll out the dough, cut it in the shape of a drop, apply textured fabric or mesh, and roll with a rolling pin to leave an imprint.
Use the tool to place the resulting “fabric” into the dress, as shown in the photo; lift the corner of the tablecloth up and carefully place it on the dress.
Mold the cat's paws, using a knife to make veins in the places of the claws. For the tail, roll out a sausage, tapered at the edges. Lay it out figuratively along the bottom of the dress.
Shape the breast into a large drop and place it on the top of the dress. Make hands in the shape of sausages for the cat. Decorate your right hand with a sleeve, making exactly the same print on it as on the dress.
For the head, roll a piece of dough into a ball. Insert half a toothpick into the place where it is attached to the head so that the head does not fall off during the drying process.
Use your fingers to press down the eye sockets, and with a tool, draw the cat’s jaws and mouth. Make a nose out of a small ball of dough. Use a toothpick to mark where the antennae grow. The eyes can be made from pateek or small balls of dough.
Using a garlic press, make noodles from the dough, roll into waves and style your cat's hair. Roll out a small flat cake into a thin layer and form a hat.
Make the back part of the cap and two ears in the form of triangles, press the indentations in the ears with the stack at the point of attachment to the head. Then use the noodles to create bangs for the cat.
For the samovar, form a piece of dough into a drop and flatten it in your palm, apply veins with a knife. Mount the samovar in the center of the table on half a toothpick. Decorate the top and bottom of the samovar with narrow small sausages and attach handles to the edges.
Start sculpting the cat from the torso. Then place the thigh on the lower part of the body, and hide the shin under the tablecloth. Form the bottom of the leg into a trouser leg and attach the paw to it. Don't forget the ponytail.
Dress the cat in a tuxedo by turning the collar down and cutting the bottom of the jacket at an angle. Place the dough breast on top. Insert a toothpick into it to secure the head.
Make a cat out of a sausage of dough into your left hand, separately - a hand. Form a cup and “give” it to the cat’s paw.
Make the cat’s head exactly the same way as for a cat.
The mouse under the table is molded like this: the body and head are in the form of two small drops, the ears are two balls of dough, squeezed into circles, the eyes are small black beads, and the tail.
Place two plates on the table and place cakes in them (the top of these sweets is decorated with a syringe). “Treat” the mouse too.
Give the cat a cup for her paws too, and put a faucet on the samovar.
Leave the painting to dry for 5-7 days. Paint with watercolors, gouache or acrylic. Open with waterproof wood varnish. Decorate the background to your liking: you can cover it with ceiling tiles or coarse fabric (burlap, linen). Attach the background with universal glue.
On our website you can see many different crafts created based on salt dough.
Here one of the recipes for the manufacture of salt dough:
1Mix a glass of flour and 1 glass of salt.
Then pour in 125 ml of water(the volume is approximate, because the amount of water may depend on the type of flour you used for the dough). Stir this mass again with a spoon, and then knead with your hands until a homogeneous consistency. Some people use a mixer for this purpose.
By the way, water can be replaced with jelly made from potato starch (dissolve 1 tablespoon of starch in 1/2 cup of cold water. Then pour another 1 glass of boiled water into this liquid, stirring. When the jelly thickens and becomes transparent, remove from heat. received the paste). The dough will only benefit from such a replacement - it becomes more plastic.
Just don't overdo it! If the dough is too soft, knead it with a little extra flour and salt mixture. Salty dough there must be dense.
Now you can sculpt! It is better to sculpt on a sheet or board - this is a good place for drying. The drying itself is carried out at a temperature of +80C in the oven for an hour, or on a radiator (in winter). The drying time depends on the thickness of the figurine.
If you need color salty dough , then it can be colored either at the kneading stage, using food coloring or gouache, which is convenient when working with small children; or paint the finished product after complete drying.
And our craftswomen have their own subtleties and secrets for working with salt dough. That's why , go to the blog , Whose work did you like and ask! I’m sure the craftswomen will be happy to share with you!
P.S. Reminder on how to make the required color:
cyan = blue + white
pink = white + red
purple = blue + pink
green = blue + yellow
orange = yellow + red
brown = green + red
emerald = green + blue
flesh = light pink + a little yellow
gold and silver will be obtained if you add the corresponding color of gouache or acrylic, in the same way you can get glitter dough(gel for gouache)
When working with salt dough many come up with amazingly beautiful names - testoplasty , bioceramics and even, flour ! But whatever you call it, the result sometimes exceeds all our expectations! The birth of a salt dough masterpiece is always an event! Happy creativity and peace to everyone!